Table of Contents
- Developing Wolframe Server Applications
- Foreword
- 1. Introduction
- 2. Installation via binary packages
- 3. Configuration
- 4. AAAA
- 5. Data processing
- 5.1. Processor Configuration
- 5.2. Application Server Requests
- 5.3. Command handler
- 5.3.1. The standard command handler
- Introduction
- Example configuration
- Example command description
- Command description language
- Keywords
- Simple document map
- Command with action prefix
- Explicit function name declaration
- Returned document declaration
- Returned document meta data
- Skipping the document validation
- Return a standalone document
- Explicit filter definitions for a command
- Authorization checks
- Adding parameters from the execution context
- Using brackets
- Overview
- 5.4. Functions
- 5.4.1. Transactions in TDL
- Introduction
- Some internals
- Configuration
- Language description
- Subroutines
- Transaction function declarations
- Main processing instructions
- Preprocessing instructions
- Selector path
- Referencing Database Results
- Naming database results
- Referencing Subroutine Parameters
- Constraints on database results
- Rewriting error messages for the client
- substructures in the result
- Explicit sefinition of elements in the result
- Database specific code
- Subroutine templates
- Includes
- Auditing
- 5.4.2. Functions in .NET
- 5.4.3. Functions in python
- 5.4.4. Functions in Lua
- 5.4.5. Functions in native C++
- 5.5. Forms
- 5.6. Filters
- 5.7. Testing and defect handling
- Glossary
- Index
- A. GNU General Public License version 3
- Wolframe Clients
- 1. Introduction
- 2. Clients with PHP
- 3. Clients with .NET (C#)
- 4. Clients with Qt
- Index
- Wolframe Installation from Source
- 1. Installation from source
- 1.1. Source Releases
- 1.2. Building on Unix systems
- 1.2.1. Prerequisites
- 1.2.2. Basic build instructions
- 1.2.3. GCC compiler
- 1.2.4. clang compiler
- 1.2.5. Intel compiler
- 1.2.6. Using ccache and distcc
- 1.2.7. Platform-specific build instructions
- 1.2.8. Boost
- 1.2.9. Secure Socket Layer (SSL)
- 1.2.10. SQLite database support
- 1.2.11. PostgreSQL database support
- 1.2.12. Oracle database support
- 1.2.13. XML filtering support with libxml2 and libxslt
- 1.2.14. XML filtering support with Textwolf
- 1.2.15. JSON filtering support with cJSON
- 1.2.16. Scripting support with Lua
- 1.2.17. Scripting support with Python
- 1.2.18. Printing support with libhpdf
- 1.2.19. Image processing with FreeImage
- 1.2.20. zlib and libpng
- 1.2.21. Support for ICU
- 1.2.22. Internationalization support with gettext
- 1.2.23. Authentication support with PAM
- 1.2.24. Authentication support with SASL
- 1.2.25. Testing Wolframe
- 1.2.26. Testing with Expect
- 1.2.27. Building the documentation
- 1.2.28. Installation
- 1.2.29. Manual dependency generation
- 1.2.30. Creating source tarballs
- 1.2.31. Building the wolfclient
- RedHat/Centos/Scientific Linux 5 and similar Linux distributions
- RedHat/Centos/Scientific Linux 6 and 7 or similar Linux distributions
- Fedora 19 and 20 and similar distributions
- Debian 6 and 7
- Ubuntu 10.04.1 and 12.04
- Ubuntu 13.10 and 14.04
- openSUSE 12.3, SLES and similar Linux distributions
- openSUSE 13.1
- ArchLinux
- Slackware
- FreeBSD 8 and 9
- FreeBSD 10
- NetBSD
- OpenIndiana 151a8
- Solaris 10
- 1.3. Building on Windows systems (the NMAKE way)
- 1.3.1. Prerequisites
- 1.3.2. Basic build instructions
- 1.3.3. Using ccache and distcc
- 1.3.4. Boost
- 1.3.5. Secure Socket Layer (SSL)
- 1.3.6. SQLite database support
- 1.3.7. PostgreSQL database support
- 1.3.8. Oracle database support
- 1.3.9. XML filtering support with libxml2 and libxslt
- 1.3.10. XML filtering support with Textwolf
- 1.3.11. JSON filtering support with cJSON
- 1.3.12. Scripting support with Lua
- 1.3.13. Scripting support with Python
- 1.3.14. Printing support with libhpdf
- 1.3.15. Image processing with FreeImage
- 1.3.16. zlib and libpng
- 1.3.17. Support for ICU
- 1.3.18. Testing Wolframe
- 1.3.19. Testing with Expect
- 1.3.20. Building the documentation
- 1.3.21. Building the wolfclient
- Wolframe Server Extension Modules
Wolframe Application Development Manual
Copyright © 2010 - 2014 Project Wolframe
Commercial Usage. Licensees holding valid Project Wolframe Commercial licenses may use this file in accordance with the Project Wolframe Commercial License Agreement provided with the Software or, alternatively, in accordance with the terms contained in a written agreement between the licensee and Project Wolframe.
GNU General Public License Usage. Alternatively, you can redistribute this file and/or modify it under the terms of the GNU General Public License as published by the Free Software Foundation, either version 3 of the License, or (at your option) any later version.
Wolframe is distributed in the hope that it will be useful, but WITHOUT ANY WARRANTY; without even the implied warranty of MERCHANTABILITY or FITNESS FOR A PARTICULAR PURPOSE. See the GNU General Public License for more details.
You should have received a copy of the GNU General Public License along with Wolframe. If not, see http://www.gnu.org/licenses/
If you have questions regarding the use of this file, please contact Project Wolframe.
Aug 29, 2014 version 0.0.3
Table of Contents
- Foreword
- 1. Introduction
- 2. Installation via binary packages
- 3. Configuration
- 4. AAAA
- 5. Data processing
- 5.1. Processor Configuration
- 5.2. Application Server Requests
- 5.3. Command handler
- 5.3.1. The standard command handler
- Introduction
- Example configuration
- Example command description
- Command description language
- Keywords
- Simple document map
- Command with action prefix
- Explicit function name declaration
- Returned document declaration
- Returned document meta data
- Skipping the document validation
- Return a standalone document
- Explicit filter definitions for a command
- Authorization checks
- Adding parameters from the execution context
- Using brackets
- Overview
- 5.4. Functions
- 5.4.1. Transactions in TDL
- Introduction
- Some internals
- Configuration
- Language description
- Subroutines
- Transaction function declarations
- Main processing instructions
- Preprocessing instructions
- Selector path
- Referencing Database Results
- Naming database results
- Referencing Subroutine Parameters
- Constraints on database results
- Rewriting error messages for the client
- substructures in the result
- Explicit sefinition of elements in the result
- Database specific code
- Subroutine templates
- Includes
- Auditing
- 5.4.2. Functions in .NET
- 5.4.3. Functions in python
- 5.4.4. Functions in Lua
- 5.4.5. Functions in native C++
- 5.5. Forms
- 5.6. Filters
- 5.7. Testing and defect handling
- Glossary
- Index
- A. GNU General Public License version 3
List of Tables
- 3.1. Windows service configuration settings
- 3.2. Unix daemon configuration settings
- 3.3. Global server settings
- 3.4. Listen settings
- 3.5. ListenSSL settings
- 3.6. Restrictions settings
- 3.7. Log message types
- 3.8. LoadModules configuration settings
- 3.9. Global Settings
- 3.10. PostgreSQL database configuration settings
- 3.11. SSL configuration settings
- 3.12. SSL modes
- 3.13. Sqlite3 database configuration settings
- 3.14. Oracle database configuration settings
- 4.1. Authentication configuration settings
- 5.1. Options
- 5.2. Marshalling Tags
- 5.3. Attributes of assembly declarations
- 5.4. Method
- 5.5. List of Atomic Data Types
- 5.6. Methods of 'datetime'
- 5.7. Methods of 'datetime'
- 5.8. Filter interface iterator elements
- 5.9. Method
- 5.10. Data forms declared by DDL
- 5.11. Data forms returned by functions
- 5.12. Document
- 5.13. Logger functions
- 5.14. Global functions
- 5.15. Element attributes in simpleform
The Wolframe project was started in 2010. The goal was to create a platform for fully customizable business applications that can be hosted in modern system environments.
This manual introduces the architecture of Wolframe and explains how to build client/server applications with it. After reading this you should be able to create an application on your own.
First we describe the overall architecture and the data flow in a Wolframe application.
Wolframe is a 3-tier application server.
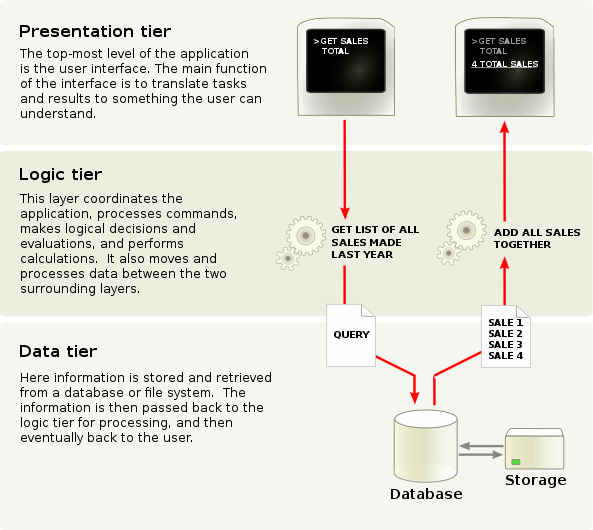
The presentation tier of Wolframe is implemented as a thin client. It maps the presentation of the application from the request answers it gets from the server. For some clients the data describing this mapping can also be loaded from the server when connecting to it. The whole processing ot the application is made by the server.
The logic tier of Wolframe defines the processing of application server requests and the rules for access control with the configurable mechanisms for authorization.
A client that logs in to the system passes an authentication procedure. The resulting authentication defines the privileges to execute functions or accessing resources (authorization). The chapter AAAA (Authentication,Authorization,Auditing and Accounting) will introduce the several aspects covered by Wolframe besides data processing.
A client that passed authentication can send application server requests to the server. A request consists of a command name plus a structured content also called document. The server returns a single document to the presentation tier as answer. Many different programming/scripting languages are supported to define the input/output mapping between the layers. Wolframe introduces three concepts as data processing building blocks for handling the server requests:
Filters: Filters are transforming serialized input data (XML,JSON,CSV,etc.) to a unified serialization of hierarchically structured data and to serialize any form of processed data for output. Filters are implemented as loadable modules (e.g. XML filter based on libxml2, JSON filter based on cJSON) or as scripts based on a filter module (XSLT filter script for rewriting input or output)
Forms: Forms are data structures defined in a data definition language (DDL). Forms are used to validate and normalize input (XML validation, token normalization, structure definition). The recommended definition of a command in the logic tier has a form to validate its input and a form to validate its output before returning it to the caller.
Functions: Functions delegate processing to the data tier (transactions) or they are simple data transformations or they serve as interface to integrate with other environments (e.g. .NET). Functions have a unique name and are called with a structure as argument and a structure as result. Functions can call other functions for delegation, e.g. a transaction definition can call a .NET function for preprocessing its input or a .NET function can call a Python function to do parts of the processing.
The chapter data processing will describe these building blocks.
The data tier of Wolframe defines the interface to the databases of the application. A transaction description is passed as a complete data structure to the database that returns the result of the transaction. The logic tier builds the result data structure out of this result and completes other actions defined as part of the transaction (like audit) before invoking the completion of the transaction in the data tier with a commit or rollback. All databases of the data tier are integrated with the same interface into the server. Nevertheless there is no unified database language involved and transactions can use proprietary language constructs of the underlying database. Wolframe supports many databases like for example PostgreSQL, Sqlite and Oracle and others can be added by just implementing the database interface as a loadable module.
Table of Contents
This section describes how to install the Wolframe application via packages on various operating systems.
Linux distributions are currently built on the Open Build Server (http://openbuildservice.org) and on a bunch of virtual machines.
The resulting packages and the repository metadata is hosted on Sourceforge (http://sourceforge.net).
The packages are always build with the default system compiler, which is currently GNU gcc.
Packages for proprietary software (like the Oracle database module) have to be built manually, they can not be distributed as binary packages due to license problems.
wolframe-0.0.3 .x86_64.rpm: contains the Wolframe core server with minimal 3rd party software requirements
wolframe-sqlite3-0.0.3 .x86_64.rpm: the database module for Sqlite3 databases
wolframe-postgresql-0.0.3 .x86_64.rpm: the database module for PostgreSQL databases
wolframe-libxml2-0.0.3 .x86_64.rpm: filtering module for XML and XSLT (using libxml2/libxslt)
wolframe-textwolf-0.0.3 .x86_64.rpm: filtering module for XML (using textwolf)
wolframe-cjson-0.0.3 .x86_64.rpm: filtering module for JSON (using cJSON)
wolframe-pam-0.0.3 .x86_64.rpm: authentication module for PAM
wolframe-sasl-0.0.3 .x86_64.rpm: authentication module for SASL
wolframe-python-0.0.3 .x86_64.rpm: language bindings for Python
wolframe-lua-0.0.3 .x86_64.rpm: language bindings for Lua
wolframe-libhpdf-0.0.3 .x86_64.rpm: printing module using libhpdf
wolframe-freeimage-0.0.3 .x86_64.rpm: image manipuation module using FreeImage
wolframe-libclient-0.0.3 .x86_64.rpm: C/C++ client library
wolframe-client-0.0.3 .x86_64.rpm: command line tool
wolfclient-0.0.4 .x86_64.rpm: Wolframe graphical frontend
Installing the packages via repositories is usually the prefered way.
First install the repository file for the corresponding distribution (as example we choose Centos 6):
	cd /etc/yum.repos.d
	wget http://sourceforge.net/projects/wolframe/files/repositories/CentOS-6/wolframe.repo
You can list all available Wolframe packages with:
yum search wolframe
You install the main Wolframe package with:
yum install wolframe
You have to accept the signing key:
	Retrieving key from http://sourceforge.net/projects/wolframe/files/repositories/CentOS-6/repodata/repomd.xml.key
	Importing GPG key 0x9D404026:
	Userid: "home:wolframe_user OBS Project <home:wolframe_user@build.opensuse.org>"
	From  : http://sourceforge.net/projects/wolframe/files/repositories/CentOS-6/repodata/repomd.xml.key
	Is this ok [y/N]: y
You can start the service with:
service wolframed start
respectively
systemctl start wolframed
on newer Fedora systems.
wolframe_0.0.3 _amd64.deb: contains the Wolframe core server with minimal 3rd party software requirements
wolframe_sqlite3-0.0.3 _amd64.deb: the database module for Sqlite3 databases
wolframe_postgresql-0.0.3 _amd64.deb: the database module for PostgreSQL databases
wolframe-libxml2_0.0.3 _amd64.deb: filtering module for XML and XSLT (using libxml2/libxslt)
wolframe_textwolf_0.0.3 _amd64.deb: filtering module for XML (using textwolf)
wolframe-cjson_0.0.3 _amd64.deb: filtering module for JSON (using cJSON)
wolframe-pam_0.0.3 _amd64.deb: authentication module for PAM
wolframe-sasl_0.0.3 _amd64.deb: authentication module for SASL
wolframe-python_0.0.3 _amd64.deb: language bindings for Python
wolframe-lua_0.0.3 _amd64.deb: language bindings for Lua
wolframe-libhpdf_0.0.3 _amd64.deb: printing module using libhpdf
wolframe-freeimage_0.0.3 _amd64.deb: image manipuation module using FreeImage
wolframe-libclient_0.0.3 _amd64.deb: C/C++ client library
wolframe-client_0.0.3 _amd64.deb: command line tool
wolfclient_0.0.4 _amd64.deb: Wolframe graphical frontend
Installing the packages via repositories is usually the prefered way.
Note: Some older versions of Ubuntu (like Ubuntu 12.04 LTS, 10.04 LTS or Debian 6) have problems to download the metadata files from Sourceforge. If you get messages like:
	W: Failed to fetch http://sourceforge.net/projects/wolframe/files/repositories/Ubuntu-12.04_LTS/Release.gpg  Got a single header line over 360 chars
	Err http://sourceforge.net  Packages
then you have to download the binaries manually.
Add a new repository file /etc/apt/sources.list.d/wolframe.list
which contains:
deb http://sourceforge.net/projects/wolframe/files/repositories/Ubuntu-14.04_LTS/ /
(as example we choose Ubuntu 14.04).
Download the signing key:
wget http://wolframe.net/Release.key
Verify that the key then add it with:
apt-key add - < Release.key
Update the repository with:
apt-get update
You can list all available Wolframe packages with:
apt-cache search wolframe
You install the main Wolframe package with:
apt-get install wolframe
To start the Wolframe service you have to
edit the file /etc/default/wolframe
and enable the wolframe daemon there:
RUN=yes
You can start the service now with:
service wolframed start
wolframe-0.0.3 .x86_64.rpm: contains the Wolframe core server with minimal 3rd party software requirements
wolframe-sqlite3-0.0.3 .x86_64.rpm: the database module for Sqlite3 databases
wolframe-postgresql-0.0.3 .x86_64.rpm: the database module for PostgreSQL databases
wolframe-libxml2-0.0.3 .x86_64.rpm: filtering module for XML and XSLT (using libxml2/libxslt)
wolframe-textwolf-0.0.3 .x86_64.rpm: filtering module for XML (using textwolf)
wolframe-cjson-0.0.3 .x86_64.rpm: filtering module for JSON (using cJSON)
wolframe-pam-0.0.3 .x86_64.rpm: authentication module for PAM
wolframe-sasl-0.0.3 .x86_64.rpm: authentication module for SASL
wolframe-python-0.0.3 .x86_64.rpm: language bindings for Python
wolframe-lua-0.0.3 .x86_64.rpm: language bindings for Lua
wolframe-libhpdf-0.0.3 .x86_64.rpm: printing module using libhpdf
wolframe-freeimage-0.0.3 .x86_64.rpm: image manipuation module using FreeImage
wolframe-libclient-0.0.3 .x86_64.rpm: C/C++ client library
wolframe-client-0.0.3 .x86_64.rpm: command line tool
wolfclient-0.0.4 .x86_64.rpm: Wolframe graphical frontend
Note: This is currently not working perfectly and some steps have to be done manually.
First we add the Wolframe repository for the corresponding distribution (as example we choose OpenSUSE 13.1):
zypper addrepo http://sourceforge.net/projects/wolframe/files/repositories/openSUSE-13.1/wolframe.repo
You may get the following error:
	/var/adm/mount/AP_0xmiyYP3/projects/wolframe/files/repositories/openSUSE-13.1/wolframe.repo: Line 1 is missing '=' sign
	Is it a .repo file? See http://en.opensuse.org/Standards/RepoInfo for details.
Try to download the repo file by hand and install it by hand:
	wget http://sourceforge.net/projects/wolframe/files/repositories/openSUSE-13.1/wolframe.repo
	zypper addrepo wolframe.repo
Now refresh your repositories with:
zypper refresh
If you get the following message
File 'repomd.xml' from repository 'Wolframe Project (openSUSE-13.1)' is unsigned, continue? [yes/no] (no): yes
the signing key could not be downloaded from SourceForge. Accept it in this case anyway.
If you get the following message
	File './repodata/ea7cb8d9a0caa2c3d8977919be124accdf55c6b8952ddee72f1b48f4decb0644-primary.xml.gz' not found on medium 'http://sourceforge.net/projects/wolframe/files/repositories/openSUSE-13.1/'

	Abort, retry, ignore? [a/r/i/? shows all options] (a): u^H
	Invalid answer ''. [a/r/i/? shows all options] (a): ?

	a - Skip retrieval of the file and abort current operation.
	r - Try to retrieve the file again.
	i - Skip retrieval of the file and try to continue with the operation without the file.
	u - Change current base URI and try retrieving the file again.

	[a/r/i/? shows all options] (a): u
the Sourceforge redirect didn't work and you have to force the baseURL to be a SourceForge mirror like:
New URI: http://freefr.dl.sourceforge.net/project/wolframe/repositories/openSUSE-13.1/
You can list all available Wolframe packages with:
	zypper se wolframe
	zypper se wolfclient
You install the main Wolframe package with:
zypper install wolframe
You can start the service with:
service wolframed start
respectively
systemctl start wolframed
on newer openSUSE systems.
Wolframe is currently only available as two monolithic packages:
wolframe-0.0.3 .x86_64.rpm: contains the Wolframe core server with all modules for 3rdParty software included,
wolfclient-0.0.4 .x86_64.rpm: Wolframe graphical frontend
You can use the packages from http://sourceforge.net/projects/wolframe/files/wolframe-binaries/ directly.
First add the following section to /etc/pacman.conf:
	[wolframe]
	SigLevel = Optional DatabaseRequired
	Server = http://sourceforge.net/projects/wolframe/files/repositories/ArchLinux/$arch
Fetch and verify the sigining key, import and locally sign the key:
	wget http://wolframe.net/Release.key
	pacman-key --add Release.key
	pacman-key --lsign 9D404026
Alternatively you can also disable the verification of the signature of the database by removing 'DatabaseRequired' from the 'SigLevel' option.
Update the repository data with:
pacman -Syy
You can list all available Wolframe packages with:
pacman -Sl wolframe
You install the main Wolframe package with:
pacman -S wolframe
You can start the service with:
systemctl start wolframed
You can also customize your build by downloading the build files from the AUR at https://aur.archlinux.org/packages/?O=0&K=wolframe and customize them to your needs.
For instance:
	yaourt -G wolframe
	cd wolframe
	makepkg
Wolframe is currently only available as two monolithic packages:
wolframe-0.0.3 .x86_64.rpm: contains the Wolframe core server with all modules for 3rdParty software included,
wolfclient-0.0.4 .x86_64.rpm: Wolframe graphical frontend
Download the package file (we picked 64-bit Slackware 14 for example):
	wget http://sourceforge.net/projects/wolframe/files/wolframe-binaries/0.0.3
/Slackware-14/x86_64/wolframe-0.0.3
-x86_64.tgz
You install the Wolframe package with:
	installpkg wolframe-0.0.3
-x86_64.tgz
You can start the service with:
/etc/rc.d/rc.wolframed start
Download the package file (we choose 64-bit FreeBSD 9 for example):
	wget http://sourceforge.net/projects/wolframe/files/wolframe-binaries/0.0.3
/FreeBSD-9/x86_64/wolframe-0.0.3
-x86_64.tgz
You install the Wolframe package with:
	pkg_add wolframe-0.0.3
-x86_64.tgz
The FreeBSD packages contain the whole server and the whole client respectively.
You can start the service with:
/usr/local/etc/rc.d/wolframed onestart
To start the Wolframe service at system boot time
you have to edit the file /etc/rc.conf
and enable the wolframe daemon there with:
wolframed_enable="YES"
You can start the service now with:
service wolframed start
Download the package file (we choose 64-bit NetBSD 6 for example):
	wget http://sourceforge.net/projects/wolframe/files/wolframe-binaries/0.0.3
/NetBSD-6/x86_64/wolframe-0.0.3
-x86_64.tgz
You install the Wolframe package with:
	pkg_add wolframe-0.0.3
-x86_64.tgz
The NetBSD packages contain the whole server and the whole client respectively.
You can start the service with:
/usr/pkg/share/examples/rc.d/wolframed onestart
To start the Wolframe service at system boot time
you have to edit the file /etc/rc.conf
and enable the wolframe daemon there with:
wolframed=YES
Copy the example startup script to the final place:
cp /usr/pkg/share/examples/rc.d/wolframed /etc/rc.d/
You can start the service now with:
/etc/rc.d/wolframed
Download the package file for SPARC Solaris 10 (the only one we can build at the moment):
	wget http://sourceforge.net/projects/wolframe/files/wolframe-binaries/0.0.3
/Solaris-10/sparc/wolframe-0.0.3
-sparc-5.10.pkg.Z
You install the Wolframe package with:
	uncompress wolframe-0.0.3
-sparc-5.10.pkg.Z
	pkgadd -d wolframe-0.0.2-sparc-5.10.pkg all
The Solaris packages contain the whole server and the whole client respectively.
The package installs to the /opt/csw directory tree.
Install the CSW toolchain (http://www.opencsw.org) and the minimally required packages:
	pkgadd -d http://get.opencsw.org/now
	pkgutil --install CSWlibgcc CSWlibssl1
Depending on the third party software you plan to use you also have to install those packages, for instance to run a Sqlite3 database you have to install 'CSWsqlite3'.
You can start the service now with:
/etc/opt/csw/init.d/wolframed start
Table of Contents
This chapter describes the configuration of the wolframe server besides the data processing described in the section data processing and the AAAA backends described in the section AAAA.
The service configuration is depending on the platform you run the Wolframe server. We show the configuration for Windows and Unix in different sections:
The service configuration for Windows is defined in the section
Service. The following table describes the settings
in the service configuration for Windows. The service configuration
for Windows is only read at installation time. Changing them later
in the configuration file has no effect.
Table 3.1. Windows service configuration settings
| Name | Arguments | Description |
|---|---|---|
| ServiceName | string | Parameter for service registration. Defines the name of the service |
| DisplayName | string | Parameter for service registration. Defines the display name of the service |
| Description | string | Parameter for service registration. Defines the description of the service |
Example configuration:
Service {
    ServiceName wolframe
    DisplayName "Wolframe Daemon"
    Description "Wolframe Daemon"
}
The daemon configuration for Unix systems is defined in the section
Daemon. The following table describes the settings
in a daemon configuration:
Table 3.2. Unix daemon configuration settings
| Name | Arguments | Description |
|---|---|---|
| User | identifier | Defines the name of the user the Wolframe server should run as. |
| Group | identifier | Defines the name of the group of the user the Wolframe server should run as. |
| PidFile | filepath | Defines the path to the file used as pid file |
Example configuration:
Daemon {
    User    wolframe
    Group   wolframe
    PidFile /var/run/wolframed.pid
}
The server configuration is defined in the Server
section. The server specifies the set of sockets a client can
connect to. It defines rules for how and from where a client
can connect and the properties of the connection.
It also defines some global settings listed in the following table:
Table 3.3. Global server settings
| Name | Description |
|---|---|
| MaxConnections | The maximum number of total simultaneous connections (clients). If not specified the default is used. The default is the operating system limit. |
| Threads | Number of threads for serving client connections. |
Here is an example configuration of the server global settings:
Server
{
    MaxConnections 12
    Threads 7
}
The server has two types of sockets to configure in the
sections Listen and ListenSSL.
ListenSSL is describing a secure connection
with a transport layer encryption based on SSL/TLS.
Listen on the other hand is describing a plain
TCP/IP connection.
In the following two sections they are introduced:
In the subsections named Listen of the server
configuration we define sockets providing plain connections based
on TCP/IP. The following table describes the attributes you can set
for plain TCP/IP connections:
Table 3.4. Listen settings
| Name | Description |
|---|---|
| Address | Listening address (IPv4 or IPv6) of the server. '127.0.0.1' and '::1' stand for the loopback address (IPv4 an IPv6 respectively). The listener wildcards '*' or '0.0.0.0' (IPv4) or '::' (IPv6) are also accepted. |
| Port | Connection port. Ports 7649-7671 and 7934-7966 are unassigned according to IANA (last updated 2010-03-11). The default ports are 7661 for unencrypted connections and 7961 for SSL connections. Note that 7654 seems to be used by Winamp. |
| Identifier | Identifier that can be referenced in authorization functions to classify connections and to define authorization based on it. |
| MaxConnections | (optional) The maximum number of simultaneus connections for this socket. |
| Restrictions | (optional) Defines the subsection containing IP restrictions on the connection. If not defined, the connection is allowed from everywhere. The configuration of IP restrictions will be defined in the section IP restrictions. |
The following Listen configuration shows an example plain TCP/IP
connection definition:
Server
{
    Listen
    {
        Address localhost
        Port 7661
        Identifier "Interface 1"
        Restrictions {
            allow 192.168.201.0/24
        }
    }
}
In the subsections named ListenSSL of the
server configuration we define sockets providing secured connections
with full transport layer encryption based on SSL/TLS.
The following table describes the attributes you can set for secured
connections. The first five attributes are the same as for
sockets configured as plain TCP/IP (Listen)
as shown before:
Table 3.5. ListenSSL settings
| Name | Description |
|---|---|
| Address | Listening address (IPv4 or IPv6) of the server. '127.0.0.1' and '::1' stand for the loopback address (IPv4 an IPv6 respectively). The listener wildcards '*' or '0.0.0.0' (IPv4) or '::' (IPv6) are also accepted. |
| Port | Connection port. Ports 7649-7671 and 7934-7966 are unassigned according to IANA (last updated 2010-03-11). The default ports are 7661 for unencrypted connections and 7961 for SSL connections. Note that 7654 seems to be used by Winamp. |
| Identifier | Identifier that can be referenced in authorization functions to classify connections and to define authorization based on it. |
| MaxConnections | The maximum number of simultaneus connections for this port. |
| Restrictions | Defines the subsection containing IP restrictions on the connection. If not defined, the connection is allowed from everywhere. The configuration of IP restrictions will be defined in the section IP restrictions. |
| Certificate | File with the SSL certificate |
| Key | File with the SSL key |
| CAdirectory | Directory holding the CA certificate files. |
| CAchainFile | SSL CA chain file |
| Verify | ON/OFF switch to enabe/disable client certificate verification. |
The following configuration shows an example ListenSSL
definition:
Server
{
    ListenSSL
    {
        Address localhost
        Port 7961
        Identifier "Interface 1"
        MaxConnections 2
        Certificate SSL/wolframed.crt
        key SSL/wolframed.key
        CAchainFile SSL/CAchain.pem
        Verify Off
    }
}
IP restrictions are defined as sub section restrictions
of the socket configurations (Listener and ListenerSSL)
in the server configuration.
Table 3.6. Restrictions settings
| Name | Argument | Description |
|---|---|---|
| Allow | IP address with optional network mask | Define an IP or network address
as allowed to connect from, if not explicitely
defined by a Deny directive.
If no allow is specified then
all IPs are allowed to connect from, if not
explicitely excluded by a deny
directive. So no allow is equivalent
to allow all
|
| Deny | IP address with optional network mask | Define an IP or network address
as forbidden to connect from. If a
deny directive refers to
an IP explictely defined or part of an
allow then the deny
is stronger and overrides the allow
declaration.
|
The logger configuration is defined in the Logging
section. The logger is defined for different backends.
We can define several backends for the logger.
Each backend defines the level (verbosity) of logging. For the log levels we use the type of the log message. The types of log messages can be listed in ascending order of their severity. Setting the log level to a type of log message means that the system logs all messages with equal or higher severity than the specified type. The log message types are listed in the following table. They are listed in ascending order of severity:
Table 3.7. Log message types
| Name | Description |
|---|---|
| DATA2 | Processing data messages, not truncated |
| DATA | Processing data messages with big chunks truncated |
| TRACE | Processing trace messages |
| DEBUG | Debug messages |
| INFO | Information messages |
| NOTICE | Important information messages |
| WARNING | Warning messages |
| ERROR | Processing error messages |
| SEVERE | Severe errors that should be analyzed. |
| CRITICAL | Critical errors that have to notified. |
| ALERT | Critical errors that have to be escalated to a person responsible immediately. |
| FATAL | Fatal errors that cause the server to shut down. |
In the following sub sections we list the different backends and how they can be configured.
For defining the backend to log to console (stderr), we
have to configure a subsection stderr of the
Logging section. For console logging we just
can define the logging level with level.
Example configuration:
Logging
{
    Stderr {
        Level INFO
    }
}
For defining the backend to log to a file, we
have to configure a subsection LogFile of the
Logging section. For logging to file we
can define the logging level with Level
and the file name with Filename.
Example configuration:
Logging
{
    LogFile {
        Filename /var/log/wolframed.log
        Level NOTICE
    }
}
For defining the backend to log to syslog, we
have to configure a subsection Syslog of the
Logging section. For logging to syslog we
can define the logging level with Level,
the syslog facility with Facility
and the identifier with Ident.
Example configuration:
Logging
{
    Syslog {
        Ident wolframed
        Facility LOCAL2
        Level INFO
    }
}
On Windows we can also log to eventlog.
For defining the backend to log to eventlog, we
have to configure a subsection Eventlog of the
Logging section. For logging to eventlog we
can define the logging level with Level,
the eventlog source with Source
and the identifier with Name.
Example configuration:
Logging
{
    Eventlog {
        Name Wolframe
        Source wolframed
        Level WARNING
    }
}
The configuration of modules loaded by the server for processing
are defined in the LoadModules section.
The following table describes the settings in the modules:
Table 3.8. LoadModules configuration settings
| Name | Arguments | Description |
|---|---|---|
| Directory | path | Path to use as base path for relative module paths specified with 'Module'. If specified as relative path, it is relative to the directory containing the main configuration file. If not specified, the default module directory of Wolframe is used (for example /usr/lib64/wolframe/modules). |
| Module | path | Define a module to load by path. If the setting 'directory' was not specified then the path is relative to the library directory of Wolframe (subdirectory 'wolframe' of the user library directory) |
Example configuration:
LoadModules
{
    Directory /usr/lib/wolframe
    Module mod_db_postgresql
    Module mod_auth_textfile
    Module mod_filter_libxml2
}
The following table describes the global settings you can configure:
Table 3.9. Global Settings
| Name | Arguments | Description |
|---|---|---|
| ServerTokens | One of None, ProductOnly, Major, Minor, Revision, Build, OS | Define what to print in the initial greeting of the protocol (first message of the server). Every token above prints more information as the previous one, staring from 'None' which prints nothing, to 'OS' which prints 'Wolframe version 1.4.5.22, Linux, Ubuntu 14.04'. The default is 'None'. |
| ServerSignature | string | Define the string to be printed in the initial greeting of the protocol (first message of the server). The server signature gets added to the greeting string in brackets, for instance 'Wolframe version 1.4.5.22, Linux, Ubuntu 14.04 (CRM)'. The default is an empty string. |
Example configuration:
ServerTokens OS
ServerSignature "CRM"
The server would send the following greeting string:
Wolframe version 1.4.5, Linux, Ubuntu 14.04 (CRM)
The Databases for Wolframe are configured in the Database
section of the configuration.
This section explains how to configure a Postgres database.
In order to use a Postgres database in Wolframe you have to configure the loading of the module mod_db_postgresql in the LoadModules section of your configuration. The addressed Postgres database server must be running and the database and the user configured must have been created before.
The configuration settings for PostgreSQL are splitted in two parts: The database configuration settings and the SSL configuration settings. The following three tables show the PostgreSQL database configuration settings, the PostgreSQL SSL configuration settings and the table with configurable SSL modes:
Table 3.10. PostgreSQL database configuration settings
| Name | Parameter | Description |
|---|---|---|
| Identifier | identifier | Database identifier used to reference this database. |
| Host | host name or IP address | Address of the PostgreSQL database server. Uses the unix domain socket if not defined. |
| Port | number | Port of the PostgreSQL database server. The default is 5432. |
| Database | identifier | Name of the database to connect to |
| User | identifier | User to connect to the database with |
| Password | string | Password to connect to the database with |
| ConnectionTimeout | number | Connection timeout in seconds. The default if not specified is 30 seconds. A value of '0' disables the connection timeout. |
| Connections | number | Maximum number of simoultaneus database connections (size of connection pool). Default if not specified is 4 connections. |
| AcquireTimeout | number | Maximum time allowed to acquire a database connection in seconds |
| StatementTimeout | number | The maximum allowed time to execute a statement in milliseconds. |
Table 3.11. SSL configuration settings
| Name | Parameter | Description |
|---|---|---|
| SslMode | identifier | How a SSL TCP/IP connection should be negotiated with the server. Possible values and their explanation can be found in the SSL Mode table below. |
| SslCert | filename | The file name of the client SSL certificate in case of an SSL connection to the database. |
| SslKey | filename | The file with the secret key used for the client certificate in case of an SSL connection to the database. |
| SslRootCert | filename | The File name of the root SSL CA certificate in case of an SSL connection to the database. |
| SslCRL | filename | The File name of the SSL certificate revocation list (CRL) in case of an SSL connection to the database. |
Table 3.12. SSL modes
| Name | Description |
|---|---|
| disable | Only try a non-SSL connection |
| allow | First try a non-SSL connection. If that fails, try an SSL connection |
| prefer | First try an SSL connection. If that fails, try a non-SSL connection. This is the default. |
| require | Only try an SSL connection. If a root CA file is present, verify the certificate. |
| verify-ca | Only try an SSL connection, and verify that the server. The certificate is issued by a trusted CA. |
| verify-full | Only try an SSL connection, verify that the server certificate is issued by a trusted CA and that the server hostname matches that in the certificate. |
This section explains how to configure a Sqlite database.
In order to use an Sqlite3 database in Wolframe you have to configure the loading of the module mod_db_sqlite3 in the LoadModules section of your configuration. The database file configured must have been created before.
The following table shows the configuration settings for a Sqlite3 database in Wolframe.
Table 3.13. Sqlite3 database configuration settings
| Name | Parameter | Description |
|---|---|---|
| Identifier | identifier | Database identifier used to reference this database. |
| File | filepath | Store the SQLite database into the file specified as argument. This parameter is required and the file must have been created before. |
| Connections | number | Number of simultaneous connections to the database. Specifies the size of the pool of connections used for database transactions. The default number of connections is 4 if not configured. |
| ForeignKeys | yes or no | Setting foreignKeys to yes
enables referential integrity in the database. This is
actually the same as executing 'PRAGMA foreign_keys=true'.
The default is yes. |
| Profiling | yes or no | Shows the SQL commands being executed and their
execution time in milliseconds. Default is no. |
| Extension | filename | Loads the SQLite3 extension module specified as argument. This is useful to load native code into SQLite3 imlementing for instance new database functions. Have a look at the SQLite3 'Run-Time Loadable Extensions' section at http://www.sqlite.org/loadext.html. |
This section explains how to configure an Oracle database.
In order to use an Oracle database in Wolframe you have to configure the loading of the module mod_db_oracle in the LoadModules section of your configuration. The addressed Oracle database server must be running and the database and the user configured must have been created before.
The following table shows the Oracle database configuration settings:
Table 3.14. Oracle database configuration settings
| Name | Parameter | Description |
|---|---|---|
| Identifier | identifier | Database identifier used to reference this database. |
| Host | identifier or string | Address of the Oracle database server |
| Port | number | Port of the Oracle database server, the default is 1521 if not specified |
| Database | identifier | Name of the database to connect to, this is the Oracle SID. |
| User | identifier | User to connect to the database with |
| Password | string | Password to connect to the database with |
| Connections | number | Maximum number of simultaneous database connections (size of connection pool) |
| AcquireTimeout | number | Maximum time allowed to acquire a database connection in seconds |
Table of Contents
AAAA is an acronym for authentication,authorization, accounting and auditing. The different aspects of AAAA in the application are linked together as they all are based on the identity of the user. The identitiy of a user is authenticated after his login. Depending on the identity and the method the user was authenticated, he gets privileges to access resources or execute procedures. Wolframe provides hooks for calling authorization to enforce checks of these privileges. Every request and every transaction can be bound to authorization. Every function executed can use authorization functions to check privileges.
Accounting and auditing functions use the identity of the user to log the actions of a session.
Wolframe defines authentification methods as configurable modules. New modules can be added easily. Authorization and auditing calls are implemented as ordinary functions that can be written in any language that has bindings for Wolframe. A layer inbetween declares what data of the users context is passed to authorization or audit/accounting functions. This makes it easy to enforce rules how to handle sensible login data in a controlled way.
The configuration section AAAA bundles the
definition of mechanisms and resources needed for AAAA.
The following example shows an empty AAAA configuration
section:
AAAA
{
    ;... configuration for
    ;    authentication,authorization,auditing and accounting
}
The identitiy of a user is authenticated after his login.
The identity and the method he was
The aspect of authentication is configured in the
subsection Authentication of the AAAA section
in the server configuration.
In order to use authentication in Wolframe you have to configure the
loading of the module implementing it. The authentication mech explained
here as example is implemented in the module mod_auth_textfile.
For using it you have to declare the module mod_auth_textfile
in the LoadModules section of your configuration before.
The following table shows the configuration settings for Authentication in Wolframe.
Table 4.1. Authentication configuration settings
| Name | Parameter | Description |
|---|---|---|
| RandomDevice | address or path | Specifies the random device to be used. This configuration setting is optional. The system should have a reasonable default for most applications. |
| Textfile | section | Specifies the block with the configuration for authentication based on a textfile with WOLFRAME-CRAM as authentication mech. |
The following example shows an Authentication
configuration with the Wolframe textfile authentication module
that provides an authentication over the "WOLFRAME-CRAM" protocol:
AAAA
{
    Authentication
    {
        randomDevice /dev/urandom
        TextFile
        {
            identifier "TextFileAuth"
            file /var/tmp/wolframe.auth
        }
}
Currently only the authentication protocol for
WOLFRAME-CRAM is implemented. The
client can choose between no authentication
(if configured to allow no authentication)
or WOLFRAME-CRAM. You configure
it as shown in the example above. For the setup of a
client see the chapter "Clients".
Authorization in Wolframe has two levels. The first level is authorization based on connection info, e.g. is a client allowed/denied to connect from a certain ip or network. Connection info based authorization happens on connect to the server.
The second level is command authorization based on identity (user attributes, connection characteristics) that is done on execution of a function. Identity based authorization can can be defined for the access of resources. It's is up to us to define the access control matrix
The authorization based on connection info is implemented in the server configuration as IP restrictions (see chapter "IP restrictions").
Authorization
The aspect of authorization is configured in the
subsection Authorization of the AAAA section
in the server configuration.
The only working configuration is the
default Authorization configuration with
the setting to allow access to anybody authenticated
that is not explicitely denied:
AAAA
{
    Authorization
    {
        Authorization {
            default allow
        }
    }
}
The command execution authorization is not implemented yet completely. The idea is to have programs that map authorization function calls to Wolframe function calls. The language to describe these programs is not yet defined. The mechanism to map the authorize requests to the function calls already exists. Authorization based on command execution will be a subject of the next release.
The aspect of auditing and accounting is configured in the
subsection Audit of the AAAA section
in the server configuration. Accounting is a sub aspect of
auditing. The audit (and accounting) calls are implemented as normal
Wolframe function calls. The configuration defines additional parameters
depending on the authentication status for the audit function calls
and resources to be referenced.
The following example shows an Audit
configuration with the setting use the textfile /var/tmp/wolframe.audit
as audit log:
AAAA
{
    Audit
    {
        TextFile
        {
            file /var/tmp/wolframe.audit
        }
    }
}
The mechanism of auditing, the calling of audit functions and their declaration in the transaction layer is implemented and tested. The underlaying methods, for example to log to a text file as configured in the example above is not yet implemented, but is subject of the next release.
Table of Contents
- 5.1. Processor Configuration
- 5.2. Application Server Requests
- 5.3. Command handler
- 5.3.1. The standard command handler
- Introduction
- Example configuration
- Example command description
- Command description language
- Keywords
- Simple document map
- Command with action prefix
- Explicit function name declaration
- Returned document declaration
- Returned document meta data
- Skipping the document validation
- Return a standalone document
- Explicit filter definitions for a command
- Authorization checks
- Adding parameters from the execution context
- Using brackets
- Overview
- 5.4. Functions
- 5.4.1. Transactions in TDL
- Introduction
- Some internals
- Configuration
- Language description
- Subroutines
- Transaction function declarations
- Main processing instructions
- Preprocessing instructions
- Selector path
- Referencing Database Results
- Naming database results
- Referencing Subroutine Parameters
- Constraints on database results
- Rewriting error messages for the client
- substructures in the result
- Explicit sefinition of elements in the result
- Database specific code
- Subroutine templates
- Includes
- Auditing
- 5.4.2. Functions in .NET
- 5.4.3. Functions in python
- 5.4.4. Functions in Lua
- 5.4.5. Functions in native C++
- 5.5. Forms
- 5.6. Filters
- 5.7. Testing and defect handling
In the this chapter we will see how application server requests look like. We will have a look at the Wolframe standard command handler that handles the requests and how it is configured. Then we will show how to write programs that declare the functions executing the requests and how you link them to your application. Finally we will describe the tools available in Wolframe for defect handling and testing.
The processing of application server requests is configured in the
section Processor of the server configuration.
The following example shows an empty Processor configuration
section:
Processor
{
    ;... processing configuration
}
Wolframe application server requests consist of a named command and a structured content (document) as argument.
The following illustration shows the processing of one client request to the server. A call of the Wolframe logic tier gets to a command handler that calls functions given by the provider to perform the transaction requested.
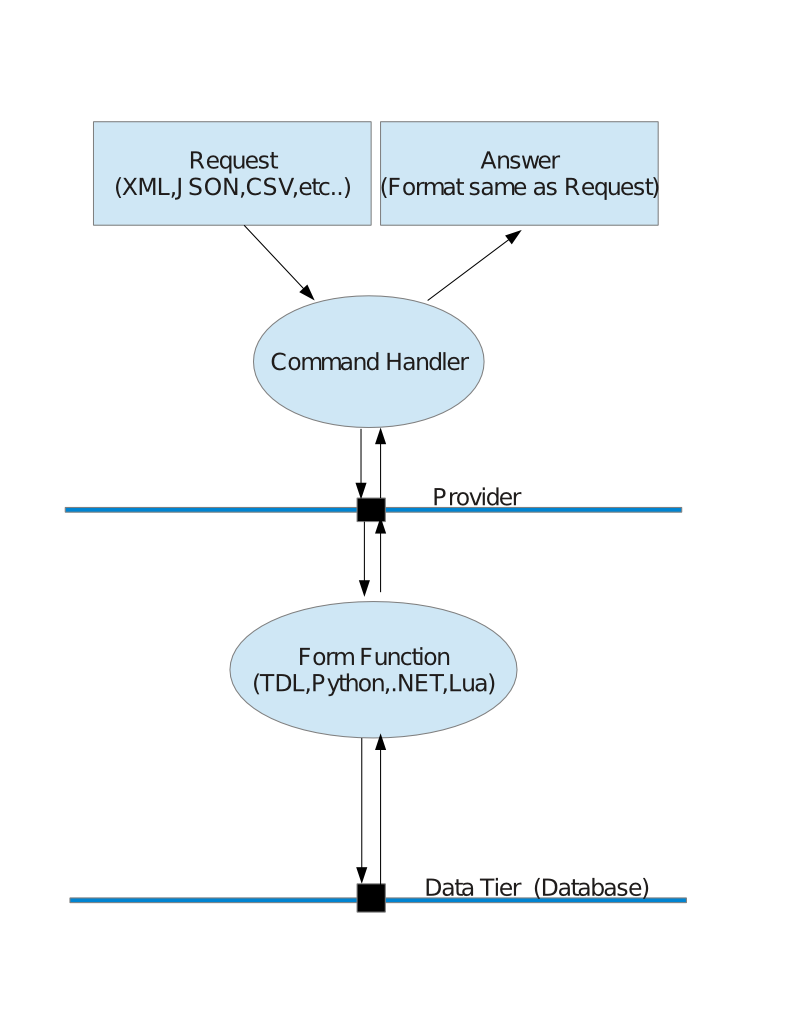
Command handlers define the mapping of server requests to functions to execute. This chapter introduces the standard command handler.
The Wolframe standard command handler is called directmap and named so in the configuration because it only declares a redirection of the commands to functions based on the document type and the command identifier specified by the client in the request.
The declarations of the Wolframe Standard Command Handler (directmap) are specified in a program source file with the extension '.dmap' that is declared in the configuration.
The following annotated configuration example
declares (1) a program example.tdl written in the
transaction definition language (TDL)
to contain the function declarations that can be called by
the command handler. It (2) declares the database with
name pgdb to be used as the
database for transactions. It (3) loads a description
example.dmap that will declare the mappings
of commands to the filters used and functions called.
It (4) specifies the filter with name libxml2
to be used for documents of format XML and
(5) the filter with name cjson
to be used for documents of format JSON, if not specified
else in example.dmap.
; Simple Data Processing Configuration Example
Processor
{
    ; Programs to load:
    Program example.tdl            ; (1) a program with functions (in TDL)
    Database pgdb                  ; (2) references transaction database

    ; Command handlers to load:
    Cmdhandler
    {
        Directmap                  ; the standard command handler
        {
            Program example.dmap   ; (3) description of command mappings

            Filter XML=libxml2     ; (4) std filter for XML document format
            Filter JSON=cjson      ; (5) std filter for JSON document format
        }
    }
}
The following source example could be one of the example.dmap
in the configuration example introduced above. It defines two commands. The first one links a command "insert" with document type
"Customer" as content to a transaction function "doInsertCustomer". The content is validated
automatically against a form named "Customer" if not explicitly defined else.
The command has no result except that it succeeds or fails. The second example command links a
command "get" with a document type "Employee" to a function "doSelectEmployee".
The input is not validated and the transaction output is validated and mapped through the
form "Employee".
COMMAND insert Customer CALL doInsertCustomer;
COMMAND get Employee SKIP CALL doSelectEmployee RETURN Employee;
A command map description file like our example shown consists of instructions started with
COMMAND and terminated by semicolon ';'. The first argument after COMMAND is the name of the
command followed by the name of the document type of the input document. The name of the command
is optional. If not specified the first argument after COMMAND names the input document type.
Conflicts with keywords and names are solved by using strings instead of identifiers. The standard command handler description language has the following keywords:
| COMMAND |
| CALL |
| CONTEXT |
| RETURN |
| SKIP |
| FILTER |
| INPUT |
| OUTPUT |
| AUTHORIZE |
The following example shows the simplest possible declaration. It states that documents with the document type "Document" are forwarded to a function with the same name "Document".
COMMAND Document;
The next example adds a action name to the declaration. The implicit name of the function called is insertDocument:
COMMAND insert Document;
For declaring the function called explicitly like for example a function doInsertDocument we need to declare it with CALL <functionname>:
COMMAND insert Document CALL doInsertDocument;
The document type returned is specified with RETURN <doctype>:
COMMAND process Document RETURN Document;
or with explicit naming of a function called
COMMAND process Document CALL doProcessDocument RETURN Document;
We can define additional document meta data or overload existing document meta or inherited document meta from input or a referenced form in the output. This is done with a comma separated list of attribute assignments in curly brackets after the document type name like:
COMMAND process Document
    CALL doProcessDocument
        RETURN Document { root = 'doc', schema = 'bla.com/schema' };
If you want to skip the input document validation, either because you are dealing
with legacy software where a strict definition of a schema is not possible or
because the function called has strict typing and validates the input on its own (.NET,C++),
then you can add a declaration SKIP:
COMMAND process Document SKIP
	CALL doProcessDocument RETURN Document;
The same you can specify for the output with a SKIP
following the RETURN of the output declaration:
COMMAND process Document
	CALL doProcessDocument RETURN SKIP Document;
For being able to skip validation of output of a processed XML
we have additionally to specify the root element as document
meta data. This defintion can be part of a form declaration
(not used for validation) or it can be specified after
the RETURN SKIP and the document
type identifier in a standard command handler instruction.
The following example shows such a definition with 'list'
as root element defined. Such a command definition makes sense
for strongly typed languages like .NET or native C++ where data
validation can be delagated completely to the strongly typed
structure definition of the called function.
COMMAND process Document
	CALL doProcessDocument RETURN SKIP Document {root='list'};
If we want to return a document as standalone
(standalone="yes" in the header in case of XML) without validation,
we have to declare this with explicit document meta data as
RETURN SKIP {standalone='yes',root='root'}.
COMMAND process Document
	CALL doProcessDocument
	RETURN SKIP {standalone='yes',root='list'};
For most processing it's enough to declare the standard filters in the configuration of the command handler. But in certain cases we want to declare a filter explicitly for a command, for example to preprocess a certain document type with an XSLT filter. Explicitly declared filters always refer to a document format and documents of other formats have to be converted first or they cannot be preprocessed. The conversions mechanisms we will explain in detail later. Explicit filter declarations are done with
FILTER <name>orFILTER INPUT <inputfiltername>orFILTER OUTPUT <outputfiltername>orFILTER INPUT <inputfiltername> OUTPUT <outputfiltername>
Here is an example:
COMMAND process Document FILTER INPUT myXsltInputFilter
    CALL doProcessDocument RETURN Document;
We can tag a command to be allowed only after an authorization check. The check denies command execution with an error if the login of the user does not allow the execution of the command. The call is the same as in TDL for example. Authorization checks are triggered by the AUTHORIZE attribute with one or two arguments as follows:
AUTHORIZE <authfunc>orAUTHORIZE <authfunc> <resource>
Wolframe functions that are written in a language other than C++ are usually pure data in / data out functions. So the input document defines the input. But sometimes we need to include data from the user context into processing, for example for inserting or editing some personal data. Wolframe gives us the possibility to include data from the execution context into the input document. We do this with the directive CONTEXT followed by a list of comma ',' separated assignments in curly brackets '{' '}'. The following example adds an element 'uname' that does not exist yet in the input to the input document before execution (after validation). The value of the add 'uname' element is the user name of the user issuing the request.
COMMAND insert UserData CONTEXT { uname = UserName }
    CALL doInsertUserData;
This way we keep the processing functions as pure data functions. We are in certain cases able to inject some login dependent data in a controlled way, without exposing an API to all language bindings for being able to access everything from everywhere.
For better readability you can use optional '(' ')' brackets on the arguments of the command declaration:
COMMAND ( process Document )
    FILTER INPUT myXsltInputFilter CALL doProcessDocument
    RETURN Document;
Each command declaration has as already explained the form
COMMAND <doctype> [OPTIONS] ;orCOMMAND <action> <doctype> [OPTIONS] ;
The following table shows an overview of the elements that can be used in the [OPTIONS] part of the command:
Table 5.1. Options
| Keywords | Arguments | Description |
|---|---|---|
| CALL | Function Name | Names the function to be called for processing the request |
| RETURN | Document Type | Specifies the type of the document returned and forces validation of the output |
| RETURN SKIP | Document Type | Specifies the type of the document returned but skips validation of the output |
| SKIP | (no arguments) | Specifies the input document validation to be skipped |
| FILTER INPUT | Filter Name | Specifies that the filter <Name> should be used as input filter |
| FILTER OUTPUT | Filter Name | Specifies that the filter <Name> should be used as output filter |
| FILTER | Filter Name | Specifies that the filter <Name> should be used both as input and output filter |
| AUTHORIZE | func res | Specifies that the function <func> should be called with the resource <res> to check if the user is allowed to execute the command. |
This chapter describes how functions are linked to the logic tier. It gives an overview on the language bindings available for Wolframe.
For defining database transactions Wolframe introduces a language called TDL (Transaction Definition Language). TDL embeddes the language of the underlaying database (SQL) in a language that defines how sets of elements of input and output are addressed.
This chapter also describes how data types are defined that can be used in data definion languages (DDL) for form desciptions. Forms and their definition will be introduced in a different chapter.
After reading this chapter you should be able to write functions of the Wolframe logic tier on your own.
Be aware that you have to configure a programming language of the logic tier in Wolframe before using it. Each chapter introducing a programming language will have a section that describes how the server configuration of Wolframe has to be extended for its availability.
For the description of transactions Wolframe provides the transaction definition language (TDL) introduced here. Wolframe transactions in TDL are defined as functions in a transactional context. This means that whatever is executed in a transaction function belongs to a database transaction. The transaction commit is executed implicitely on function completion. Errors or a denied authorization or a failing audit operation lead to an abort of the database transaction.
A TDL transaction function takes a structure as input and returns a structure as output. The Wolframe database interface defines a transaction as object where the input is passed to as a structure and the output is fetched from it as a structure.
TDL is a language to describe the building of transaction input and the building of the result structure from the database output. It defines a transaction as a sequence of instructions on multiple data. An instruction is either described as a single embedded database command in the language of the underlying database or a TDL subroutine call working on multiple data.
Working on multiple data means that the instruction is executed for every item of its input set. This set can consist of the set of results of a previous instruction or a selection of the input of the transaction function. A "for each" selector defines the input set as part of the command.
Each instruction result can be declared as being part of the transaction result structure. The language has no flow control based on state variables other than input and results of previous commands and is therefore not a general purpose programming language. But because of this, the processing and termination of the program is absolutely predictable.
As possibility to convert the input data before passing it to the database, the transaction definition language defines a preprocessing section where globally defined Wolframe functions can be called for the selected input. To build an output structure that cannot be modeled with a language without control structures and recursion, TDL provides the possibility to define a function as filter for postprocessing of the result of the transaction function. This way it is for example possible to return a tree structure as TDL function result.
The TDL is - as most SQL databases - case insensitive. For clearness and better readability TDL keywords are written in uppercase here. We recommend in general to use uppercase letters for TDL keywords. It makes the source more readable.
TDL is compiled to a code for a virtual machine. Setting the log level to DATA will print the symbolic representation of the code as log output. The internals of the virtual machine will be discussed in a different chapter of this book.
Each TDL program source referenced has to be declared in the
Processor section of the configuration with
program <sourcefile>.
A TDL program consists of subroutine declarations and exported transaction function declarations. Subroutines have the same structure as transaction function blocks but without pre- and postprocessing and authorization method declarations.
A subroutine declaration starts with the Keyword SUBROUTINE
followed by the subroutine name and optionally some parameter names
in brackets ('(' ')') separated by comma.
The declared subroutine name identifies the function in the scope
of this sourcefile after this subroutine declaration.
The name is not exported and the subroutine not available for other TDL
modules. With includes described later we can reuse code.
The body of the function contains the following parts:
DATABASE <database name list>
This optional definition is restriction the definition and availability of the function to a set of databases. The databases are listed by name separated by comma (','). The names are the database id's defined in your server configuration or database names as specified in the module. If the database declaration is omitted then the transaction function is avaiable for any database. This declaration allows you to run your application with configurations using different databases but sharing a common code base.
BEGIN <...instructions...> END
The main processing block starts with
BEGINand ends withEND. It contains all the commands executed when calling this subroutine from another subroutine or a transaction function.
The following pseudocode example shows the parts of a subroutine declaration:
			SUBROUTINE <name> ( <parameter name list> )
			DATABASE <list of database names>
			BEGIN
				...<instructions>...
			END
The DATABASE declaration is optional.
A transaction function declaration starts with the Keyword TRANSACTION
followed by the name of the transaction function. This name identifies the
function globally. The body of the function contains the following parts:
AUTHORIZE ( <auth-function>, <auth-resource> )
This optional definition is dealing with authorization and access rights. If the authorization function fails, the transaction function is not executed and returns with error. The <auth-function> references a form function implementing the authorization check. The <auth-resource> is passed as parameter with name 'resource' to the function.
DATABASE <database name list>
This optional definition is restriction the definition and availability of the function to a set of databases. The databases are listed by name separated by comma (','). The names are the database id's defined in your server configuration. If the database declaration is omitted then the transaction function is avaiable for any database. This declaration allows you to run your application with configurations using different databases but sharing a common code base.
RESULT FILTER <post-filter-name>
This optional declaration defines a function applied as post filter to the transaction function. The idea is that you might want to return a structure as result that cannot be built by TDL. For example a recursive structure like a tree. The result filter function is called with the structure printed by the main processing block (BEGIN .. END) and the result of the filter function is returned to the caller instead.
PREPROC <...instructions...> ENDPROC
This optional block contains instructions on the transaction function input. The result of these preprocessing instructions are put into the input structure, so that they can be referenced in the main code definition block of the transaction. We can call any global normalization or form function in the preprocessing block to enrich or transform the input to process.
BEGIN <...instructions...> END
The main processing block starts with
BEGINand ends withEND. It contains all the database instructions needed for completing this transaction.AUDIT [CRITICAL] <funcname...> WITH BEGIN <...instructions...> END
This optional block specifies a function that is executed at the end of a transaction. The input of the function is the structure built from the output of the instructions block. If CRITICAL is specified then the transaction fails (rollback) if the audit function fails. Otherwise there is just the error of the audit function logged, but the transaction is completed (commit). You can specify several audit functions. The variables in the instructions block refer to the scope of the main processing block. So you can reference everything that is referencable after the last instruction of the main processing block.
AUDIT [CRITICAL] <funcname...> ( <...parameter...> )
If the input structure of the audit function is just one parameter list this alternative syntax for an audit function declaration can be used. You simply specify the audit function call after the AUDIT or optionally after the CRITICAL keyword.
The following pseudo code snippet shows the explained building blocks in transaction functions together:
			TRANSACTION <name>
			AUTHORIZE ( <auth-function>, <auth-resource> )
			DATABASE <list of database names>
			RESULT FILTER <post-filter-name>
			PREPROC
				...<preprocessing instructions>...
			ENDPROC
			BEGIN
				...<instructions>...
			END
			AUDIT CRITICAL <funcname> ( ...<parameter>... )
The lines with AUTHORIZE,DATABASE and RESULT FILTER are optional. So is the preprocessing block PREPROC..ENDPROC. A simpler transaction function looks like the following:
			TRANSACTION <name>
			BEGIN
				...<instructions>...
			END
Main processing instructions defined in the main execution block of a subroutine or transaction function consist of three parts in the following order terminated by a semicolon ';' (the order of the INTO and FOREACH expression can be switched):
INTO <result substructure name>
This optional directive specifies if and where the results of the database commands should be put into as part of the function output. In subroutines this substructure is relative to the current substructure addressed in the callers context. For example a subroutine with an "INTO myres" directive in a block of an "INTO output" directive will write its result into a substructure with path "output/myres".
FOREACH <selector>
This optional directive defines the set of elements on which the instruction is executed one by one. Specifying a set of two elements will cause the function to be called twice. An empty set as selection will cause the instruction to be ignored. Without quantifier the database command or subroutine call of the instruction will be always be executed once.
The argument of the FOREACH expression is either a reference to the result of a previous instruction or a path selecting a set of input elements.
Results of previous instructions are referenced either with the keyword RESULT referring to the result set of the previous command or with a variable naming a result set declared with this name before.
Input elements are selected by path relative to the path currently selected, starting from the input root element when entering a transaction function. The current path selected and the base element of any relative path calculated in this scope changes when a subroutine is called in a FOREACH selection context. For example calling a subroutine in a 'FOREACH person' context will cause relative paths in this subroutine to be sub elements of 'person'.
DO <command>
Commands in an instruction are either embedded database commands or subroutine calls. Command arguments are either constants or relative paths from the selector path in the FOREACH selection or referring to elements in the result of a previous command. If an argument is a relative path from the selector context, its reference has to be unique in the context of the element selected by the selector. If an argument references a previous command result it must either be unique or dependent an the FOREACH argument. Results that are sets with more than one element can only be referenced if they are bound to the FOREACH quantifier.
The following example illustrate how the FOREACH,INTO,DO expressions in the main processing block work together:
TRANSACTION insertCustomerAddresses
BEGIN
    DO SELECT id FROM Customer
        WHERE name = $(customer/name);
    FOREACH /customer/address
        DO INSERT INTO Address (id,address)
        VALUES ($RESULT.id, $(address));
END
Preprocessing instructions defined in the PREPROC execution block of a transaction function consist similar to the instructions in the main execution block of three parts in the following order terminated by a semicolon ';' (the order of the INTO and FOREACH expression can be switched and has no meaning, e.g. FOREACH..INTO == INTO..FOREACH):
INTO <result substructure name>
This optional directive specifies if and where the results of the preprocessing commands should be put into as part of the input to be processed by the main processing instructions. The relative paths of the destination structure are calculated relative to a FOREACH selection element.
FOREACH <selector>
This optional directive defines the set of elements on which the instruction is executed one by one. The preprocessing command is executed once for each element in the selected set and it will not be executed at all if the selected set is empty.
DO <command>
Commands in an instruction are function calls to globally defined form functions or normalization functions. Command arguments are constants or relative paths from the selector path in the FOREACH selection. They are uniquely referencing elements in the context of a selected element.
The following example illustrate how the "FOREACH, INTO, DO" expressions in the main processing block work together:
TRANSACTION insertPersonTerms
PREPROC
    FOREACH //address/* INTO normalized
        DO normalizeStructureElements(.);
    FOREACH //id INTO normalized
        DO normalizeNumber(.);
ENDPROC
BEGIN
    DO UNIQUE SELECT id FROM Person
        WHERE name = $(person/name);
    FOREACH //normalized DO
        INSERT INTO SearchTerm (id, value)
        VALUES ($RESULT.id, $(.));
END
An element of the input or a set of input elements can be selected by a path. A path is a sequence of one of the following elements separated by slashes:
Identifier
An identifier uniquely selects a sub element of the current position in the tree.
*
Anp asterisk selects any sub element of the current position in the tree.
..
Two dots in a row select the parent element of the current position in the tree.
.
One dots selects the current element in the tree. This operator can also be useful as part of a path to force the expression to be interpreted as path if it could also be interpreted as a keyword of the TDL language (for example
./RESULT).
A slash at the beginning of a path selects the root element of the transaction function input tree. Two subsequent slashes express that the following node is (transitively) any descendant of the current node in the tree.
Paths can appear as argument of a FOREACH selector where they specify the set of elements on which the attached command is executed on. Or they can appear as reference to an argument in a command expression where they specify uniquely one element that is passed as argument to the command when it is executed.
When used in embedded database statements, selector paths are referenced
with $(<path expression>). When used as database
function or subroutine call arguments path expressions can be used in
plain without '$' and '(' ')' markers. These markers are just used to
identify substitution entities.
The following list shows different ways of addressing an element by path:
/
Root element
/organization
Root element with name "organization"
/organization/address/city
Element "city" of root "organization" descendant "address"
.//id
Any descendant element with name "id" of the current element
//person/id
Child with name "id" of any descendant "person" of the root element
//id
Any descendant element with name "id" of the root element
/address/*
Any direct descendant of the root element "address"
.
Currently selected element
This example shows the usage of path expression in the preprocessing and the main processing part of a transaction function:
TRANSACTION selectPerson
PREPROC
    FOREACH /person/name
        INTO normalized DO normalizeName( . );
    FOREACH /person
        INTO citycode DO getCityCode( city );
ENDPROC
BEGIN
    FOREACH person
        DO INSERT INTO Person (Name,NormalizedName,CityCode)
            VALUES ($(name),$(name/normalized),$(citycode));
END
Database results of the previous instruction are referenced with a '$RESULT.' followed by the column identifier or column number. Column numbers start always from 1, independent from the database! So be aware that even if the database counts column from 0 you have to use 1 for the first column.
As already explained before, database result sets of cardinality
bigger than one cannot be addressed if not bound to a FOREACH
selection. In statements potentially addressing more than one
result element you have to add a FOREACH RESULT quantifier.
For addressing results of instructions preceding the previous instruction,
you have to name them (see next section). The name of the result can then
be used as FOREACH argument to select the elements of a set to be
used as base for the command arguments of the instruction. Without
binding instruction commands with a FOREACH quantifier the named
results of an instruction can be referenced as
$<name>.<columnref>,
for example as $person.id for the column with name 'id' of the
result named as 'person'.
The 'RESULT.' prefix in references to the previous instruction result is a default and can be omitted in instructions that are not explicitly bound to any other result than the last one. So the following two instructions are equivalent:
			DO SELECT name FROM Company
			    WHERE id = $RESULT.id
			DO SELECT name FROM Company
			    WHERE id = $id
and so are the following two instructions:
			FOREACH RESULT
			    DO SELECT name FROM Company
			        WHERE id = $RESULT.id
			FOREACH RESULT
			    DO SELECT name FROM Company
			        WHERE id = $id
The result name prefix of any named result can also be omitted if the instruction is bound to a FOREACH selector naming the result. So the following two statements in the context of an existing database result named "ATTRIBUTES" are equivalent:
			FOREACH ATTRIBUTES
			    DO SELECT name FROM Company
			        WHERE id = $ATTRIBUTES.id
			FOREACH ATTRIBUTES
			    DO SELECT name FROM Company
			        WHERE id = $id
Database results can be hold and made referenceable by name
with the declaration KEEP AS <resultname>
following immediately the instruction with the result to be referenced.
The identifier <resultname> references the
result in a variable reference or a FOREACH selector expression.
Subroutine Parameters are addressed like results but with
the prefix PARAM. instead of RESULT.
or a named result prefix. "PARAM." is reserved for parameters.
The first instruction without FOREACH quantifier can reference
the parameters without prefix by name.
SUBROUTINE selectDevice( id)
BEGIN
    INTO device
        DO SELECT name FROM DevIdMap
            WHERE id = $PARAM.id;
END

TRANSACTION selectDevices
BEGIN
    DO selectDevice( id );
END
Database commands returning results can have constraints to catch certain errors that would not be recognized at all or too late otherwise. For example a transaction having a result of a previous command as argument would not be executed if the result of the previous command is empty. Nevertheless the overall transaction would succeed because no database error occurring during execution of the commands defined for the transaction.
Constraints on database results are expressed as keywords following the DO keyword of an instruction in the main processing section. If a constraint on database results is violated the whole transaction fails and a rollback occurrs.
The following list explains the result constraints available:
NONEMPTY
Declares that the database result for each element of the input must not be empty.
UNIQUE
Declares that the database result for each element of the input must be unique, if it exists. Result sets with more than one element are refused but empty sets are accepted. If you want to declare each result to have to exist, you have to put the double constraint "UNIQUE NONEMPTY" or "NONEMPTY UNIQUE".
This example illustrates how to add result constraint for database commands returning results:
TRANSACTION selectCustomerAddress
BEGIN
    DO NONEMPTY UNIQUE SELECT id FROM Customer
        WHERE name = $(customer/name);
    INTO address
        DO NONEMPTY SELECT street,city,country
            FROM Address WHERE id = $id;
END
Sometimes internal error messages are confusing and are not helpful
to the user that does not have a deeper knowledge about the database
internals. For a set of error types it is possible to add a message
to be shown to the user if an error of a certain class happens.
The instruction ON ERROR <errorclass> HINT <message>;
following a database instruction catches the errors of class <errorclass>
and add the string <message> to the error message show to the user.
We can have many subsequent ON ERROR definitions in a row if the error classes to be caught are various.
The following example shows the usage HINTs in error cases. It catches errors that are constraint violations (error class CONSTRAINT) and extends the error message with a hint that will be shown to the client as error message:
TRANSACTION insertCustomer
BEGIN
    DO INSERT INTO Customer (name) VALUES ($(name));
    ON ERROR CONSTRAINT
        HINT "Customers must have a unique name.";
END
On the client side the following message will be shown:
			unique constaint violation in transaction 'insertCustomer'
			-- Customers must have a unique name.
We already learned how to define substructures of the
transaction function result with the RESULT INTO
directive of a TRANSACTION.
But we can also define a scope in the result structure
for sub blocks. A sub-block in the result is declared with
				INTO <resulttag>
				BEGIN
					...<instruction list>...
				END
All the results of the instruction list that get into the final result will be attached to the substructure with name <resulttag>. The nesting of result blocks can be arbitrary and the path of the elements in the result follows the scope of the sub-blocks.
The result of a transaction consists normally of database command
results that are mapped into the result with the attached INTO directive.
For printing variable values or constant values you can in certain
SQL databases use a select constant statement without specifying a table.
Unfortunately select of constants might not be supported in your
database of choice. Besides that explicit printing seems to be much
more readable. The statement INTO <resulttag> PRINT <value>;
prints a value that can be a constant, variable or an input or result reference
into the substructure named <resulttag>. The following artificial
example illustrates this.
TRANSACTION doPrintX
BEGIN
  INTO person
  BEGIN
    INTO name PRINT 'jussi';
    INTO id PRINT '1';
  END
END
TDL allows the support of different transaction databases with one code base.
For example one for testing and demonstration and one for the productive system.
We can tag transactions,subroutines or whole TDL sources as beeing valid for one or a list of databases
with the command DATABASE followed by a comma separated list of database names as declared in
the configuration. The following example declares the transaction function 'getCustomer' to be valid only for
the databases DB1 and DBtest.
TRANSACTION getCustomer
DATABASE DB1,DBtest
BEGIN
    INTO customer
        DO SELECT * FROM CustomerData
            WHERE ID=$(id);
END
The following example does the same but declares the valid databases for the whole TDL file. In this case the database declaration has to appear as first declaration in the file.
DATABASE DB1,DBtest

TRANSACTION getCustomer
BEGIN
    INTO customer DO SELECT *
        FROM CustomerData WHERE ID=$(id);
END
To reuse code with different context, for example for doing the same procedure on different tables, subroutine templates can be defined in TDL. Subroutine templates become useful when we want to make items instantiable that are not allowed to be dependent on variable arguments. Most SQL implementations for example forbid tables to be dependent on variable arguments. To reuse code on different tables you can define subroutine templates with the involved table names as template argument. The following example defines a transaction using the template subroutine insertIntoTree on a table passed as template argument. The subroutine template arguments are substituting the identifiers in embedded database statements by the passed identifier. Only whole identifiers and not substrings of identifiers and no string contents are substituted.
TEMPLATE <TreeTable>
SUBROUTINE insertIntoTree( parentID)
BEGIN
    DO NONEMPTY UNIQUE SELECT rgt FROM TreeTable
        WHERE ID = $PARAM.parentID;
    DO UPDATE TreeTable
        SET rgt = rgt + 2 WHERE rgt >= $1;
    DO UPDATE TreeTable
        SET lft = lft + 2 WHERE lft > $1;
    DO INSERT INTO TreeTable (parentID, lft, rgt)
        VALUES ( $PARAM.parentID, $1, $1+1);
    DO NONEMPTY UNIQUE SELECT ID AS "ID" from TreeTable
        WHERE lft = $1;
END

TRANSACTION addTag
BEGIN
    DO insertIntoTree<TagTable>( $(parentID) )
    DO UPDATE TagTable
        SET name=$(name),description=$(description)
            WHERE ID=$RESULT.id;
END
TDL has the possibility to include files for reusing subroutines
or subroutine templates in different modules.
The keyword INCLUDE followed by the name of the relative path of the TDL file without the extension .tdl includes the declarations of the included file.
The declarations in the included file are treated as they would have been
made in the including file instead.
The following example swhows the use of include.
We assume that the subroutine template insertIntoTree
of the example before is defined in a separate include file
treeOperations.tdl located in the same folder as the
TDL program.
INCLUDE treeOperations

TRANSACTION addTag
BEGIN
    DO insertIntoTree<TagTable>( $(parentID) )
    DO UPDATE TagTable
        SET name=$(name),description=$(description)
            WHERE ID=$RESULT.id;
END
TDL defines hooks to add function calls for auditing transactions. An audit call is a form function call with a structure build from transaction input and some database results. An auditing function call can be marked as critical, so that the final commit is dependent not only on the transaction success but also on the success of the auditing function call. The following two examples show equivalent calls of audit. One with the function call syntax for calls with a flat structure (only atomic parameters) as parameter and one with the parameter build from a result structure of a BEGIN..END block executed. The later one can be used for audit function calls with a more complex parameter structure.
TRANSACTION doInsertUser
BEGIN
	DO INSERT INTO Users (name) values ($(name));
	DO SELECT id FROM Users WHERE name = $(name);
END
AUDIT CRITICAL auditUserInsert( $RESULT.id, $(name) )
You can write functions for the logic tier of Wolframe in languages based on .NET (http://www.microsoft.com/net) like for example C# and VB.NET. Because .NET based libraries can only be called by Wolframe as a compiled and not as an interpreted language, you have to build a .NET assembly out of a group of function implementations before using it. There are further restrictions on a .NET implementation. We will discuss all of them, so that you should be able to write and configure .NET assemblies for using in Wolframe on your own after reading this chapter.
For enabling .NET you have to declare the loading of the module 'mod_command_dotnet' in the main section of the server configuration file.
Module mod_command_dotnet
For the configuration of the .NET assemblies to be loaded, see section 'Configure .NET Modules'.
In .NET the building blocks for functions called by Wolframe are classes and method calls. The way of defining callable items for Wolframe is restricted either due to the current state of the Wolframe COM/.NET interoperability implementation or due to general or version dependent restrictions of .NET objects exposed via COM/.NET interop. We list here the restrictions:
The methods exported as functions for Wolframe must not be defined in a nested class. They should be defined in a top level class without namespace. This is a restriction imposed by the current development state of Wolframe.
The class must be derived from an interface with all methods exported declared.
The methods must not be static because COM/.NET interop, as far as we know, cannot cope with static method calls. Even if the methods nature is static, they have to be defined as ordinary method calls.
Functions callable from Wolframe take an arbitrary
number of arguments as input and return a structure (struct) as
output. The named input parameters referencing atomic elements or complex
structures are forming the input structure of the Wolframe
function. A Wolframe function called with a
structure containing the elements "A" and "B" is implemented in
.NET as function taking two arguments
with the name "A" and "B". Both "A" and "B" can represent either atomic elements
or arbitrary complex structures. .NET functions
that need to call global Wolframe functions,
for example to perform database transactions, need to declare
a ProcProvider interface from Wolframe
namespace as additional parameter. We will describe the ProcProvider
interface in a separate section of this chapter.
The following simple example without provider context is declared
without marshalling and introspection tags. It can therefore not be called
by Wolframe. We explain later how to make it callable.
The example just illustrates the structure of the exported object with
its interface (example C#):
using System;
using System.Runtime.InteropServices;

public struct Address
{
    public string street;
    public string country;
};

public interface FunctionInterface
{
    Address GetAddress( string street, string country);
}

public class Functions : FunctionInterface
{
    public Address GetAddress( string street, string country)
    {
        Address rt = new Address();
        rt.street = street;
        rt.country = country;
        return rt;
    }
}
Wolframe itself is not a .NET application. Therefore it has to call .NET functions via COM/.NET interop interface of a hosted CLR (Common Language Runtime). To make functions written in .NET callable by Wolframe, the following steps have to be performed:
First the asseblies with the functions exported to Wolframe have to be build COM visible.
To make the .NET functions called from Wolframe COM visible, you have to tick
"Properties/Assembly Information" the switch "Make assembly COM visible". Furthermore
every object and method that is part of the exported API (also objects used as parameters)
has to be tagged in the source as COM visible with [ComVisible(true)].
Each object that is part of the exported API has to be tagged with a global unique
identifier (Guid) in order to be adressable. Modules with .NET functions will have to be globally
registered and the objects need to be identified by the Guid because that's the only way
to make the record info structure visible for Wolframe. The record info structure is
needed to serialize/deserialize .NET objects from another interpreter context that
is not registered for .NET. There are many ways to create a Guid and
tag an object like this: [Guid("390E047F-36FD-4F23-8CE8-3A4C24B33AD3")].
For marshalling function calls correctly, Wolframe needs tags for every parameter and member of a sub structure of a parameter of methods exported as functions. The following table lists the supported types and their marshalling tags:
Table 5.2. Marshalling Tags
| .NET Type | Marshalling Tag |
|---|---|
| I2 | [MarshalAs(UnmanagedType.I2)] |
| I4 | [MarshalAs(UnmanagedType.I4)] |
| I8 | [MarshalAs(UnmanagedType.I8)] |
| UI2 | [MarshalAs(UnmanagedType.UI2)] |
| UI4 | [MarshalAs(UnmanagedType.UI4)] |
| UI8 | [MarshalAs(UnmanagedType.UI8)] |
| R4 | [MarshalAs(UnmanagedType.R4)] |
| R8 | [MarshalAs(UnmanagedType.R8)] |
| BOOL | [MarshalAs(UnmanagedType.BOOL)] |
| string | [MarshalAs(UnmanagedType.BStr)] |
| RECORD | no tag needed |
| array of structures | [MarshalAs(UnmanagedType.SafeArray, SafeArraySubType = VarEnum.VT_RECORD)] |
| array of strings | [MarshalAs(UnmanagedType.SafeArray, SafeArraySubType = VarEnum.VT_BSTR)] |
| array of XX (XX=I2,I4,I8,..) | [MarshalAs(UnmanagedType.SafeArray, SafeArraySubType = VarEnum.VT_XX)] |
Decimal floating point and numeric types (DECIMAL) are not yet supported, but will soon be available.
The following C# module definition repeats the example introduced above with the correct tagging for COM visibility and introspection:
using System;
using System.Runtime.InteropServices;

[ComVisible(true)]
[Guid("390E047F-36FD-4F23-8CE8-3A4C24B33AD3")]
public struct Address
{
    [MarshalAs(UnmanagedType.BStr)] public string street;
    [MarshalAs(UnmanagedType.BStr)] public string country;
};

[ComVisible(true)]
public interface FunctionInterface
{
    [ComVisible(true)]  Address GetAddress( [MarshalAs(UnmanagedType.BStr)] string street, [MarshalAs(UnmanagedType.BStr)] string country);
}

[ComVisible(true)]
[ClassInterface(ClassInterfaceType.None)]
public class Functions : FunctionInterface
{
    public Address GetAddress([MarshalAs(UnmanagedType.BStr)] string street, [MarshalAs(UnmanagedType.BStr)] string country)
    {
        Address rt = new Address();
        rt.street = street;
        rt.country = country;
        return rt;
    }
}
For making the API introspectable by Wolframe, we have to create a TLB
(Type Library) file from the assembly (DLL) after build. The type library has
to be recreated every time the module interface (API) changes. The type library is
created with the program tlbexp. All created type library (.tlb) file
that will be loaded with the same runtime environment have to be copied into
the same directory. They will be referenced for introspection in the
configuration. The configuration of .NET will be explained later.
The type library created with tlbexp has also to be registered.
For this you call the program regtlibv12 with your type library file
(.tlb file) as argument. The type libary fegistration has to be repeated when
the the module interface (API) changes.
Wolframe does not accept local assemblies. In order to be addressable over
the type library interface assemblies need to be put into the global assembly cache (GAC).
Unfortunately this has to be repeated every time the assembly binary changes.
There is no way around. For the registration in the GAC we have to call the program
gacutil /if <assemblypath> with the assembly path <assemblypath>
as argument. The command gacutil has to be called from
administrator command line. Before calling gacutil, assemblies
have to be strongly signed. We refer here to the MSDN documentation for how
to sign an application.
We have to register the types declared in the assembly
to enable Wolframe to create these types.
An example could be a provider function returning a structure that is called
from a Wolframe .NET function. The structure
returned here has to be build in an unmanaged context. In order to be valid
in the managed context, the type has to be registered.
For the registration of the types in an assembly we have to call the program
regasm <assemblypath> with the assembly path <assemblypath>
as argument. The command regasm has to be called from
administrator command line.
Wolframe functions in .NET calling globally defined Wolframe functions need to declare the processor provider interface as an additional parameter. The processor provider interface is defined as follows (example C#):
namespace Wolframe
{
    public interface ProcProvider
    {
        object call(
        [In] string funcname,
        [In] object argument,
        [In] Guid resulttype);
    }
}
To use it we have to include the reference to the assembly WolframeProcessorProvider.DLL.
The interface defined there has a method call taking 3 arguments: The name of the
function to call, the object to pass as argument and the Guid of the object type
to return. The returned object will be created with help of the registered Guid
and can be casted to the type with this Guid.
The following example shows the usage of a Wolframe.ProcProvider call.
The method GetUserObject is declared as Wolframe function requiring the processor
provider context as additional argument and taking one object of type User as
argument named usr.
The example function implementation redirects the call to the global Wolframe function
named GetAddress returning an object of type Address
(example C#):
public Address GetUserAddress(
            Wolframe.ProcProvider provider,
            User usr
) {
    Address rt = (Address)provider.call(
                     "GetAddress", usr,
                     typeof(Address).GUID);
    return rt;
}
The objects involved in this example need no more tagging because the provider context and also
structures (struct) need no additional mashalling tags.
.NET modules are grouped together in a configuration block that specifies the configuration
of the Microsoft Common Language Runtime (CLR) used for .NET interop calls. The configuration
block has the header runtimeEnv dotNET and configures the version of the
runtime loaded (clrversion) and the path where the typelibraries (.tlb) files can be
found (typelibpath).
With the assembly definitions you declare the registered assemblies to load.
RuntimeEnv dotNet
{
    clrversion   "v4.0.30319"
    typelibpath  programs/typelibrary
    assembly     "Functions, Version=1.0.0.30, Culture=neutral, PublicKeyToken=1c1d731dc6e1cbe1, processorArchitecture=MSIL"
    assembly     "Utilities, Version=1.0.0.27, Culture=neutral, PublicKeyToken=1c1f723cc51212ef, processorArchitecture=MSIL"
}
Table 5.3. Attributes of assembly declarations
| Name | Description |
|---|---|
| <no identifier> | The first element of the assembly definition does not have an attribute identifier. The value is the name of the assembly (and also of the type library) |
| Version | 4 element (Major.Minor.Build.Revision) version number of the assembly. This value is defined in the assembly info file of the assembly project. |
| Culture | For Wolframe applications until now always "neutral". Functionality is in Wolframe not yet culture dependent on the server side. |
| PublicKeyToken | Public key token values for signed assemblies. See next section how to set it. |
| processorArchitecture | Meaning not explained here. Has on ordinary Windows .NET plattforms usually the value "MSIL". Read the MSDN documentation to dig deeper. |
We already found out that Wolframe .NET modules have to be strongly signed. Each strongly signed assembly has such a public key token that has to be used as attribute when referencing the assembly.
We can get the PublicKeyToken of the assembly
by calling sn -T <assemblypath> from the command line (cmd)
with <assemblypath> as the path of the assembly. The printed value is the
public key to insert as attribute value of PublicKeyToken in the
Wolframe configuration for each .NET assembly.
Languages of .NET called via the CLR are strongly typed languages. This means that
the input of a function and the output is already validated to be of a strictly
defined structure. So a validation by passing the input through a form
might not be needed anymore. Validation with .NET
data structures is weaker than for example XML validation with forms defined in
a schema language. But only if distinguishing XML attributes from content elements
is an issue.
See in the documentation of the standard command handler how validation can be
skipped with the attribute SKIP.
You can write functions for the logic tier of Wolframe in the Python programming language (http://www.python.org).
The implementation of Python calls is not yet available. But Wolframe will provide Python functions soon.
You can write functions for the logic tier of Wolframe with Lua. Lua is a scripting language designed, implemented, and maintained at PUC-Rio in Brazil by Roberto Ierusalimschy, Waldemar Celes and Luiz Henrique de Figueiredo (see http://www.lua.org/authors.html). A description of Lua is not provided here. For an introduction into programming with Lua see http://www.lua.org. The official manual which is also available as book is very good. Wolframe introduces some Lua interfaces to access input and output and to execute functions.
For enabling Lua you have to declare the loading of the module 'mod_command_lua' in the main section of the server configuration file.
Module mod_command_lua
Each Lua script referenced has to be declared in the Processor
section of the configuration with program <sourcefile>.
The script is recognized as Lua script by the file extension ".lua".
Files without this extension cannot be loaded as Lua scripts.
For Lua we do not have to declare anything in addition to the
Lua script. If you configure a Lua
script as program, all global functions declared in this script are declared as global form
functions. For avoiding name conflicts you should declare private functions
of the script as local.
Wolframe lets you access objects of the global context through
a library called provider offering the following functions:
Table 5.4. Method
| Name | Parameter | Returns |
|---|---|---|
| form | Name of the form | An instance of the form |
| type | Type name and initializer list | A constructor function to create a value instance of this type |
| formfunction | Name of the function | Form function defined in a Wolframe program or module |
| document | Content string of the document to process | Returns an object of type "document" that allows the processing of the contents passed as argument. See description of type "document" |
| authorize | 1) authorization function 2) (optional) authorization resource | Calls the specified authorization function and returns true on success (authorized) and false on failure (authorization denied or error) |
Wolframe lets us extend the type system consisting
of Lua basic data types with our own. We can create atomic data types
defined in a module or in a DDL datatype definition program (.wnmp file).
For this you call the type method of the provider with
the type name as first argument plus the type initializer argument
list as additional parameters.
The function returns a constructor function that can be called
with the initialization value as argument to get a
value instance of this type. The name of the type can refer to
one of the following:
Table 5.5. List of Atomic Data Types
| Class | Initializer Arguments | Description |
|---|---|---|
| Custom data type | Custom Type Parameters | A custom data type defined in a module with arithmetic operators and methods |
| Normalization function | Dimension parameters | A type defined as normalization function in a module |
| DDL data type | (no arguments) | A normalizer defined as sequence of normalization functions in a .wnmp source file |
| Data type 'bignumber' | (no arguments) | Arbitrary precision number type |
| Data fype 'datetime' | (no arguments) | Data type representing date and time down to a granularity of microseconds |
The data type 'datetime' is used as interface for date time values.
Table 5.6. Methods of 'datetime'
| Method Name | Arguments | Description |
|---|---|---|
| <constructor> | year, month, day, hour, minute, second ,millisecond, microsecond | Creates a date and time value with a granularity down to microseconds |
| <constructor> | year, month, day, hour, minute, second ,millisecond | Creates a date and time value with a granularity down to milliseconds |
| <constructor> | year, month, day, hour, minute, second | Creates a date and time value |
| <constructor> | year, month, day | Creates a date value |
| year | (no arguments) | Return the value of the year |
| month | (no arguments) | Return the value of the month (1..12) |
| day | (no arguments) | Return the value of the day in the month (1..31) |
| hour | (no arguments) | Return the value of the hour in the day (0..23) |
| minute | (no arguments) | Return the value of the minute (0..59) |
| second | (no arguments) | Return the value of the second (0..63 : 59 + leap seconds) |
| millisecond | (no arguments) | Return the value of the millisecond (0..1023) |
| microsecond | (no arguments) | Return the value of the microsecond (0..1023) |
| __tostring | (no arguments) | Return the date as string in the format YYYYMMDD, YYYYMMDDhhmmss, YYYYMMDDhhmmssll or YYYYMMDDhhmmssllcc, depending on constructor used to create the date and time value. |
The data type 'bignumber' is used to reference fixed point BCD numbers with a precision of 32767 digits between -1E32767 and +1E32767.
Table 5.7. Methods of 'datetime'
| Method name | Arguments | Description |
|---|---|---|
| <constructor> | number value as string | Creates a bignumber from its string representation |
| <constructor> | number value | Creates a bignumber from a lua number value (double precision floating point number) |
| precision | (no arguments) | Return the number of significant digits in the number |
| scale | (no arguments) | Return the number of fractional digits (may be negative, may be bigger than precision) |
| digits | (no arguments) | Return the significant digits in the number |
| tonumber | (no arguments) | Return the number as lua number value (double precision floating point number) with possible lost of accurancy |
| __tostring | (no arguments) | Return the big number value as string (not normalized). |
Lua provides an interface to the iterators internally used to couple objects and functions. They are accessible as iterator function closure in Lua. The look similar to Lua iterators but are not. You should not mix them with the standard Lua iterators though the semantic is similar. Filter interface iterators do not return nodes of the tree as subtree objects but only the node data in the order of a pre-order traversal. You can recursively iterate on the tree and build the object during traversal if you want. The returned elements of the Filter interface iterators are tuples with the following meaning:
Table 5.8. Filter interface iterator elements
| Tuple First Element | Tuple Second Element | Description |
|---|---|---|
| NIL/false | string/number | Open (tag is second element) |
| NIL/false | NIL/false | Close |
| Any non NIL/false | string/number | Attribute assignment (value is first, tag is second element) |
| string/number | NIL/false | Content value (value is first element) |
Wolframe lets you access filter interface
iterators through a library called iterator
offering the following functions:
Table 5.9. Method
| Name | Parameter | Returns |
|---|---|---|
| scope | serialization iterator (*) | An iterator restricted on the subnodes of the last visited node (**) |
(*) See section "serialization iterator"
(**) If iterator.scope is called, all elements of the returned iterator has to be visited in order to continue iteration with the origin iterator on which iterator.scope was called.
Besides the provider library Wolframe defines the following objects global in the script execution context:
| Name | Description |
| logger | object with methods for logging or debugging |
The provider function provider.form( ) with the name of the form as string as
parameter returns an empty instance of a form. It takes the name of
the form as string argument. If you for example have a form configured
called "employee" and you want to create an employee object from
a Lua table, you call
bcf = provider.form( "employee" )
bcf:fill( {surname='Hans', name='Muster', company='Wolframe'} )
The first line creates the data form object. The second line fills the data into the data form object.
The form method fill takes a second optional parameter. Passing "strict" as
second parameter enforces a strict validation of the input against the form, meaning that
attributes are checked to be attributes (when using XML serialization) and non optional elements are checked to be initialized.
Passing "complete" as second parameter forces non optional elements to be checked for initialization
but does not distinguish between attributes and content values. "relaxed" is the default and
checks only the existence of filled-in values in the form.
Given the following validation form in simple form DDL syntax (see chapter "Forms"):
FORM Employee
	-root employee
{
    ID !@int                  ; Internal customer id (mandatory)
    name !string              ; Name of the customer (mandatory)
    company string            ; Company he is working for (optional)
}
the call of fill in the following piece of code will raise an error because some elements
of the form ('ID' and 'name') are missing in the input:
bc = provider.form( "employee" ):fill( {company='Wolframe'}, "strict" )
To access the data in a form there are two form methods available.
get() returns a filter interface iterator on the form data.
There is also a method value() that returns the form data as
Lua data structure
(a Lua table or atomic value).
For calling transactions or built-in functions loaded as modules the Lua layer defines the
concept of functions. The provider function provider.formfunction with the name of the function
as argument returns a Lua function. This function takes a table or a filter interface iterator as argument
and returns a data form structure. The data in the returned form data structure can be
accessed with get() that returns a filter interface iterator on the content
and value() that returns a Lua table or
atomic value.
If you for example have a transaction called "insertEmployee" defined in a transaction description program file declared in the configuration called "insertEmployee" and you want to call it with the 'employee' object defined above as input, you do
f = provider.formfunction( "insertEmployee")
res = f ( {surname='Hans', name='Muster', company='Wolframe'} )
t = res:value()
output:print( t[ "id" ] )
The first line creates the function called "insertEmployee" as Lua function. The second calls the transaction, the third creates a Lua table out of the result and the fourth selects and prints the "id" element in the table.
This is a list of all objects and functions declared by Wolframe:
Table 5.10. Data forms declared by DDL
| Method Name | Arguments | Returns | Description |
|---|---|---|---|
| get | filter interface iterator (*) | Returns a filter interface iterator on the form elements | |
| value | Lua table | Returns the contents of the data form as Lua table or atomic value | |
| __tostring | string | String representation of form for debugging | |
| name | string | Returns the global name of the form. | |
| fill | Lua table or filter interface iterator (*), optional validation mode (**) | the filled form (for concatenation) | Validates input and fills the input data into the form. |
(*) See section "filter interface iterator"
(**) "strict" (full validation), "complete" (only check for all non optional elements initialization) or "relaxed" (no validation except matching of input to elements)
Table 5.11. Data forms returned by functions
| Method Name | Returns | Description |
|---|---|---|
| get | filter interface iterator (*) | Returns a filter interface iterator on the form elements |
| value | Lua table or atomic value | Returns the contents of the data form as Lua table or atomic value |
| __tostring | string | String representation of form for debugging |
(*) See section "filter interface iterator"
Table 5.12. Document
| Method Name | Arguments | Description |
|---|---|---|
| docformat | - | Returns the format of the document {'XML','JSON',etc..} |
| as | filter and/or document type table | Attaches a filter to the document to be used for processing |
| doctype | - | Returns the document type of the content. For retrieving the document type you have first to define a filter. |
| metadata | - | Returns the meta data structure of the content. For retrieving the document meta data you have first to define a filter. |
| value | - | Returns the contents of the document as Lua table or atomic value. The method 'table' does the same but is considered to be deprecated. |
| table | - | Deprecated. Does return the same as the method 'value' |
| form | - | Returns the contents of the document as filled form instace |
| get | - | Returns a filter interface iterator (*) on the form elements |
(*) See section "filter interface iterator"
Table 5.13. Logger functions
| Method Name | Arguments | Description |
|---|---|---|
| logger.printc | arbitrary list of arguments | Print arguments to standard console output |
| logger.print | loglevel (string) plus arbitrary list of arguments | log argument list with defined log level |
Table 5.14. Global functions
| Function Name | Arguments | Description |
|---|---|---|
| provider.form | name of form (string) | Returns an empty data form object of the given type |
| provider.formfunction | name of function (string) | Returns a lua function to execute the Wolframe function specified by name |
| provider.type | name of data type (string) | Returns a constructor function for the data type given by name. The name specifies either a custom data type or a normalization function as used in forms or one of the additional userdata types 'datetime' or 'bignumber'. |
| provider.document | Content string of the document to process | Returns an object of type "document" that allows the processing of the contents passed as argument. See description of type "document" |
(*) See section "filter interface iterator "
(**) The filter interface iterator of a defined scope must be consumed completely before consuming anything of the parent iterator. Otherwise it may lead to unexpected results because they share some part of the iterator state.
You can write functions for the logic tier of Wolframe with C++. Because native C++ is by nature a compiled and not an interpreted language, you have to build a module out of your function implementation.
For native C++ you need a C++ build system with compiler and linker or an integrated development environment for C++.
Form functions declared in C++ have two arguments. The output structure to fill
is passed by reference as first and the input structure passed is by value.
The input structure copy should not be modified by the callee.
This means in C++ that it is passed as const
reference.
The function returns an int that is 0 on success
and any other value indicating an error code. The function may also throw a
runtime error exception in case of an error.
The following example shows a function declaration. The function declaration
is not complete because the input output structures need to be declared with some
additional attributes needed for introspection. We will explain this in the following
section.
The function takes a structure as input and writes the result into an output structure. In this example input and output type are the same, but this is not required. It's just the same here for simplicity.
The elements of the function declaration are put into a structure with four elements.
The typedef for the InputType and OutputType structures is required,
because the input and output types should be recogniceable without complicated
type introspection templates. (Template based introspection might cause spurious
and hard to understand error messages when building the module).
The function name returns the name of the function that
identifies the function in the Wolframe global scope.
The exec function declared as static function with this signature refers to
the function implementation.
// ... PUT THE INCLUDES FOR THE "Customer" STRUCTURE DECLARATION HERE !

struct ProcessCustomer
{
    typedef Customer InputType;
    typedef Customer OutputType;
    static const char* name() {return "process_customer";}

    static int exec( const proc::ProcessorProvider* provider, InputType& res, const OutputType& param);
};
For defining input and output parameter structures in C++ you have to define the
structure and its serialization description. The serialization description is a static
function getStructDescription without arguments returning a const structure that describes
what element names to bind to which structure elements.
The following example shows a form function parameter structure defined in C++.
Declares the structure and the serialization description of the structure. Structures may contain structures with their own serialization description.
#include "serialize/struct/structDescriptionBase.hpp"
#include <string>

namespace _Wolframe {
namespace example {

struct Customer
{
    int ID;                         // Internal customer id
    std::string name;               // Name of the customer
    std::string canonical_Name;     // Customer name in canonical form
    std::string country;            // Country
    std::string locality;           // Locality

    static const serialize::StructDescriptionBase* getStructDescription();
};

}}//namespace
Declares 'ID' as attribute and name, canonical_Name, country, locality as tags. The '--' operator marks the end of attributes section and the start of content section.
#include "serialize/struct/structDescription.hpp"

using namespace _Wolframe;

namespace {
struct CustomerDescription :public serialize::StructDescription<Customer>
{
    CustomerDescription()
    {
        (*this)
        ("ID", &Customer::ID)
        --
        ("name", &Customer::name)
        ("canonical_Name", &Customer::canonical_Name)
        ("country", &Customer::country)
        ("locality", &Customer::locality)
        ;
    }
};

const serialize::StructDescriptionBase* Customer::getStructDescription()
{
    static CustomerDescription rt;
    return &rt;
}
Now we have all pieces together to build a loadable Wolframe module with our example C++ function. The following example shows what you have to declare in the main module source file.
The module declaration needs to include appdevel.hpp and
of course all headers with the function and data structure declarations needed.
The module starts with the header macro CPP_APPLICATION_FORM_FUNCTION_MODULE
with a short description of the module.
What follows are the function declarations declared with the macro
CPP_APPLICATION_FORM_FUNCTION. This macro has the following arguments in
this order:
| Name | Description |
| NAME | identifier of the function |
| FUNCTION | implementation of the function |
| OUTPUT | output structure of the function |
| INPUT | input structure of the function |
The declaration list is closed with the parameterless footer macro CPP_APPLICATION_FORM_FUNCTION_MODULE_END. The following example shows an example module declaration:
#include "appDevel.hpp"
// ... PUT THE INCLUDES FOR THE "ProcessCustomer" FUNCTION DECLARATION HERE !

#include "customersFunction.hpp"

using namespace _Wolframe;

WF_MODULE_BEGIN( "ProcessCustomerFunction", "process customer function")
WF_FORM_FUNCTION("process_customer",ProcessCustomer::exec,Customer,Customer)
WF_MODULE_END
For building the module we have to include all modules introduced here and to link at against the wolframe serialization library (wolframe_serialize) and the wolframe core library (wolframe).
The module built can be loaded as the other modules by declaring it in the wolframe
LoadModules section of the configuration. Simply list it there with
module <yourModuleName> with <yourModuleName> being the name
or path to your module.
C++ is a strongly typed language. This means that the
input of a function and the output is already validated to be of a strictly
defined structure. So a validation by passing the input through a form
might not be needed anymore. The constructs used to describe structures of
Wolframe
in native C++ are even capable of describing attributes
like used in XML (section 'Input/Output Data Structures' above).
See in the documentation of the standard command handler how validation can be
skipped with the attribute SKIP.
Forms are data structures used to validate input and output data and to do some basic normalization in order to make data accessible in a uniform way. Forms are defined in a data definition language (DDL) and translated by a compiler at startup. Those compilers are defined as loadable modules.
This chapter describes how form data schemas are linked to the logic tier. It introduces a data description
language (DDL) called simpleform that allows you to specify data schemas with the validation and
normalization of atomic types. It also describes the Wolframe module concept for form descriptions that
allows you to add a compiler for your existing data schemas.
After reading this chapter you should be able to write data forms of Wolframe of the logic tier
in the simpleform data description language on your own. You should also know how a new data description
language (DDL) could be added.
Be aware that you have to configure a data description language type (DDL compiler) of the logic tier in Wolframe before using it. Each chapter introducing a data form description language will have a section that describes how the server configuration of Wolframe has to be extended for its availability.
Form data structures can be defined in a DDL (Data Definition Language). It depends very much on the application what DDL is best to use. Users may already have their data definitions defined in a certain way. The form DDL can be defined in the way you want. Wolframe offers a plugin mechanism for DDL compilers and provides examples of such compilers. You configure the DDL sources to load and the compiler to use.
With the DDL form description we get a deserialization of some content into a structure and a serialization for the output. We get also a validation and normalization procedure of the content by assigning types to atomic form elements that validate and normalize the data elements. Most of the business transactions should be doable as input form description, output form description and a transaction that maps input to output without control flow aware programming.
All types of data forms introduced here are equivalent in use for all programs.
As example of a form DDL we provide the simpleform DDL. In simple form we forms, subtructures for reuse inside structures and forms and includes that help you to organize your code.
The simpleform language has 3 commands:
FORM | Declare the name of the form, some document meta data and the structure that represents the description of the document content of this form |
STRUCT | Declare the name of the structure, the structure that can be referenced by name in structures of subsequent FORM or STRUCT declarations |
INCLUDE | include the file given as argument |
Structures in FORM or STRUCT declarations
are defined as list of elements in curly brackets '{' '}'.
The following example shows an empty structure declaration
STRUCT myStructure
{
}
The following example shows an empty form declaration
FORM myDocumentSchema
{
}
An element in the list is either a declaration of a substructure or an atomic element. The elements are separated by comma ',' or end of line.
The following example shows a structure that is a list with 3 elements separated by end of line
{
    number int
    name string
    id int
}
And the same example with a comma as element separator
{
    number int, name string, id int
}
An element starts with an identifier, the name of the element.
The name is followed by some special characters defining the element
attributes and the element type. The element attributes will be described
later. The element type is either an embedded substructure in '{' '}'
brackets or an identifier naming an atomic type or a substructure
declared previously as a STRUCT.
Here is an example with a embedded substructure
{
    number int
    name string
    address {
        street string, country string
    }
}
Embedded substructure declarations follow recursively the same rules as structures defined here.
Named types referencing atomic types can be followed by an assignment operator '=' and a string that declared a default value initialization of the structure element. Here is an example with a default value assignment
{
    number int = 1
    name string
}
The atomic element type names are either the reserved keyword string
or a type defined as sequence of normalizer functions
in a normalize definition file. The normalizer
functions assigned to a type validate the value and transform it to its
normalized form. The next section will explain how data types are defined.
The element attributes are marked with some special characters listed and explained in the following table:
Table 5.15. Element attributes in simpleform
| Location | Example | Description | |
|---|---|---|---|
| @ | prefix of data type | id @int | Expresses that the element is an attribute and not a content element of the structure. This has only influence on the XML or similar representation of the form content |
| ? | prefix of data type | value ?string | Expresses that the element is optional also in strict validation |
| ^ | prefix of form name | ltree ^bintree | Expresses that the element is optional and refers to a structure defined in the same module that is expanded only if the element is present. With this construct it is possible to define recursive structures like trees. |
| ! | prefix of data type | id !int | Expresses that the element is always mandatory (also in non strict validation) |
| [] | suffix of data type | values string[] | Expresses that the element is an array of this type |
| [] | without data type | ar [] { } | Expresses this element is an array of structures and that the structure defined describes the prototype (initialization) element of the array. |
| ='..' | end of data type declaration | id int = 1 | Expresses that '..' is the default initialization value of this element. |
Non contradicting attributes can be combined:
id ?@int = 1
Using a single underscore '_' as atomic element name means that the atomic element is representing the unnamed content value of the structure. Using a single underscore for a substructure means that the substructure is embedded into the structure without being referenceable by name. The embedding into a structure is used to express inheritance.
Here is an example with embedding of a named structure
STRUCT content
{
    name string
    birth string
}

FORM insertedContent
{
    id int
    _ content
}
Document meta data in FORM definitions are declared after the
form declaration header and before the form structure declaration.
A meta data declaration starts with a dash '-' followed by the meta data
attribute name as identifier or string and the value as string.
Here is an example of a form with meta data declarations
FORM myDoc
    -root = 'doc', -schemaLocation = 'http://bla.com/schema'
{
}
or with end of line as attribute separator
FORM myDoc
    -root = 'doc'
    -schemaLocation = 'http://bla.com/schema'
{
}
Now all elements of simpleform are explained. Here is an example that shows a complete form definition in simpleform DDL.
FORM Customer
	-root customer
{
    ID !@int                  ; Internal customer id (mandatory)
    name string               ; Name of the customer
    canonical_Name string     ; Customer name in canonical form
    country string            ; Country
    locality ?string          ; Locality (optional)
}
The basic elements to build atomic data types in Wolframe are normalization functions. Basic normalization functions are written in C++ and loadable as modules.
As we already mentioned are atomic elements in forms typed.
With each type a function is associated to validate and normalize the
atomic element of that type. There is only one predefined type called 'string'.
strings are neither validated nor transformed for processing in any way.
The others are defined in files with the extension .wnmp
that are referenced as programs in the configuration.
A .wnmp file contains assignments of a type name to sequences
of basic normalization function calls where the first takes the initial input.
A normalization function call can either be a normalizer function
or a custom data type defined in a module or a method of the predecessing
custom data type in the sequence of the normalization function calls.
The output of a function in the sequence gets the input of the next one and
the final output for the last one.
Each normalization step validates the input as atomic type (arithmetic,string,etc.)
and transforms it to another atomic type.
The example defines 3 numeric types including trimming of the input string for mode tolerant parsing and a string type that is converted to lowercase as normalization.
int=trim,integer(5);
uint=trim,unsigned;
currency=trim,fixedpoint( 13, 2);
name=trim,lcname;
Each type declaration in a .wnmp file starts with an identifier followed by an assignment
operator '='. The left side identifier specifies the name of the type.
This type name can be used in a DDL as name instead of the built-in
type string.
A token of this type is validated and normalized with the
comma separated sequence of normalizer references on the right side of
the assignment. A normalizer reference consists of an identifier plus an
optional comma separated list of constant arguments in brackets ('(' and ')').
The interpretation of the arguments depend on the function type.
An integer type for example could have the maximum number of digits
of the integer type.
There are some standard modules you can use when you define your own type system. They are delivered with Wolframe:
mod_normalize_locale: Unicode string composite normalization
mod_normalize_string: Basic string normalization (like trim, etc.)
mod_normalize_base64: Base64 encoding/decoding
mod_datatype_datetime: Custom data type for date and time arithmetics and normalization
mod_datatype_bcdnumber: Custom data type for bid number arithmetics and normalization
For declaring and using a .wnmp file in our example above, we have to load the module 'mod_normalize_string' and the module 'mod_normalize_number'. For this we add the following two lines to the LoadModules section of our Wolframe configuration:
    Module mod_normalize_number
    Module mod_normalize_string
We also have to add the declaration of the program "example.wnmp" (listing example above) to the Processor section of the configuration.
Program example.wnmp
Filters describe the transformation of serialized data to a unified element sequence of hierarchical structured data and to document meta data and back. The application does not care about data formats as long as there exists a filter providing the unified form of data. This unified data format is represented as iterator visiting the nodes of the document tree and plus a contract to level out language differences. Additioally each document type has some metadata defined. A filter interprets all meta data it understands (his) and uses them for output.
This chapter describes how filters for different data formats are linked to the logic tier. For each data format supported by Wolframe one or more filter type is introduced.
After reading this chapter you should be able to handle different document formats and encodings in the logic tier of Wolframe. You will know how to add programs for scriptable filters like XSLT.
Be aware that you have to configure a data filter of the logic tier in Wolframe before using it. Each chapter introducing a filter type will have a section that describes how the server configuration of Wolframe has to be extended for its availability.
You can use XML for data filters in the logic tier of Wolframe. There are the following variants of XML filters available:
libxml2 (http://www.xmlsoft.org) or
textwolf (http://www.textwolf.net)
The libxml2 and the textwolf filter support at least the following character set encodings. For character set encodings that are not in the list, please ask the Wolframe team.
UTF-8 or
UTF-16LE or
UTF-16 (UTF-16BE) or
UTF-32LE (UCS-4LE) but only with textwolf or
UTF-32 (UTF-32BE or UCS-4BE) or
ISO 8859 (code pages '1' to '9')
For using an XML filter based libxml2,
you have to load the modules mod_filter_libxml2 and
mod_doctype_xml.
For this you add the two following lines to the LoadModules
section of your Wolframe configuration:
    Module mod_doctype_xml
    Module mod_filter_libxml2
For using an XML filter based textwolf,
you have to load the modules mod_filter_textwolf and
mod_doctype_xml.
For this you add the following two lines to the LoadModules
section of your Wolframe configuration:
    Module mod_doctype_xml
    Module mod_filter_textwolf
You can use JSON for data filters in the logic tier of Wolframe. The standard JSON filter of Wolframe is called cjson and based on the library cJSON (http://sourceforge.net/projects/cjson) from Dave Gamble.
Without explicitly specified, the cjson filter support the following character set encodings. For character set encodings that are not in the list, please ask the Wolframe team.
UTF-8 or
UTF-16LE or
UTF-16 (UTF-16BE) or
UTF-32LE (UCS-4LE) or
UTF-32 (UTF-32BE or UCS-4BE) or
You can use XSLT for data filters in the logic tier of Wolframe. The XSLT filter of Wolframe for is based on libxml2 (http://www.xmlsoft.org).
Without explicitly specified, the XSLT filter support the following character set encodings. For character set encodings that are not in the list, please ask the Wolframe team.
UTF-8 or
UTF-16LE or
UTF-16 (UTF-16BE) or
UTF-32LE (UCS-4LE) or
UTF-32 (UTF-32BE or UCS-4BE) or
For using an XSLT filter based libxml2, you have to load the modules
mod_filter_libxml2 and mod_doctype_xml.
For this you add the following 2 lines to the LoadModules section of your Wolframe configuration:
    Module mod_doctype_xml
    Module mod_filter_libxml2
You also have to add the program of the XSLT filter into the Processor section of the configuration. The name of the filter is the filename of the XSLT filter program without path and extension. In our example the filter would be named invoice_ISOxxxx:
Program invoice_ISOxxxx.xslt
In this chapter we learn how parts of a Wolframe application can be verified to work correctly. The basis for testing and debugging a Wolframe application is the command line tool wolfilter.
The command line program wolfilter allows you to call any Wolframe function or filter or mapping into a form structure on command line. The program is mapping stdin or if specified the contents of a file to stdout.
The option '--config' (or '-c') specifies the configuration to use, the only argument of the wolfilter program specifies the function to call or form to fill. If a dash '-' is specified as command then no command is called. The input is just mapped through the filters specified. In case of a form or filter mapping, no configuration has to be specified.
The following examples assume the input file name to be in.xml or in.json and the output file to be named out.xml or out.json respectively.
For the examples needing a configuration, we prepare the following simple configuration, just declaring the processing stuff, we need. Of course wolfilter can also work with any wolframe server configuration. The configuration will be referenced as 'test.conf'.
LoadModules
{
    module mod_command_lua
    module mod_doctype_xml
    module mod_filter_libxml2
    module mod_filter_json
    module mod_filter_token
}
Processor
{
    program test.lua
    program myfilter.xslt
    program myform.sfrm
}
The following example shows the mapping through a libxml2 filter. Filters are tested by passing a dash '-' command to execute. Because we do not need to load programs, we can call wolfilter without a test configuration.
cat in.xml | wolfilter -e libxml2 -m mod_filter_libxml2 - > out.xml
The following example shows the processing of the input through an xslt filter and mapping the output through a token filter that shows the tokenization of the input by the input filter. Because the referenced XSLT filter is defined as source in a program, we have to specify a configuration (test.conf) that declares the programs to load.
cat in.xml | wolfilter -i myfilter -o token -c test.conf - > out.xml
The following example shows the mapping through a form defined with simpleform DDL. Mapping through forms is tested by passing the name of the form as command to execute. Because forms have to be loaded as programs, we have to specify a configuration (test.conf) too.
cat in.xml | wolfilter -e libxml2 -c test.conf MyForm > out.xml
we assume here that the form to use is defined in myform.sfrm that is declared as program in the configuration and that the form is called MyForm.
The following example shows the execution of a function written in Lua. A JSON filter is used for input and output.
cat in.xml | wolfilter -e cjson -c test.conf MyFunc > out.json
we assume here that the exported function to call defined in myfunc.lua declared in test.conf and is called MyFunc.
This is the glossary for the Wolframe Application Building Manual. Although it covers most of the terms used in the Wolframe world, some terms might be skipped if they are rarely used in this context. These terms are explained in the Application Building Manual.
Wolframe glossary
- Connection Handler
Interface for the networking to one client/server connection during its whole lifetime.
- Command Handler
Interface for delegating processing of client protocol commands in a hierarchical way. A command handler is created by a connection handler or another command handler. During command execution the input/output of the connection is entirely handled by the command handler. Command Handlers are used to build the communication protocol processing as hierarchical state machine.
- Program
A set of named units of description of processing or data in a source file. The source file is loaded at server startup.
- Transaction
A transaction is a call of a database defined in a transaction program. A transaction either fails completely or succeeds as whole. Auditing is seen as part of the transaction. Transactions have an object as input and return an object or an error as result. Authorization tags that are checked against the user privileges of the connection can be attached to transactions.
- Lua
Lua (www.lua.org) is a scripting language. It is used in Wolframe as one language for writing programs. Lua integrates nice into a cooperative system with a single threaded execution model as Wolframe is.
- Filter
Filters are attached to network input and output to read and write input in a well defined format. Filters let you process input and print output in an iterative way. Filters are loaded by the system at startup and have a unique name.
- Form
A form is a hierarchical description of typed data. Forms are used to create objects from a serialization and to validate input. Forms are defined in programs written in a DDL (Data Definition Language) or as declared as part of a build-in function API.
- Channel
The flow for a single connection. Not all objects have channels (e.g. databases).
- Group
A set of objects of the same type seen as one single object for the objects that use it.
- Unit
An element of a group. A group is a set of units.
- Provider
An entity providing objects of a kind. Some providers are factories, but not all of them.
- End Of Data (EoD)
Marks the end of a complete data unit to be processed by a processor. End of data is marked with CR LF dot ('.') CR LF or LF dot LF. For passing lines with a dot ('.') at the start of a content line, the client has to escape an LF dot in the content with LF dot dot. This escaping applies also to the result returned to the client. So client has to unescape LF dot sequences by replacing them by a LF.
- Application Reference Path
The application server defines this file path where all relative paths defined in the configuration refer to.
A
- AAAA
Acronym for Authentication, Authorization, Accounting and Auditing
See Also Authentication, Authorization, Accounting, Auditing.
- Authentication
Authentication is a process that creates a login for the user, granting him access to parts of the system.
- Authorization
Authorization grant or deny the execution of functions or database transactions based on rules on the client login of the session (Authentication). You can specify such access rules on different levels of processing.
- Accounting
- Auditing
Auditing describes a special kind of logging of transactions. Audit operations are represented as function calls. Audit operations specified as critical are handled as a critical part of the transaction. If a critical audit operation fails then the transaction fails (rollback).
S
- SSL
Secure Sockets Layer
Cryptographic protocols which provide secure communications on the Internet. SSL is a predecessor to TLS
See Also TLS.
T
- TLS
Transport Layer Security
Transport Layer Security (TLS) and its predecessor, Secure Sockets Layer (SSL), are cryptographic protocols that provide communication security over the Internet. TLS and SSL encrypt the segments of network connections above the Transport Layer, using asymmetric cryptography for key exchange, symmetric encryption for privacy, and message authentication codes for message integrity.
See Also SSL.
Version 3, 29 June 2007
Copyright © 2007 Free Software Foundation, Inc. http://fsf.org/
Everyone is permitted to copy and distribute verbatim copies of this license document, but changing it is not allowed.
Preamble
The GNU General Public License is a free, copyleft license for software and other kinds of works.
The licenses for most software and other practical works are designed to take away your freedom to share and change the works. By contrast, the GNU General Public License is intended to guarantee your freedom to share and change all versions of a program—to make sure it remains free software for all its users. We, the Free Software Foundation, use the GNU General Public License for most of our software; it applies also to any other work released this way by its authors. You can apply it to your programs, too.
When we speak of free software, we are referring to freedom, not price. Our General Public Licenses are designed to make sure that you have the freedom to distribute copies of free software (and charge for them if you wish), that you receive source code or can get it if you want it, that you can change the software or use pieces of it in new free programs, and that you know you can do these things.
To protect your rights, we need to prevent others from denying you these rights or asking you to surrender the rights. Therefore, you have certain responsibilities if you distribute copies of the software, or if you modify it: responsibilities to respect the freedom of others.
For example, if you distribute copies of such a program, whether gratis or for a fee, you must pass on to the recipients the same freedoms that you received. You must make sure that they, too, receive or can get the source code. And you must show them these terms so they know their rights.
Developers that use the GNU GPL protect your rights with two steps: (1) assert copyright on the software, and (2) offer you this License giving you legal permission to copy, distribute and/or modify it.
For the developers’ and authors’ protection, the GPL clearly explains that there is no warranty for this free software. For both users’ and authors’ sake, the GPL requires that modified versions be marked as changed, so that their problems will not be attributed erroneously to authors of previous versions.
Some devices are designed to deny users access to install or run modified versions of the software inside them, although the manufacturer can do so. This is fundamentally incompatible with the aim of protecting users’ freedom to change the software. The systematic pattern of such abuse occurs in the area of products for individuals to use, which is precisely where it is most unacceptable. Therefore, we have designed this version of the GPL to prohibit the practice for those products. If such problems arise substantially in other domains, we stand ready to extend this provision to those domains in future versions of the GPL, as needed to protect the freedom of users.
Finally, every program is threatened constantly by software patents. States should not allow patents to restrict development and use of software on general-purpose computers, but in those that do, we wish to avoid the special danger that patents applied to a free program could make it effectively proprietary. To prevent this, the GPL assures that patents cannot be used to render the program non-free.
The precise terms and conditions for copying, distribution and modification follow.
TERMS AND CONDITIONS
0. Definitions.
“This License” refers to version 3 of the GNU General Public License.
“Copyright” also means copyright-like laws that apply to other kinds of works, such as semiconductor masks.
“The Program” refers to any copyrightable work licensed under this License. Each licensee is addressed as “you”. “Licensees” and “recipients” may be individuals or organizations.
To “modify” a work means to copy from or adapt all or part of the work in a fashion requiring copyright permission, other than the making of an exact copy. The resulting work is called a “modified version” of the earlier work or a work “based on” the earlier work.
A “covered work” means either the unmodified Program or a work based on the Program.
To “propagate” a work means to do anything with it that, without permission, would make you directly or secondarily liable for infringement under applicable copyright law, except executing it on a computer or modifying a private copy. Propagation includes copying, distribution (with or without modification), making available to the public, and in some countries other activities as well.
To “convey” a work means any kind of propagation that enables other parties to make or receive copies. Mere interaction with a user through a computer network, with no transfer of a copy, is not conveying.
An interactive user interface displays “Appropriate Legal Notices” to the extent that it includes a convenient and prominently visible feature that (1) displays an appropriate copyright notice, and (2) tells the user that there is no warranty for the work (except to the extent that warranties are provided), that licensees may convey the work under this License, and how to view a copy of this License. If the interface presents a list of user commands or options, such as a menu, a prominent item in the list meets this criterion.
1. Source Code.
The “source code” for a work means the preferred form of the work for making modifications to it. “Object code” means any non-source form of a work.
A “Standard Interface” means an interface that either is an official standard defined by a recognized standards body, or, in the case of interfaces specified for a particular programming language, one that is widely used among developers working in that language.
The “System Libraries” of an executable work include anything, other than the work as a whole, that (a) is included in the normal form of packaging a Major Component, but which is not part of that Major Component, and (b) serves only to enable use of the work with that Major Component, or to implement a Standard Interface for which an implementation is available to the public in source code form. A “Major Component”, in this context, means a major essential component (kernel, window system, and so on) of the specific operating system (if any) on which the executable work runs, or a compiler used to produce the work, or an object code interpreter used to run it.
The “Corresponding Source” for a work in object code form means all the source code needed to generate, install, and (for an executable work) run the object code and to modify the work, including scripts to control those activities. However, it does not include the work’s System Libraries, or general-purpose tools or generally available free programs which are used unmodified in performing those activities but which are not part of the work. For example, Corresponding Source includes interface definition files associated with source files for the work, and the source code for shared libraries and dynamically linked subprograms that the work is specifically designed to require, such as by intimate data communication or control flow between those subprograms and other parts of the work.
The Corresponding Source need not include anything that users can regenerate automatically from other parts of the Corresponding Source.
The Corresponding Source for a work in source code form is that same work.
2. Basic Permissions.
All rights granted under this License are granted for the term of copyright on the Program, and are irrevocable provided the stated conditions are met. This License explicitly affirms your unlimited permission to run the unmodified Program. The output from running a covered work is covered by this License only if the output, given its content, constitutes a covered work. This License acknowledges your rights of fair use or other equivalent, as provided by copyright law.
You may make, run and propagate covered works that you do not convey, without conditions so long as your license otherwise remains in force. You may convey covered works to others for the sole purpose of having them make modifications exclusively for you, or provide you with facilities for running those works, provided that you comply with the terms of this License in conveying all material for which you do not control copyright. Those thus making or running the covered works for you must do so exclusively on your behalf, under your direction and control, on terms that prohibit them from making any copies of your copyrighted material outside their relationship with you.
Conveying under any other circumstances is permitted solely under the conditions stated below. Sublicensing is not allowed; section 10 makes it unnecessary.
3. Protecting Users’ Legal Rights From Anti-Circumvention Law.
No covered work shall be deemed part of an effective technological measure under any applicable law fulfilling obligations under article 11 of the WIPO copyright treaty adopted on 20 December 1996, or similar laws prohibiting or restricting circumvention of such measures.
When you convey a covered work, you waive any legal power to forbid circumvention of technological measures to the extent such circumvention is effected by exercising rights under this License with respect to the covered work, and you disclaim any intention to limit operation or modification of the work as a means of enforcing, against the work’s users, your or third parties’ legal rights to forbid circumvention of technological measures.
4. Conveying Verbatim Copies.
You may convey verbatim copies of the Program’s source code as you receive it, in any medium, provided that you conspicuously and appropriately publish on each copy an appropriate copyright notice; keep intact all notices stating that this License and any non-permissive terms added in accord with section 7 apply to the code; keep intact all notices of the absence of any warranty; and give all recipients a copy of this License along with the Program.
You may charge any price or no price for each copy that you convey, and you may offer support or warranty protection for a fee.
5. Conveying Modified Source Versions.
You may convey a work based on the Program, or the modifications to produce it from the Program, in the form of source code under the terms of section 4, provided that you also meet all of these conditions:
The work must carry prominent notices stating that you modified it, and giving a relevant date.
The work must carry prominent notices stating that it is released under this License and any conditions added under section 7. This requirement modifies the requirement in section 4 to “keep intact all notices”.
You must license the entire work, as a whole, under this License to anyone who comes into possession of a copy. This License will therefore apply, along with any applicable section 7 additional terms, to the whole of the work, and all its parts, regardless of how they are packaged. This License gives no permission to license the work in any other way, but it does not invalidate such permission if you have separately received it.
If the work has interactive user interfaces, each must display Appropriate Legal Notices; however, if the Program has interactive interfaces that do not display Appropriate Legal Notices, your work need not make them do so.
A compilation of a covered work with other separate and independent works, which are not by their nature extensions of the covered work, and which are not combined with it such as to form a larger program, in or on a volume of a storage or distribution medium, is called an “aggregate” if the compilation and its resulting copyright are not used to limit the access or legal rights of the compilation’s users beyond what the individual works permit. Inclusion of a covered work in an aggregate does not cause this License to apply to the other parts of the aggregate.
6. Conveying Non-Source Forms.
You may convey a covered work in object code form under the terms of sections 4 and 5, provided that you also convey the machine-readable Corresponding Source under the terms of this License, in one of these ways:
Convey the object code in, or embodied in, a physical product (including a physical distribution medium), accompanied by the Corresponding Source fixed on a durable physical medium customarily used for software interchange.
Convey the object code in, or embodied in, a physical product (including a physical distribution medium), accompanied by a written offer, valid for at least three years and valid for as long as you offer spare parts or customer support for that product model, to give anyone who possesses the object code either (1) a copy of the Corresponding Source for all the software in the product that is covered by this License, on a durable physical medium customarily used for software interchange, for a price no more than your reasonable cost of physically performing this conveying of source, or (2) access to copy the Corresponding Source from a network server at no charge.
Convey individual copies of the object code with a copy of the written offer to provide the Corresponding Source. This alternative is allowed only occasionally and noncommercially, and only if you received the object code with such an offer, in accord with subsection 6b.
Convey the object code by offering access from a designated place (gratis or for a charge), and offer equivalent access to the Corresponding Source in the same way through the same place at no further charge. You need not require recipients to copy the Corresponding Source along with the object code. If the place to copy the object code is a network server, the Corresponding Source may be on a different server (operated by you or a third party) that supports equivalent copying facilities, provided you maintain clear directions next to the object code saying where to find the Corresponding Source. Regardless of what server hosts the Corresponding Source, you remain obligated to ensure that it is available for as long as needed to satisfy these requirements.
Convey the object code using peer-to-peer transmission, provided you inform other peers where the object code and Corresponding Source of the work are being offered to the general public at no charge under subsection 6d.
A separable portion of the object code, whose source code is excluded from the Corresponding Source as a System Library, need not be included in conveying the object code work.
A “User Product” is either (1) a “consumer product”, which means any tangible personal property which is normally used for personal, family, or household purposes, or (2) anything designed or sold for incorporation into a dwelling. In determining whether a product is a consumer product, doubtful cases shall be resolved in favor of coverage. For a particular product received by a particular user, “normally used” refers to a typical or common use of that class of product, regardless of the status of the particular user or of the way in which the particular user actually uses, or expects or is expected to use, the product. A product is a consumer product regardless of whether the product has substantial commercial, industrial or non-consumer uses, unless such uses represent the only significant mode of use of the product.
“Installation Information” for a User Product means any methods, procedures, authorization keys, or other information required to install and execute modified versions of a covered work in that User Product from a modified version of its Corresponding Source. The information must suffice to ensure that the continued functioning of the modified object code is in no case prevented or interfered with solely because modification has been made.
If you convey an object code work under this section in, or with, or specifically for use in, a User Product, and the conveying occurs as part of a transaction in which the right of possession and use of the User Product is transferred to the recipient in perpetuity or for a fixed term (regardless of how the transaction is characterized), the Corresponding Source conveyed under this section must be accompanied by the Installation Information. But this requirement does not apply if neither you nor any third party retains the ability to install modified object code on the User Product (for example, the work has been installed in ROM).
The requirement to provide Installation Information does not include a requirement to continue to provide support service, warranty, or updates for a work that has been modified or installed by the recipient, or for the User Product in which it has been modified or installed. Access to a network may be denied when the modification itself materially and adversely affects the operation of the network or violates the rules and protocols for communication across the network.
Corresponding Source conveyed, and Installation Information provided, in accord with this section must be in a format that is publicly documented (and with an implementation available to the public in source code form), and must require no special password or key for unpacking, reading or copying.
7. Additional Terms.
“Additional permissions” are terms that supplement the terms of this License by making exceptions from one or more of its conditions. Additional permissions that are applicable to the entire Program shall be treated as though they were included in this License, to the extent that they are valid under applicable law. If additional permissions apply only to part of the Program, that part may be used separately under those permissions, but the entire Program remains governed by this License without regard to the additional permissions.
When you convey a copy of a covered work, you may at your option remove any additional permissions from that copy, or from any part of it. (Additional permissions may be written to require their own removal in certain cases when you modify the work.) You may place additional permissions on material, added by you to a covered work, for which you have or can give appropriate copyright permission.
Notwithstanding any other provision of this License, for material you add to a covered work, you may (if authorized by the copyright holders of that material) supplement the terms of this License with terms:
Disclaiming warranty or limiting liability differently from the terms of sections 15 and 16 of this License; or
Requiring preservation of specified reasonable legal notices or author attributions in that material or in the Appropriate Legal Notices displayed by works containing it; or
Prohibiting misrepresentation of the origin of that material, or requiring that modified versions of such material be marked in reasonable ways as different from the original version; or
Limiting the use for publicity purposes of names of licensors or authors of the material; or
Declining to grant rights under trademark law for use of some trade names, trademarks, or service marks; or
Requiring indemnification of licensors and authors of that material by anyone who conveys the material (or modified versions of it) with contractual assumptions of liability to the recipient, for any liability that these contractual assumptions directly impose on those licensors and authors.
All other non-permissive additional terms are considered “further restrictions” within the meaning of section 10. If the Program as you received it, or any part of it, contains a notice stating that it is governed by this License along with a term that is a further restriction, you may remove that term. If a license document contains a further restriction but permits relicensing or conveying under this License, you may add to a covered work material governed by the terms of that license document, provided that the further restriction does not survive such relicensing or conveying.
If you add terms to a covered work in accord with this section, you must place, in the relevant source files, a statement of the additional terms that apply to those files, or a notice indicating where to find the applicable terms.
Additional terms, permissive or non-permissive, may be stated in the form of a separately written license, or stated as exceptions; the above requirements apply either way.
8. Termination.
You may not propagate or modify a covered work except as expressly provided under this License. Any attempt otherwise to propagate or modify it is void, and will automatically terminate your rights under this License (including any patent licenses granted under the third paragraph of section 11).
However, if you cease all violation of this License, then your license from a particular copyright holder is reinstated (a) provisionally, unless and until the copyright holder explicitly and finally terminates your license, and (b) permanently, if the copyright holder fails to notify you of the violation by some reasonable means prior to 60 days after the cessation.
Moreover, your license from a particular copyright holder is reinstated permanently if the copyright holder notifies you of the violation by some reasonable means, this is the first time you have received notice of violation of this License (for any work) from that copyright holder, and you cure the violation prior to 30 days after your receipt of the notice.
Termination of your rights under this section does not terminate the licenses of parties who have received copies or rights from you under this License. If your rights have been terminated and not permanently reinstated, you do not qualify to receive new licenses for the same material under section 10.
9. Acceptance Not Required for Having Copies.
You are not required to accept this License in order to receive or run a copy of the Program. Ancillary propagation of a covered work occurring solely as a consequence of using peer-to-peer transmission to receive a copy likewise does not require acceptance. However, nothing other than this License grants you permission to propagate or modify any covered work. These actions infringe copyright if you do not accept this License. Therefore, by modifying or propagating a covered work, you indicate your acceptance of this License to do so.
10. Automatic Licensing of Downstream Recipients.
Each time you convey a covered work, the recipient automatically receives a license from the original licensors, to run, modify and propagate that work, subject to this License. You are not responsible for enforcing compliance by third parties with this License.
An “entity transaction” is a transaction transferring control of an organization, or substantially all assets of one, or subdividing an organization, or merging organizations. If propagation of a covered work results from an entity transaction, each party to that transaction who receives a copy of the work also receives whatever licenses to the work the party’s predecessor in interest had or could give under the previous paragraph, plus a right to possession of the Corresponding Source of the work from the predecessor in interest, if the predecessor has it or can get it with reasonable efforts.
You may not impose any further restrictions on the exercise of the rights granted or affirmed under this License. For example, you may not impose a license fee, royalty, or other charge for exercise of rights granted under this License, and you may not initiate litigation (including a cross-claim or counterclaim in a lawsuit) alleging that any patent claim is infringed by making, using, selling, offering for sale, or importing the Program or any portion of it.
11. Patents.
A “contributor” is a copyright holder who authorizes use under this License of the Program or a work on which the Program is based. The work thus licensed is called the contributor’s “contributor version”.
A contributor’s “essential patent claims” are all patent claims owned or controlled by the contributor, whether already acquired or hereafter acquired, that would be infringed by some manner, permitted by this License, of making, using, or selling its contributor version, but do not include claims that would be infringed only as a consequence of further modification of the contributor version. For purposes of this definition, “control” includes the right to grant patent sublicenses in a manner consistent with the requirements of this License.
Each contributor grants you a non-exclusive, worldwide, royalty-free patent license under the contributor’s essential patent claims, to make, use, sell, offer for sale, import and otherwise run, modify and propagate the contents of its contributor version.
In the following three paragraphs, a “patent license” is any express agreement or commitment, however denominated, not to enforce a patent (such as an express permission to practice a patent or covenant not to sue for patent infringement). To “grant” such a patent license to a party means to make such an agreement or commitment not to enforce a patent against the party.
If you convey a covered work, knowingly relying on a patent license, and the Corresponding Source of the work is not available for anyone to copy, free of charge and under the terms of this License, through a publicly available network server or other readily accessible means, then you must either (1) cause the Corresponding Source to be so available, or (2) arrange to deprive yourself of the benefit of the patent license for this particular work, or (3) arrange, in a manner consistent with the requirements of this License, to extend the patent license to downstream recipients. “Knowingly relying” means you have actual knowledge that, but for the patent license, your conveying the covered work in a country, or your recipient’s use of the covered work in a country, would infringe one or more identifiable patents in that country that you have reason to believe are valid.
If, pursuant to or in connection with a single transaction or arrangement, you convey, or propagate by procuring conveyance of, a covered work, and grant a patent license to some of the parties receiving the covered work authorizing them to use, propagate, modify or convey a specific copy of the covered work, then the patent license you grant is automatically extended to all recipients of the covered work and works based on it.
A patent license is “discriminatory” if it does not include within the scope of its coverage, prohibits the exercise of, or is conditioned on the non-exercise of one or more of the rights that are specifically granted under this License. You may not convey a covered work if you are a party to an arrangement with a third party that is in the business of distributing software, under which you make payment to the third party based on the extent of your activity of conveying the work, and under which the third party grants, to any of the parties who would receive the covered work from you, a discriminatory patent license (a) in connection with copies of the covered work conveyed by you (or copies made from those copies), or (b) primarily for and in connection with specific products or compilations that contain the covered work, unless you entered into that arrangement, or that patent license was granted, prior to 28 March 2007.
Nothing in this License shall be construed as excluding or limiting any implied license or other defenses to infringement that may otherwise be available to you under applicable patent law.
12. No Surrender of Others’ Freedom.
If conditions are imposed on you (whether by court order, agreement or otherwise) that contradict the conditions of this License, they do not excuse you from the conditions of this License. If you cannot convey a covered work so as to satisfy simultaneously your obligations under this License and any other pertinent obligations, then as a consequence you may not convey it at all. For example, if you agree to terms that obligate you to collect a royalty for further conveying from those to whom you convey the Program, the only way you could satisfy both those terms and this License would be to refrain entirely from conveying the Program.
13. Use with the GNU Affero General Public License.
Notwithstanding any other provision of this License, you have permission to link or combine any covered work with a work licensed under version 3 of the GNU Affero General Public License into a single combined work, and to convey the resulting work. The terms of this License will continue to apply to the part which is the covered work, but the special requirements of the GNU Affero General Public License, section 13, concerning interaction through a network will apply to the combination as such.
14. Revised Versions of this License.
The Free Software Foundation may publish revised and/or new versions of the GNU General Public License from time to time. Such new versions will be similar in spirit to the present version, but may differ in detail to address new problems or concerns.
Each version is given a distinguishing version number. If the Program specifies that a certain numbered version of the GNU General Public License “or any later version” applies to it, you have the option of following the terms and conditions either of that numbered version or of any later version published by the Free Software Foundation. If the Program does not specify a version number of the GNU General Public License, you may choose any version ever published by the Free Software Foundation.
If the Program specifies that a proxy can decide which future versions of the GNU General Public License can be used, that proxy’s public statement of acceptance of a version permanently authorizes you to choose that version for the Program.
Later license versions may give you additional or different permissions. However, no additional obligations are imposed on any author or copyright holder as a result of your choosing to follow a later version.
15. Disclaimer of Warranty.
THERE IS NO WARRANTY FOR THE PROGRAM, TO THE EXTENT PERMITTED BY APPLICABLE LAW. EXCEPT WHEN OTHERWISE STATED IN WRITING THE COPYRIGHT HOLDERS AND/OR OTHER PARTIES PROVIDE THE PROGRAM “AS IS” WITHOUT WARRANTY OF ANY KIND, EITHER EXPRESSED OR IMPLIED, INCLUDING, BUT NOT LIMITED TO, THE IMPLIED WARRANTIES OF MERCHANTABILITY AND FITNESS FOR A PARTICULAR PURPOSE. THE ENTIRE RISK AS TO THE QUALITY AND PERFORMANCE OF THE PROGRAM IS WITH YOU. SHOULD THE PROGRAM PROVE DEFECTIVE, YOU ASSUME THE COST OF ALL NECESSARY SERVICING, REPAIR OR CORRECTION.
16. Limitation of Liability.
IN NO EVENT UNLESS REQUIRED BY APPLICABLE LAW OR AGREED TO IN WRITING WILL ANY COPYRIGHT HOLDER, OR ANY OTHER PARTY WHO MODIFIES AND/OR CONVEYS THE PROGRAM AS PERMITTED ABOVE, BE LIABLE TO YOU FOR DAMAGES, INCLUDING ANY GENERAL, SPECIAL, INCIDENTAL OR CONSEQUENTIAL DAMAGES ARISING OUT OF THE USE OR INABILITY TO USE THE PROGRAM (INCLUDING BUT NOT LIMITED TO LOSS OF DATA OR DATA BEING RENDERED INACCURATE OR LOSSES SUSTAINED BY YOU OR THIRD PARTIES OR A FAILURE OF THE PROGRAM TO OPERATE WITH ANY OTHER PROGRAMS), EVEN IF SUCH HOLDER OR OTHER PARTY HAS BEEN ADVISED OF THE POSSIBILITY OF SUCH DAMAGES.
17. Interpretation of Sections 15 and 16.
If the disclaimer of warranty and limitation of liability provided above cannot be given local legal effect according to their terms, reviewing courts shall apply local law that most closely approximates an absolute waiver of all civil liability in connection with the Program, unless a warranty or assumption of liability accompanies a copy of the Program in return for a fee.
END OF TERMS AND CONDITIONS
How to Apply These Terms to Your New Programs
If you develop a new program, and you want it to be of the greatest possible use to the public, the best way to achieve this is to make it free software which everyone can redistribute and change under these terms.
To do so, attach the following notices to the program. It is safest to attach them to the start of each source file to most effectively state the exclusion of warranty; and each file should have at least the “copyright” line and a pointer to where the full notice is found.
one line to give the program’s name and a brief idea of what it does.Copyright (C)yearname of authorThis program is free software: you can redistribute it and/or modify it under the terms of the GNU General Public License as published by the Free Software Foundation, either version 3 of the License, or (at your option) any later version. This program is distributed in the hope that it will be useful, but WITHOUT ANY WARRANTY; without even the implied warranty of MERCHANTABILITY or FITNESS FOR A PARTICULAR PURPOSE. See the GNU General Public License for more details. You should have received a copy of the GNU General Public License along with this program. If not, see http://www.gnu.org/licenses/.
Also add information on how to contact you by electronic and paper mail.
If the program does terminal interaction, make it output a short notice like this when it starts in an interactive mode:
programCopyright (C)yearname of authorThis program comes with ABSOLUTELY NO WARRANTY; for details type ‘show w’. This is free software, and you are welcome to redistribute it under certain conditions; type ‘show c’ for details.
The hypothetical commands ‘show w’ and
‘show c’ should show the appropriate parts of
the General Public License. Of course, your program’s commands might be
different; for a GUI interface, you would use an “about box”.
You should also get your employer (if you work as a programmer) or school, if any, to sign a “copyright disclaimer” for the program, if necessary. For more information on this, and how to apply and follow the GNU GPL, see http://www.gnu.org/licenses/.
The GNU General Public License does not permit incorporating your program into proprietary programs. If your program is a subroutine library, you may consider it more useful to permit linking proprietary applications with the library. If this is what you want to do, use the GNU Lesser General Public License instead of this License. But first, please read http://www.gnu.org/philosophy/why-not-lgpl.html.
Clients to access Wolframe
Copyright © 2010 - 2014 Project Wolframe
Commercial Usage. Licensees holding valid Project Wolframe Commercial licenses may use this file in accordance with the Project Wolframe Commercial License Agreement provided with the Software or, alternatively, in accordance with the terms contained in a written agreement between the licensee and Project Wolframe.
GNU General Public License Usage. Alternatively, you can redistribute this file and/or modify it under the terms of the GNU General Public License as published by the Free Software Foundation, either version 3 of the License, or (at your option) any later version.
Wolframe is distributed in the hope that it will be useful, but WITHOUT ANY WARRANTY; without even the implied warranty of MERCHANTABILITY or FITNESS FOR A PARTICULAR PURPOSE. See the GNU General Public License for more details.
You should have received a copy of the GNU General Public License along with Wolframe. If not, see http://www.gnu.org/licenses/
If you have questions regarding the use of this file, please contact Project Wolframe.
Aug 29, 2014 version 0.0.3
Table of Contents
- 1. Introduction
- 2. Clients with PHP
- 3. Clients with .NET (C#)
- 4. Clients with Qt
- Index
List of Tables
- 2.1. PHP modules required
- 2.2. PHP client modules
- 3.1. C# client modules
- 4.1. Properties
- 4.2. Properties
- 4.3. Properties
- 4.4. Properties
- 4.5. Properties
- 4.6. Properties
- 4.7. Properties
- 4.8. Basic elements of request/answer
- 4.9. Types of arrays
- 4.10. Types of indirections
This part of the manual describes how the user interface part (presentation tier or client) of Wolframe applications can be built.
A Wolframe client can be of various kinds. They all communicate with the server over a text based protocol in a plain or encrypted session. All methods used are based on open standards.
We will introduce some examples of clients: The Wolframe standard client written in Qt (C++), a .NET client written in C# and a web client written in PHP communicating via a web server with the Wolframe application server.
After reading this chapter you should be able to create a Wolframe client based of one of these examples on your own.
Table of Contents
This chapter describes how you can call Wolframe from a web service. It will show how a Wolframe command can be issued as HTTP call and how it is mapped in the Webserver by a scripting language. We use PHP as example language. The example is so simple that you can easily map it to other languages than PHP. We took PHP because its use for web services is so widespread nowadays.
The minimum PHP version required for the client is 5.3. The following additional PHP modules have to be installed:
Table 2.1. PHP modules required
| Name | Description |
|---|---|
| php5-mcrypt | Encryption functions needed for the password change protocol of WOLFRAME-CRAM. |
In the subdirectory clients/php of the Wolframe installation you'll find the following source files you need. The main module you need to call to establish a session and to issue requests is session.php. The other files are helper classes for the client:
Table 2.2. PHP client modules
| Name | Description |
|---|---|
| session.php | implements the Wolframe client/server protocol behind the scenes with a simple interface to send requests to the server and receive the answers. |
| connection.php | defines the base class of the connection to a Wolframe server with methods to read and write messages |
| wolframe_cram.php | implements helper functions needed to implement the authentication with the Wolframe-CRAM mech and its password change protocol. |
| pbkdf2.php | implements the function hash_pbkdf2 available in PHP 5.5. for PHP 5.3. (patch published on php.net) |
The script examples/clients/php/webclient_form_xml.php shows the mechanisms of using the PHP client modules to create a client calling Wolframe from a web service. It takes a HTTP request, builds an XML document and a Wolframe server request with this document, passes the request to the server and returns the answer XML to the web client. In case of error an XML with the error message is returned.
The script examples/clients/php/webclient_change_password.php shows the changing of password when authenticated with "WOLFRAME-CRAM". It takes a HTTP request, authenticates an initiates a password change. In case of error an XML with the error message is returned.
In the following we shortly introduce the Wolframe session interface implemented in clients/php/session.php.
namespace Wolframe
{
require 'connection.php';
use Wolframe\Connection as Connection;

class Session extends Connection
{
    /* Constructor
    * @param[in] address Wolframe server IP address to connect
    * @param[in] port Wolframe server port to connect
    * @param[in] sslopt array of PHP options for SSL. The options
    *            are not interpreted, but directly passed to to the SSL
    *            stream context with stream_context_set_option(..)'
    * @param[in] authopt authorization options defining the mechanism
    *            and depending on the mechanism, the credentials needed.
    */
    function __construct( $address, $port, $sslopt, $authmethod);

    /* Change the users password
    * @param[in] the old password
    * @param[in] the new password
    * @remark The function throws in case of an error.
    * @remark The function is blocking on read/write on its connection
    */
    public function changePassword( $oldpassword, $newpassword)

    /* Send a request to the server
    * @param[in] command (optional) identifier prefix of the command
    *            to execute.
    * @param[in] content content of the request (document to process)
    * @return FALSE, if the server reports an error in processing
    *            the request. The error details can be inspected with
    *            lasterror(). In case of success the function returns
    *            the request answer string.
    * @remark The function throws in case of a system or protocol error.
    * @remark The function is blocking on read/write on its connection
    */
    public function request( $command, $content);

    /* Get the last error returned by the Wolframe server (protocol).
    * @return the last error
    */
    public function lasterror();
} // class Session
} // namespace Wolframe
Table of Contents
This chapter describes how you can call Wolframe from .NET. As example language C# is used. The client implementation introduced here has an asynchronous interface with a synchronous implementation. The client is feeded with requests over a queue and the issuer of a request gets notified over a delegate bound to the request. An example program will show it's use.
In the subdirectory clients/dotnet/csharp/WolframeClient of the Wolframe installation you'll find a Microsoft Visual Studio project file and the following source files you need for a Wolframe C# client. The main module you need to call to establish a session and to issue requests is Session.cs, or the interface SessionInterface.cs respectively. The other files are helper classes for the client:
Table 3.1. C# client modules
| Name | Description |
|---|---|
| SessionInterface.cs | interface of the Wolframe server session |
| Session.cs | implements the Wolframe client/server protocol behind the scenes with a simple interface to issue requests with a notification delegate to handle the answer. |
| ConnectionInterface.cs | interface of the Wolframe server connection |
| Connection.cs | implements the base class of the connection to a Wolframe server with methods to read and write messages |
| Protocol.cs | some helper functions to handle LF dot escaping/unescaping and parse protocol messages from the server. |
| ObjectQueue.cs | implementation of the message queue used as standard queue with concurrent access and notification. |
| Serializer.cs | implementation of the serialization/deserialization of C# objects sent to the server and received from the server as XML |
The script examples/clients/dotnet/csharp/Program.cs shows the mechanisms of using the C# client modules to create a .NET client for Wolframe. The example program defines the request and the answer type as C# class, creates a session object, issues the request, sleeps for a second (for simplicity) so that the request gets processed and shuts down the connection.
Here is the Wolframe session interface implemented in clients/dotnet/csharp/SessionInterface.cs:
using System;
using System.Collections.Generic;
using System.Linq;
using System.Text;

namespace WolframeClient
{
    public class Request
    {
        public int id { get; set; }          ///< id of the request
        public int number { get; set; }      ///< number of the request
        public string command { get; set; }  ///< command prefix of the request
        public string doctype { get; set; }  ///< document type of the request
        public string root { get; set; }     ///< root element of the request
        public object obj { get; set; }      ///< serializable request object
        public Type objtype { get; set; }    ///< request object type
        public Type answertype { get; set; } ///< answer object type
    };

    public class Answer
    {
        /// \brief Answer type (execution status)
        public enum MsgType {
            Error,       ///< fatal error in the request
            Failure,     ///< the request failed, the session is still alive
            Result       ///< successful execution of the request
        };
        public MsgType msgtype { get; set; } ///< status of the answer
        public int id { get; set; }          ///< id of the request
        public int number { get; set; }      ///< number of the request
        public object obj { get; set; }      ///< answer object
    };

    interface SessionInterface
    {
        /// \brief Connect to the server and do the initial
        ///        handshake with authentication
        bool Connect();
        /// \brief Signal the server to process all pending requests
        ///        and to shutdown
        void Shutdown();
        /// \brief Close the connection (abort pending requests)
        void Close();
        /// \brief Issue a request. The answer is delivered with a call
        ///        of AnswerCallback (passed with the constructor)
        void IssueRequest(Request request);
        /// \brief Return the total number of open requests
        ///        (in the queue or already sent)
        int NofOpenRequests();
        /// \brief Get the last fatal (unrecoverable) error reported
        string GetLastError();
    }
}
Here is the signature of the Session constructor as defined in clients/dotnet/csharp/Session.cs:
namespace WolframeClient
{
    public class Session
        :SessionInterface
    {
        public class Configuration
            :Connection.Configuration
        {
            public string banner { get; set; }
            public string authmethod { get; set; }
            public string username { get; set; }
            public string password { get; set; }
            public string schemadir { get; set; }
            public string schemaext { get; set; }

            public Configuration()
            {
                banner = null;
                authmethod = null;
                username = null;
                password = null;
                schemadir = "http://www.wolframe.net";
                schemaext = "xsd";
            }
        };

        public delegate void AnswerCallback(Answer msg);

        public Session( Configuration config_, AnswerCallback answerCallback_);
    };
}
Table of Contents
This chapter describes the standard Wolframe client called wolfclient based on Qt and how a user interface is built with it.
The Wolframe standard client wolfclient is a thin client which executes XML requests via the Wolframe protocol and presents XML answers. It is written in Qt and is cross-platform. Qt is currently available on http://doc.qt.digia.com/qt/index.html. User interfaces for wolfclient are defined as a set of forms using standard Qt widgets and are if ever possible defined using the Qt Interface Designer (see http://qt-project.org/doc/qt-4.8/designer-manual.html).
The wolfclient renders user interface forms dynamically, this means no code generation or compilation is involved when creating user interfaces for Wolframe.
The UI files follow the schema 'qt-ui-4.7.xsd', as documented in http://qt-project.org/doc/qt-4.8/designer-ui-file-format.html. The UI files have the extension .ui
UI files are created and edited with the Qt designer.
The wolfclient uses the Qt translation format, version 2.0 for form translations as described in http://qt-project.org/doc/qt-4.8/linguist-ts-file-format.htmll. Those are the files with extension .ts.
The translation files can get merged and generated with the lupdate tool, then translated with the Qt Linguist.
The Qt client needs the files in compiled form as files with the extension .qm. The lupdate tool is taking care of that.
Read more on translations in http://qt-project.org/doc/qt-4.8/linguist-manual.html.
Programming means we annotate the XML of the UI form files with some extra properties. They control the following things:
Which events in the current form replace it with a new form, e. g. clicking the Edit button loads the form called edit_item.
When and how requests to the Wolframe server should be sent and how the results should be interpreted when adding data to the widgets, e.g. executing a save item request with all the data in the text fields of the form added to the request XML.
For mapping data structures from the user interface elements to the data description needed to fulfill an interface for a server request we need some kind of translation. An implicit mapping would only be able to describe very trivial data mappings. After drawing the user interface this translation has to be defined. On the other hand the requests answer returned by the server has to be mapped to be shown in the user interface elements view. Here applies the same: Some kind of translation is needed to map a server data structure to the user interface elements.
Let's have a look at a QLineEdit
element of a form and a possible XML representation of the
data used for a request.
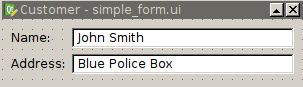
<?xml version="1.0" encoding="UTF-8" standalone="yes"?>
<!DOCTYPE customer SYSTEM 'Customer'>
<customer>
  <name>John Smith</name>
  <address>Blue Police Box</address>
</customer>
For an insert or update request that transmits all data of the form to the server we have to fill the name field and the address field into the request data structure XML. The translation is defined as dynamic property "action" or "action." plus a suffix for the action identifier if needed. We will explain this naming of actions later. The value of the property is describing the request and could look as follows:
update: Customer customer {name{{main.name}}; address{{main.address}}}
For the initial filling of the form with data we submit a request that just sends an id to the server. The answer that is returned by the server has then to be translated to fill the name field and the address field of the form. The translation is defined as dynamic property "answer" or "answer." plus a suffix for the action identifier. A detailed description of the language in the request and answer property value that describes requests and answers will presented in the next chapter. We provide here just an example:
Customer customer {name{{main.name}}; address{{main.address}}}
Some elements are more complicated than that. They present the user a list of options or items the user to pick from, e.g. a list of cities.

When the form is saved, the currently selected element is written into the resulting XML:
<customer>
  <name>John Smith</name>
  <address>Blue Police Box</address>
  <city>6</city>
</customer>
In this case the widget with the city list can load its own domain data as a separate XML request:
<?xml version="1.0" encoding="UTF-8"?>
<!DOCTYPE city SYSTEM 'CityListRequest'>
<cities/>
and the corresponding domain load request answer definition in the dynamic property "answer" could look like this:
CityList cities {city[] {id={main.city.id}; {main.city.value}}}
The answer contains all possible values in the domain, in our case a list of all cities and their internal id.
<?xml version="1.0" encoding="UTF-8" standalone="no"?>
<!DOCTYPE "cities" SYSTEM "CityList">
<cities>
<city id='1'>Tokyo</city>
<city id='2'>Lima</city>
<city id='3'>Beijing</city>
<city id='4'>Cairo</city>
<city id='5'>Tehran</city>
<city id='6'>London</city>
</cities>
A UI form contains a set of widgets, the dynamic property
form contains the name of a widget (without
extension .ui) to load.
For linking a push QPushButton click in the Qt designer
to the switching of the form you have to attach a dynamic property
named form of type string to the corresponding
widget of type QPushButton:
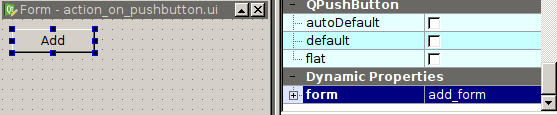
Before loading the next form the client terminates all current requests, for instance a save request of the form data. In case of an error in an action any defined switching of the form is cancelled.
The _w_ prefix is used for internal widget properties not of interest for the user.
The dynamic properties introduced here are edited by the user to stear application behaviour:
The following properties are reserved for states steering the behavior of the user interface:
Table 4.1. Properties
| Name | Description |
|---|---|
| initialFocus | Boolean value for one widget in a form that should get the initial keyboard focus. |
The following properties stear the user interface elements flow:
Table 4.2. Properties
| Name | Description |
|---|---|
| form | Defines a form to be opened on click (push button). If the widget has an action defined, then the action is executed before and the form is opened when the action succeeds and not opened when it fails. |
| form:IDENTIFIER | Defines a form related to a context menu entry with identifier IDENTIFIER. If the context menu entry has also an action defined, then the action is executed before. The form is opened only if the action succeeds. |
The following properties define additional interface elements:
Table 4.3. Properties
| Name | Description |
|---|---|
| contextmenu | Defines a context menu with a comma separated list of identifiers of actions defined as propery value. Two following commas without menu entry identifier are used to define a separator. |
| contextmenu:NAME | Defines the (translatable) text of a context menu entry. NAME refers to a non empty name in the list of context menu entries. |
The following properties are used for the communication with the server:
Table 4.4. Properties
| Name | Description |
|---|---|
| action | Defines a server request. This can either be a load action request for a widget that is not a push button or an action request without answer than OK/ERROR for a push button |
| action:IDENTIFIER | Defines an action request either related to a context menu entry (when clicked) or related to a dataslot declaration of this widget named with IDENTIFIER. |
| dropmove | Defines a action request that is issued on a drop request moving an object inside a widget or between widgets of the same type (same object name). The request is an action request without other answer than success or failure. Refresh after the action completed is triggered via a datasignal 'datasignal:drop' defined in the drop widget and a 'datasignal:drag' defined in the drag widget. |
| dropmove:OBJECTNAME | Defines a server request that is issued on a drop request moving an object from a widget with object name OBJECTNAME. The request is an action request without other answer than success or failure. Refresh after the action completed is triggered via a datasignal 'datasignal:drop' defined in the drop widget and a 'datasignal:drag' defined in the drag widget. |
| dropcopy | Defines a action request that is issued on a drop request copying an object inside a widget or between widgets of the same type (same object name). The kind of request and the signaling after completion is the same for a 'dropmove' action. |
| dropcopy:OBJECTNAME | Defines a server request that is issued on a drop request copying an object from a widget with object name OBJECTNAME. The kind of request and the signaling after completion is the same for a 'dropmove:OBJECTNAME' action. |
| answer | Defines the format of the action request answer linked to the widget activation (for example a click on a push button). |
| answer:IDENTIFIER | Defines the format of the request answer of the action defined as 'action:IDENTIFIER' |
Table 4.5. Properties
| Name | Description |
|---|---|
| global:IDENTIFIER | Defines an assignment from a global variable IDENTIFIER at initialization and writing the global variable when closing the widget. |
| assign:PROP | Defines an assingment of property PROP to the property defined as value "assign:PROP" on data load and refresh |
| link:IDENTIFIER | Defines a symbolic link to another widget. Defining the property "link:<name>" = <widgetid>: defines <name> to be a reference to the widget with the widgetid set to <widgetid>. Links are used to read data from other widgets on load and refresh. |
| widgetid | Unique identifier of the widget used for identifying it when resolving symbolic links or an address of a request aswer. When not explicitely defined it is implicitely defined as unique identifier on widget creation. Unique means unique during one run of one client. It's a simple counter plus the name of the widget. |
| synonym:NAME | Defines a renaming of the identifier NAME to the identifier in the property value. Be careful when using synonyms. They are the last construct you should consider to use in the client. |
Table 4.6. Properties
| Name | Description |
|---|---|
| state:IDENFITIER | Defines a state of the widget dependent on a condition. IDENTIFIER is one of 'enabled', 'disabled', 'hidden', 'visible'. The state condition is defined the property value. The value can be a property reference in '{' '}' brackets. The condition is true when the property is defined. A condition can also be a boolean expression of the form <prop> <op> <value>, where <prop> is a property reference in '{' '}' brackets, <op> an operator and <value> a constant value Valid operators are: '==' (string),'!=' (string),'<=' (integer), '<' (integer) ,'>=' (integer), '>' (integer) For 'action' definitions the state 'state:enabled' is dependent on the properties referenced in the 'action' value. |
Table 4.7. Properties
| Name | Description |
|---|---|
| datasignal:IDENTIFIER | Defines a signal of type IDENTIFIER (clicked, doubleclicked, destroyed, signaled, loaded, drag, drop) with the slot name and destination address defined as property value of "datasignal:IDENTIFIER" Datasignal destinations can be defined as follows: As widgetid, as slot identifier (declared with 'dataslot'), as widget path. A preceding identifier followed by '@' specifies what to do with the widget of the target slot. If you specify 'close' there in a form top level widget then the form is closed. Every other identifier causes a reload of the widget. |
| dataslot | Defines a comma separated list of slots for the signal of with the property value as slot identifer and optionally followed by a widget id in '(..)' brackets that sepcifies a sender from where the signal is accepted. |
Drag and Drop events are defined with the properties 'dropmove' and 'dropcopy' that define the action requests issued on a drop event. See description of the properties in "Defining Server Request/Answer". For using drag and drop the property 'acceptDrops' has to be enabled and the Widget has to be capable to do drag and drop. Drag and drop is currently only possible for the Qt standard list widgets, tree widgets and table widgets or for user defined widgets that delegate the mouse events accordingly. We do not describe here how user defined widgets can implement this mechanism of drag and drop.
What happens when an object is dragged from one object and dropped at another object is a request sent to the server. To address the elements involved in drag and drop some variables are set before issueing the request. These Variables can therefore be used in the request to specify the operation to implement the drag and drop. One of these variables is a widget link 'dragobj' that points the origin widget of the drag. With {dragobj.selected} we can address the item or set of items selected with the drag. The other variable is 'dropid' that selects the value or id of the target widget of the drop. What this value means is dependent on the widget class.
Besides the 'dropmove' and 'dropcopy' there are the datasignal properties 'datasignal:drag' and 'datasignal:drop' that can be used to specify the needed widget refresh signals that have to be performed after the drag and drop operation.
Widget data elements elements are addressed by using the relative path of the element from the widget where the request or answer was specified. The relative path is a sequence of widget object names separated by dots ('.'). Only atomic element references are specified in request/answer structure.
The grouping of elements into structures is done by the biggest common ancestor path of all atomic element references in a structure. It is assumed that this biggest common ancestor is addressing the structure. If for example a structure has the atomic widget element references "home.user.name" and "home.user.id" then we assume that "home.user" is adressing the structure containing "name" and "id" in the widget data.
Table 4.8. Basic elements of request/answer
| Description | Syntax |
|---|---|
| Constant (server request only) | string with single (') or double (") quotes or numeric integral constant |
| Mandatory attribute | name={variablepath} |
| Mandatory content value | name{{variablepath}} |
| Optional attribute | name={variablepath:?} |
| Optional content value | name{{variablepath:?}} |
| Optional attribute with default | name={variablepath:default} |
| Optional content with default value | name{{variablepath:default}} |
| Ignored attribute | name={?} |
| Ignored content value | name{{?}} |
| Ignored sub structure | name{?} |
Variable references can address other widgets than sub widgets of the current widget.
A dynamic property with the prefix 'link:' followed by an identifier as name declares the widget with the widget id as dynamic property value of the link definition to be referencable by name. The referencing name is the identifier after the prefix 'link:'. So if we for example define a dynamic property 'link:myform' with a widget id as value, then we can use the variable 'myform' in a widget path to address the widget.
The mechanism of widget links is mainly used for implementing form/sub-form relationships. A form opens a subform and passes its widget id to it with the form parameter 'widgetid=..'. A link is defined to the sub-form with the widget id passed to it. The subform signals some action to the parent that can address the data entered in the subform via this link.
Structure elements are separated by semicolon ';' and put into '{' brackets '}' with the name of the structure in front.
Arrays are marked with opened and closed square brackets '[' ']' without specifying dimension (arbitrary size or empty when missing).
Table 4.9. Types of arrays
| Description | Syntax |
|---|---|
| Arbitrary Size Array of Content Values | name[]{{variablepath}} |
| Arbitrary Size Array of Structures | name[]{structure definition} |
The following example shows an array of addresses:
		address[]{
  surname{{address.surname}};
  prename{{address.prename}};
  street{{address.street}}
}
The widget element paths used to address the widget elements have to have a common ancestor path. In our example this would be 'address'. The common ancestor path is determining how elements are grouped together in the widget. It tells what belongs together to the same array element in the widget. Without common common ancestor path it would be impossible to determine what is forming a structure in the widget data. It distinguishes the case of having an array of adresses and the case of having an array of surnames, and array of prenames and an array of streets. The later makes not much sense here. With the common prefix we state how entities are grouped together to structures in the representation in the widget.
Indirection allows to define recursive structures. Indirection means that an element is specified as reference that is expanded when the element appears in the data structure to map. The grouping element of the indirection elements is the common ancestor of all non indirection elements in the structure containing the indirection.
Table 4.10. Types of indirections
| Description | Syntax (name equals ancestor name) | Syntax (name differs from ancestor name) |
|---|---|---|
| Single Element Indirection | ^ancestor | ^item:ancestor |
| Multiple Indirection | ^ancestor[] | ^item:ancestor[] |
Example representing a tree with arbitrary number of children per node:
item{
  id={treewidget.id};
  name{{treewidget.name}};
  ^item[]
}
Functional defects in the user interface like for example syntax errors in the definitions of the request answer can be eliminated by inspecting the error messages reported by the wolfclient in developer mode and fixing the interface accordingly.
In order to inspect the internals of your client program, we have first to switch on "Developer Mode" in the "Developer" context of the "Preferences Dialog". The following picture emphasizes the check box you have to enable (highlighted green).
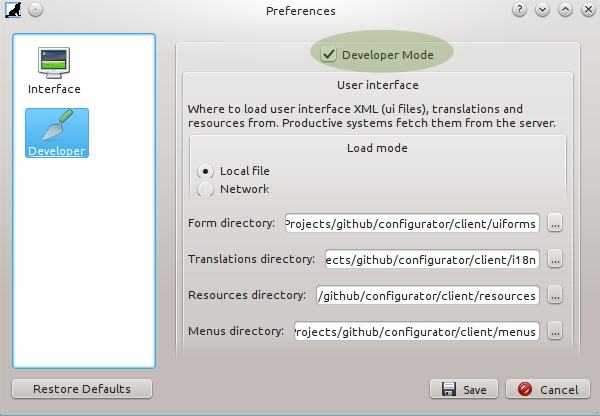
To inspect internal messages reported by the wolfclient in developer mode we have to open the debug window. The debug window is opened by clicking on the bug icon in the main tool bar or via the developer context menu. The following picture shows an example debug output. Each action we do from now on with the debug window opened can be followed on the level of messages it emits.
We can see the messages in the message list when clicking on the "Refresh" button. The navigation allows us to restrict our focus on messages on a node in the object tree by clicking on it. Clicking on the root node shows all messages in the recent history. The history starts with the last main node created before opening the debug window. All message restrictions show the messages in order of their emission. We can restrict also on the severity of messages in the severity level selection (the select box set to "Debug" as default left of the "Refresh" button).
The "Clear" button allows us to empty the recent history without closing the debug window.
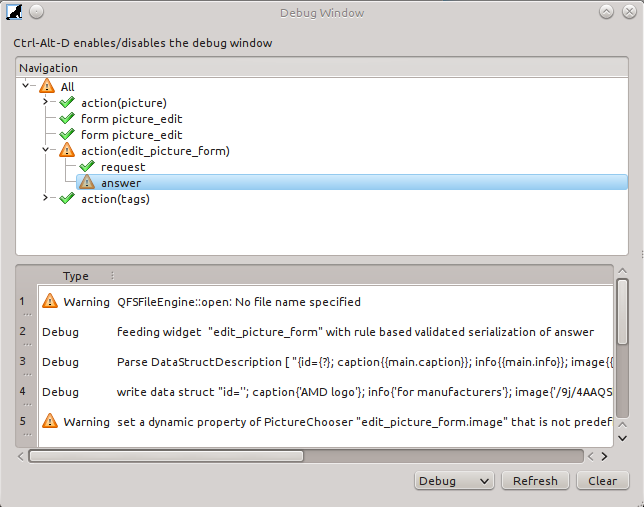
Copyright © 2010 - 2014 Project Wolframe
Commercial Usage. Licensees holding valid Project Wolframe Commercial licenses may use this file in accordance with the Project Wolframe Commercial License Agreement provided with the Software or, alternatively, in accordance with the terms contained in a written agreement between the licensee and Project Wolframe.
GNU General Public License Usage. Alternatively, you can redistribute this file and/or modify it under the terms of the GNU General Public License as published by the Free Software Foundation, either version 3 of the License, or (at your option) any later version.
Wolframe is distributed in the hope that it will be useful, but WITHOUT ANY WARRANTY; without even the implied warranty of MERCHANTABILITY or FITNESS FOR A PARTICULAR PURPOSE. See the GNU General Public License for more details.
You should have received a copy of the GNU General Public License along with Wolframe. If not, see http://www.gnu.org/licenses/
If you have questions regarding the use of this file, please contact Project Wolframe.
Aug 29, 2014 version 0.0.3
Table of Contents
- 1. Installation from source
- 1.1. Source Releases
- 1.2. Building on Unix systems
- 1.2.1. Prerequisites
- 1.2.2. Basic build instructions
- 1.2.3. GCC compiler
- 1.2.4. clang compiler
- 1.2.5. Intel compiler
- 1.2.6. Using ccache and distcc
- 1.2.7. Platform-specific build instructions
- 1.2.8. Boost
- 1.2.9. Secure Socket Layer (SSL)
- 1.2.10. SQLite database support
- 1.2.11. PostgreSQL database support
- 1.2.12. Oracle database support
- 1.2.13. XML filtering support with libxml2 and libxslt
- 1.2.14. XML filtering support with Textwolf
- 1.2.15. JSON filtering support with cJSON
- 1.2.16. Scripting support with Lua
- 1.2.17. Scripting support with Python
- 1.2.18. Printing support with libhpdf
- 1.2.19. Image processing with FreeImage
- 1.2.20. zlib and libpng
- 1.2.21. Support for ICU
- 1.2.22. Internationalization support with gettext
- 1.2.23. Authentication support with PAM
- 1.2.24. Authentication support with SASL
- 1.2.25. Testing Wolframe
- 1.2.26. Testing with Expect
- 1.2.27. Building the documentation
- 1.2.28. Installation
- 1.2.29. Manual dependency generation
- 1.2.30. Creating source tarballs
- 1.2.31. Building the wolfclient
- RedHat/Centos/Scientific Linux 5 and similar Linux distributions
- RedHat/Centos/Scientific Linux 6 and 7 or similar Linux distributions
- Fedora 19 and 20 and similar distributions
- Debian 6 and 7
- Ubuntu 10.04.1 and 12.04
- Ubuntu 13.10 and 14.04
- openSUSE 12.3, SLES and similar Linux distributions
- openSUSE 13.1
- ArchLinux
- Slackware
- FreeBSD 8 and 9
- FreeBSD 10
- NetBSD
- OpenIndiana 151a8
- Solaris 10
- 1.3. Building on Windows systems (the NMAKE way)
- 1.3.1. Prerequisites
- 1.3.2. Basic build instructions
- 1.3.3. Using ccache and distcc
- 1.3.4. Boost
- 1.3.5. Secure Socket Layer (SSL)
- 1.3.6. SQLite database support
- 1.3.7. PostgreSQL database support
- 1.3.8. Oracle database support
- 1.3.9. XML filtering support with libxml2 and libxslt
- 1.3.10. XML filtering support with Textwolf
- 1.3.11. JSON filtering support with cJSON
- 1.3.12. Scripting support with Lua
- 1.3.13. Scripting support with Python
- 1.3.14. Printing support with libhpdf
- 1.3.15. Image processing with FreeImage
- 1.3.16. zlib and libpng
- 1.3.17. Support for ICU
- 1.3.18. Testing Wolframe
- 1.3.19. Testing with Expect
- 1.3.20. Building the documentation
- 1.3.21. Building the wolfclient
Table of Contents
- 1.1. Source Releases
- 1.2. Building on Unix systems
- 1.2.1. Prerequisites
- 1.2.2. Basic build instructions
- 1.2.3. GCC compiler
- 1.2.4. clang compiler
- 1.2.5. Intel compiler
- 1.2.6. Using ccache and distcc
- 1.2.7. Platform-specific build instructions
- 1.2.8. Boost
- 1.2.9. Secure Socket Layer (SSL)
- 1.2.10. SQLite database support
- 1.2.11. PostgreSQL database support
- 1.2.12. Oracle database support
- 1.2.13. XML filtering support with libxml2 and libxslt
- 1.2.14. XML filtering support with Textwolf
- 1.2.15. JSON filtering support with cJSON
- 1.2.16. Scripting support with Lua
- 1.2.17. Scripting support with Python
- 1.2.18. Printing support with libhpdf
- 1.2.19. Image processing with FreeImage
- 1.2.20. zlib and libpng
- 1.2.21. Support for ICU
- 1.2.22. Internationalization support with gettext
- 1.2.23. Authentication support with PAM
- 1.2.24. Authentication support with SASL
- 1.2.25. Testing Wolframe
- 1.2.26. Testing with Expect
- 1.2.27. Building the documentation
- 1.2.28. Installation
- 1.2.29. Manual dependency generation
- 1.2.30. Creating source tarballs
- 1.2.31. Building the wolfclient
- RedHat/Centos/Scientific Linux 5 and similar Linux distributions
- RedHat/Centos/Scientific Linux 6 and 7 or similar Linux distributions
- Fedora 19 and 20 and similar distributions
- Debian 6 and 7
- Ubuntu 10.04.1 and 12.04
- Ubuntu 13.10 and 14.04
- openSUSE 12.3, SLES and similar Linux distributions
- openSUSE 13.1
- ArchLinux
- Slackware
- FreeBSD 8 and 9
- FreeBSD 10
- NetBSD
- OpenIndiana 151a8
- Solaris 10
- 1.3. Building on Windows systems (the NMAKE way)
- 1.3.1. Prerequisites
- 1.3.2. Basic build instructions
- 1.3.3. Using ccache and distcc
- 1.3.4. Boost
- 1.3.5. Secure Socket Layer (SSL)
- 1.3.6. SQLite database support
- 1.3.7. PostgreSQL database support
- 1.3.8. Oracle database support
- 1.3.9. XML filtering support with libxml2 and libxslt
- 1.3.10. XML filtering support with Textwolf
- 1.3.11. JSON filtering support with cJSON
- 1.3.12. Scripting support with Lua
- 1.3.13. Scripting support with Python
- 1.3.14. Printing support with libhpdf
- 1.3.15. Image processing with FreeImage
- 1.3.16. zlib and libpng
- 1.3.17. Support for ICU
- 1.3.18. Testing Wolframe
- 1.3.19. Testing with Expect
- 1.3.20. Building the documentation
- 1.3.21. Building the wolfclient
This section describes how to build the Wolframe application from the source code.
Tarballs with release source code are available from SourceForce in the directories
http://sourceforge.net/projects/wolframe/files/wolframe/
respectively
http://sourceforge.net/projects/wolframe/files/wolfclient/.
The wolframe-0.0.3
.tar.gz contains the Wolframe
server, the modules and 3rdParty software needed to build the server.
The wolfclient-0.0.4
.tar.gz contains the Wolframe
client implementing the graphical user interface.
For building Wolframe on Unix systems you need at least the following software:
A recent C/C++ compiler, the following ones are known to work:
gcc 4.1.x or newer, http://gcc.gnu.org
clang 3.4 or newer, http://clang.llvm.org
Intel Compiler ICC 14.0 or newer, http://software.intel.com/en-us/c-compilers
GNU make 3.81 or newer (but preferably 3.82 or newer) from https://www.gnu.org/software/make/
Boost 1.48.0 or newer from http://www.boost.org
Depending on the features you want to use you also may need the following software:
The OpenSSL library 0.9.7 or newer, for encryption and authentication, http://www.openssl.org
The Sqlite database library, version 3.5.0 or newer, for storing user data and authentication data in a Sqlite database, http://sqlite.org
The PostgreSQL database client library, version 8.1 or newer, for storing user data and authentication data in a PostgreSQL database, http://postgresql.org
The Oracle OCI client library, version 11.2 or newer, for storing user data and authentication data in an Oracle database, http://www.oracle.com
The libxml2 library, version 2.7.6 or newer, for filtering XML data, http://xmlsoft.org/
The libxslt library, version 1.1.26 or newer, for the transformation of XML data, http://xmlsoft.org/
Python 3, version 3.3.0 or newer, for writting applications in Python, https://www.python.org
The libhpdf library, version 2.2.1 or newer, for PDF generation and printing, http://libharu.org/
The FreeImage package, version 3.15.4 or newer, for image manipulation, http://freeimage.sourceforge.net
The ICU library, version 3.5 or newer, for text normalization and conversion, http://site.icu-project.org
A PAM library, for instance Linux PAM, version 1.0.4 or newer, for authentication via PAM, http://www.linux-pam.org
The Cyrus SASL library, version 2.1.22 or newer, for authentication via SASL, http://cyrusimap.org/
For testing the Wolframe software you need:
Expect 5.40 or newer, for running the Expect tests, http://expect.sourceforge.net/
A working telnet
A PostgreSQL or Oracle database when you want to run the database tests
For building the documentation and manpages you need:
Doxygen for developer documentation, http://www.doxygen.org
Docbook 4.5 or newer and the XSL toolchain, http://www.docbook.org
The FOP PDF generator for documentation in PDF format, http://xmlgraphics.apache.org/fop/
Dia for conversion of SVG images, http://live.gnome.org/Dia
For building the wolfclient you need:
Qt 4.6.x or later, or Qt 5, http://qt-project.org/
For secure communication between the wolfclient and the Wolframe server you need the OpenSSL library 0.9.7 or newer, http://www.openssl.org
Wolframe is built and installed by simply calling:
	make
	make install
The makefiles understand the standard GNU targets like 'clean', 'distclean', 'test', 'install', 'uninstall', etc. Also the standard installation variables 'DESTDIR' and 'prefix' are understood. The whole list of options can be seen with:
make help
There is no configure. Porting to platforms and distributions
is done in the makefiles. For most platforms we provide reasonable
default values in makefiles/gmake/platform.mk.
Optional features are enabled by using 'WITH_XXX' variables when calling make, e. g. to enable SSL support you call make like this:
make WITH_SSL=1
Additional variables can be set when 3rdParty software is not in the standard location, for instance:
make BOOST_DIR=/usr/local/boost-1.55.0
You can check how your software will be build with:
make config
If you get a 'NOT SUPPLIED ON THIS PLATFORM' you have to provide the variables explicitly as mentioned above in the example with 'BOOST_DIR'.
A complete build may look like this:
	make WITH_SSL=1 WITH_EXPECT=1 WITH_PAM=1 WITH_SASL=1 \
		WITH_SYSTEM_SQLITE3=1 WITH_PGSQL=1 WITH_ORACLE=1 \
		WITH_LUA=1 WITH_LIBXML2=1 WITH_LIBXSLT=1 \
		WITH_LOCAL_LIBHPDF=1 WITH_ICU=1 WITH_LOCAL_FREEIMAGE=1 \
		WITH_PYTHON=1 WITH_CJSON=1 WITH_TEXTWOLF=1 \
		CC=gcc CXX=g++ CCFLAGS='-Werror' CXXFLAGS='-Werror' \
		clean all test install
Compilation with GNU gcc is the default on all Unix platforms. It corresponds to the call:
make CC=gcc CXX=g++
Per default all reasonable warnings are enabled. To add your own flags you can set 'CFLAGS' or 'CXXFLAGS' respectively for instance to turn compiler warnings into fatal errors with:
make CFLAGS='-Werror' CXXFLAGS='-Werror'
or
make CFLAGS='-g -O0' CXXFLAGS='-g -O0'
to turn off optimization and to enable debug information.
Certain embedded 3rdParty software may choose to have it's own flags for compilation, you can't override those in the make invocation.
Compilation with clang is possible, only set the correct compiler variables:
make CC=clang CXX=clang++
Also here you can set 'CFLAGS' and 'CXXFLAGS' at will.
Compilation with the Intel C compiler is done with:
	source /opt/intel/bin/iccvars.csh intel64
	make CC=icc CXX=icpc
(where '/opt/intel/bin/icc' is the location of the Intel compiler).
Also here you can set 'CFLAGS' and 'CXXFLAGS' at will.
When running the tests or any binaries you have to make sure that 'LD_LIBRARY_PATH' is set correctly (the example is for csh/tcsh, Intel 64-bit):
setenv LD_LIBRARY_PATH $PROD_DIR/lib/intel64
Ccache (http://ccache.samba.org/) and DistCC (https://code.google.com/p/distcc/) can be used to cache respectively distribute the compilation of Wolframe.
Call make as follows:
make CC='ccache gcc' CXX='ccache g++'
or
make CC='distcc gcc' CXX='distcc g++'
If you want to use ccache and distcc in parallel, use the following commands:
	export DISTCC_HOSTS='server1 server2 server3'
	export CCACHE_PREFIX=distcc
	make CC='ccache gcc' CXX='ccache g++'
When using 'clang' with 'ccache' set the following environment variable too (on Linux only, on FreeBSD 10 the ccache with clang combination runs out of the box):
export CCACHE_CPP2=1
The same applies for some versions of 'icc' (for instance 14.0.2 20140120). You get spurious errors when you don't set 'CCACHE_CPP2'!
Note:: distcc is not very helpfull as most time is spent currently in dependency calculation and in the C++ preprocessing. If you want to use the pump mode of distcc you will experience a lot of errors in the pre-computed header files mainly due to boost.
You need GNU make, BSD make doesn't work. You have to install the 'gmake' package.
FreeBSD 8, 9 and 10 are supported.
Note: As of FreeBSD 10 it's recommended to use the 'pkgng' package management tool to install binary prerequsites.
Note: Since FreeBSD 10 clang is the default compiler and no longer gcc.
You need GNU make, BSD make doesn't work. You have to install the 'gmake' package.
NetBSD 6 is supported, NetBSD 5 not.
Packages are installed with 'pkgin' into the
directory /usr/pkg. Make
sure /usr/pkg/bin is part
of your PATH.
The official gcc is too old to build Boost. The Forte compiler is not free and has big problems to compile modern C++ code. So we must use the CSW/gcc/C++ toolchain for Wolframe.
Install the CSW toolchain (http://www.opencsw.org) and basic development tools:
	pkgadd -d http://get.opencsw.org/now
	pkgutil --install CSWgcc4core CSWgcc4g++ CSWgmake
You also need some system files:
	pkg install pkg:/system/header
	pkg install pkg:/developer/library/lint
	pkg install system/library/math/header-math
Make sure /opt/csw/bin is part of your PATH.
Install packages with 'pkgutil --install'.
We only build for SPARC and Solaris 10 currently.
You may have to install a 'SFWgtar' or 'CSWgtar' in order to unpack the sources. Make sure to rename them to 'gtar' to avoid collisions with the standard 'tar'!
The official gcc is too old to build Boost. The Forte compiler is not free and has big problems to compile modern C++ code. So we must use the CSW/gcc/C++ toolchain for Wolframe.
Install the CSW toolchain (http://www.opencsw.org) and basic development tools:
	pkgadd -d http://get.opencsw.org/now
	pkgutil --install CSWgcc4core CSWgcc4g++ CSWgmake
Make sure the build environment is always set as follows:
PATH=/opt/csw/bin:/usr/ccs/bin:/usr/bin:/bin:/opt/csw/sbin:/usr/sbin:/sbin
export PATH
Install official packages with 'pkgadd -d' and CSW packages with 'pkgutil --install'.
Building Wolframe is more complex as on other platforms, so we provide this working example invocation of make:
	LD_RUN_PATH=/opt/csw/lib:/opt/csw/postgresql/lib \
	OPENSSL_DIR=/opt/csw PGSQL_DIR=/opt/csw/postgresql \
	LIBLT_DIR=/usr BOOST_DIR=/opt/csw/boost-1.55.0 \
		WITH_EXPECT=1 WITH_SSL=1 WITH_SYSTEM_SQLITE3=1 WITH_PGSQL=1 WITH_LUA=1 \
		WITH_LIBXML2=1 WITH_LIBXSLT=1 WITH_PAM=1 WITH_SASL=1 WITH_LOCAL_LIBHPDF=1 \
		WITH_ICU=1 ICU_DIR=/opt/csw/icu4c-49.1.2 \
		WITH_LOCAL_FREEIMAGE=1 \
		WITH_PYTHON=1 \
		gmake \
			CC=gcc CXX=g++ CFLAGS=-mcpu=v9 CXXFLAGS=-mcpu=v9
Boost (http://www.boost.org) is the only library which is absolutely required in order to build Wolframe.
The following Boost libraries are required for building Wolframe:
	./bootstrap.sh --prefix=/usr/local/boost-1.55.0 \
		--with-libraries=thread,filesystem,system,program_options,date_time
	./bjam install
If you want to build the ICU normalization module (WITH_ICU=1) you will have to build 'boost-locale' with ICU support and you have to enable the 'regex' and the 'locale' boost libraries too:
	./bootstrap.sh --prefix=/usr/local/boost-1.55.0 \
		--with-libraries=thread,filesystem,system,program_options,date_time,regex,locale
	./bjam install
The location of the Boost library can be set when building Wolframe as follows:
make BOOST_DIR=/usr/local/boost-1.55.0
The official Boost packages are not recent enough. Build your own Boost version here.
If you want ICU support you will also need the 'libicu-devel' package.
The official Boost packages are not recent enough. Build your own Boost version here.
If you want ICU support you will also need the 'libicu-devel' package.
We currently build the official packages without ICU support. The reason is that there is no 'libicu-devel' package available for RHEL6 on OBS (see http://permalink.gmane.org/gmane.linux.suse.opensuse.buildservice/17779).
Get a Redhat developer license to get the 'libicu-devel' package or build your own libicu library and build your own Boost library with boost-locale and ICU support.
The official Boost packages are not recent enough. Build your own Boost version here.
If you want ICU support you will also need the 'libicu-devel' package.
You need the 'boost-devel' package. This package contains also the boost-locale and ICU backend.
You need the following packages: 'libboost-dev', 'libboost-program-options-dev', 'libboost-filesystem-dev', 'libboost-thread-dev', 'libboost-random-dev'.
If you want ICU support you will also need the 'libboost-locale-dev' package.
The official Boost packages are not recent enough. Build your own Boost version here.
You need the 'boost' and 'boost-libs' packages. The official Boost packages contains support for boost-locale and the ICU backend.
You need the 'boost' package. This package is part of the 'l' package series. The official Boost package contains support for boost-locale and the ICU backend.
You need the 'boost-libs' package.
Some boost header files are broken when compiling with gcc, for patches
see packaging/patches/FreeBSD.
They can be applied to the ports directory before
rebuilding Boost or directly to the installed header files in
/usr/local/include/boost.
We don't use the CSW boost packages.
As long you don't need ICU support you can build Boost as follows:
First apply all patches found in
packaging/patches/Solaris/1.55.0.
Then build boost with:
	./bootstrap.sh --prefix=/opt/csw/boost-1.55.0 \
		--with-libraries=thread,filesystem,system,program_options,date_time
	./b2 -a -d2 install
Note: The only tested version for now is version 1.55.0! Other versions of Boost may work or not work..
We don't use the CSW boost packages.
As long you don't need ICU support you can build Boost as follows:
Patch the correct architecture (V8 is not really supported, but V8
is also very old) and gcc version in tools/build/v2/user-config.jam:
using gcc : 4.8.2 : g++ : <compileflags>-mcpu=v9 ;
Then build boost with:
	./bootstrap.sh --prefix=/opt/csw/boost-1.55.0 \
		--with-libraries=thread,filesystem,system,program_options,date_time
	./b2 -a -d2 install
Note: The only tested version for now is version 1.55.0! Other versions of Boost may work or not:
Do not use boost 1.48.0, it breaks in the threading header files with newer gcc versions (4.8.x) and runs only with old gcc versions (4.6.x).
Do not use boost 1.49.0, it has a missing function 'fchmodat' causing building of libboost_filesystem to fail!
Boost 1.50.0 thru 1.54.0 have never been tested with Wolframe, so don't use those!
The Wolframe protocol can be secured with SSL. You have to specify the following when building:
make WITH_SSL=1
Currently only OpenSSL (http://www.openssl.org) is supported. The location of the library can be overloaded with:
make WITH_SSL=1 OPENSSL_DIR=/usr/local/openssl-1.0.1g
Use the most recent version of the OpenSSL library available for you platform.
Note: Be carefull to use the 0.9.8, 1.0.0 or 1.0.1g or newer versions, but not the versions 1.0.1 through 1.0.1f (Heartbleed bug)!
You need the 'openssl-devel' package.
FreeBSD contains all necessary SSL libraries per default, you don't have to install any special packages.
NetBSD contains all necessary SSL libraries per default, you don't have to install any special packages.
Wolframe can use an Sqlite3 database (http://sqlite.org) as backend for data storage and for authentication and autorization.
You enable the building of a loadable Sqlite3 database module with:
make WITH_SYSTEM_SQLITE3=1
If you don't have a recent Sqlite version on your system you can also build the module against the embedded version:
make WITH_LOCAL_SQLITE3=1
The location of the Sqlite library can be overloaded with:
make WITH_SYSTEM_SQLITE3=1 SQLITE3_DIR=/usr/local/sqlite-3.4.3
You can also override all compilation and linking flags of Sqlite separately:
	make WITH_SYSTEM_SQLITE3=1 \
		SQLITE3_INCLUDE_DIR=/usr/local/sqlite-3.4.3/include \
		SQLITE3_LIB_DIR= /usr/local/sqlite-3.4.3/lib \
		SQLITE3_LIBS=-lsqlite3
When building with 'WITH_SYSTEM_SQLITE3' it is enough to install the correct development library.
The official Sqlite package is too old, use the embedded version of Sqlite with 'WITH_SYSTEM_SQLITE3=1'.
You need the 'sqlite-devel' package.
You need the 'libsqlite3-dev' package.
For running the Sqlite3 database tests you also need the 'sqlite3' package.
You need the 'sqlite3-devel' package.
For running the Sqlite3 database tests you also need the 'sqlite3' package.
You need the 'CSWlibsqlite3-0' and the 'CSWlibsqlite3-dev' packages.
For running the Sqlite3 database tests you also need the 'CSWsqlite3' package.
Wolframe can use a PostgreSQL database (http://postgresql.org) as backend for data storage and for authentication and autorization.
You enable the building of a loadable PostgreSQL database module with:
make WITH_PGSQL=1
The location of the PostgreSQL library can be overloaded with:
make WITH_PGSQL=1 PGSQL_DIR=/usr/local/postgresql-9.1.3
You can also override all compilation and linking flags of PostgreSQL separately:
	make WITH_PGSQL=1 \
		PGSQL_INCLUDE_DIR=/usr/local/postgresql-9.1.3/include \
		PGSQL_LIB_DIR=/usr/local/postgresql-9.1.3/lib \
		PGSQL_LIBS=-lpq
You need the 'postgresql-devel' package.
For Centos/RHEL/SciLi 5 you can choose between the 'postgresql-devel'package (which is version 8.1) or the 'postgresql84-devel' package. The 8.4 version is recommended over 8.1.
For running the Postgresql tests you need a fully functional 'postgresql-server' with a db user 'wolfusr' (password: 'wolfpwd') owning a database called 'wolframe'.
Setting up a test user in PostgreSQL on version 7 of Centos/RHEL/SciLi and Fedora is done with:
	postgresql-setup initdb
	systemctl start postgresql.service
	systemctl enable postgresql.service
change the authentication method from 'ident' to 'md5' in
pg_hba.conf.
You need the 'libpq-dev' package.
For running the PostgreSQL database tests you also need the 'postgresql-client' package.
You also need a fully functional PostgreSQL server, package 'postgresql'.
You need the 'postgresql-libs' package.
If you want to test you also have to set up the PostgreSQL server which comes in the 'postgresql' package.
A PostgreSQL package is not available on Slackware, build your own one with:
	./configure --prefix=/usr/local/pgsql
	make
	make install
	groupadd -g 990 postgres
	useradd -g postgres -u 990 postgres
	mkdir /usr/local/pgsql/var
	chown -R postgres:users /usr/local/pgsql/var
	su postgres
	/usr/local/pgsql/bin/initdb -D /usr/local/pgsql/var
	exit
	cat > /etc/rc.d/rc.postgresql
	#!/bin/sh

	case "$1" in
		start)
			su -l postgres -s /bin/sh -c "/usr/local/pgsql/bin/pg_ctl  -D /usr/local/pgsql/var -p /usr/local/pgsql/bin/postmaster start  > /dev/null 2>&1" < /dev/null
			;;
		stop)
			kill `ps -efa | grep postmaster | grep -v grep | awk '{print $2}'`
			;;
		*)
			echo $"Usage: $0 {start|stop}"
			exit 1
	esac

	exit 0
	(ctrl-D)
	chmod 0775 /etc/rc.d/rc.postgresql
	usermod -d /usr/local/pgsql postgres
Compile Wolframe now with:
	make WITH_PGSQL=1 \
		PGSQL_DIR=/usr/local/pgsql
Alternatively you can of course also build the 'postgresql' package with the help of SlackBuilds.
You need the 'postgresql93-client' package.
For testing you also need the 'postgresql93-server' package.
You need the 'postgresql92-client' package.
For testing you also need the 'postgresql92-server' package.
You need the 'postgresql92-client' package.
For testing you also need the 'postgresql92-server' package.
You need the 'CSWpostgresql-dev' package.
For testing you also need the 'CSWpostgresql91-server' package.
Wolframe can use a Oracle database (http://www.oracle.com) as backend for data storage and for authentication and autorization.
Import note: Make sure you have all the licenses to develop with Oracle and to install an Oracle database! The Wolframe team doesn't take any responsability if licenses are violated!
You enable the building of a loadable Oracle database module with:
make WITH_ORACLE=1
The location of the Oracle instantclient library can be overloaded with:
make WITH_ORACLE=1 ORACLE_DIR=/opt/oracle/instantclient_11_2
You can also override all compilation and linking flags of Oracle separately:
	make WITH_ORACLE=1 \
		ORACLE_INCLUDE_DIR=/usr/lib/oracle/11_2/client64 \
		ORACLE_LIB_DIR=/usr/lib/oracle/11_2/client64 \
		ORACLE_LIBS=-lclntsh
If you want to run the tests for Oracle you'll have to set up an Oracle
database. Then install the 'wolframe' database and the 'wolfusr' database
user. Sql example files can be found in
contrib/database/oracle.
For building the Oracle database module you have to download the RPM packages
oracle-instantclient12.1-basic-12.1.0.1.0-1.i386.rpm and
oracle-instantclient12.1-devel-12.1.0.1.0-1.i386.rpm.
You can of course also install the zipfiles and install those.
From the system repositories you'll need the 'libaio' package.
If you want to use the 'sqlplus' command line tool for manual testing you also
have to install the package
oracle-instantclient12.1-sqlplus-12.1.0.1.0-1.i386.rpm.
If you want a history in sqlplus it's highly recommended that you install
a command line history wrapper like for instance 'rlwrap'.
For building the Oracle database module you have to download the RPM packages
oracle-instantclient12.1-basic-12.1.0.1.0-1.i386.rpm and
oracle-instantclient12.1-devel-12.1.0.1.0-1.i386.rpm.
To install those RPM files you'll need the 'alien' tool. You can of course also install the zipfiles and install those.
From the system repositories you'll need the 'libaio1' package.
If you want to use the 'sqlplus' command line tool for manual testing you also
have to install the package
oracle-instantclient12.1-sqlplus-12.1.0.1.0-1.i386.rpm.
If you want a history in sqlplus it's highly recommended that you install
a command line history wrapper like for instance 'rlwrap'.
For building the Oracle database module you have to download the RPM packages
oracle-instantclient12.1-basic-12.1.0.1.0-1.i386.rpm and
oracle-instantclient12.1-devel-12.1.0.1.0-1.i386.rpm.
You can of course also install the zipfiles and install those.
From the system repositories you'll need the 'libaio1' package.
If you want to use the 'sqlplus' command line tool for manual testing you also
have to install the package
oracle-instantclient12.1-sqlplus-12.1.0.1.0-1.i386.rpm.
If you want a history in sqlplus it's highly recommended that you install
a command line history wrapper like for instance 'rlwrap'.
You need the two packages 'oracle-instantclient-basic' and 'oracle-instantclient-sdk'.
Have a look at https://wiki.archlinux.org/index.php/Oracle_client on how to install the Oracle packages. Basically you have two options: either you use the 'oracle' pacman repository or you download the Oracle packages by hand and run the build scripts from AUR.
If you want to use the 'sqlplus' command line tool for manual testing you also have to install the package 'oracle-instantclient-sqlplus'. If you want a history in sqlplus it's highly recommended that you install a command line history wrapper like for instance 'rlwrap'.
Simply download the zipfiles and install them to a directory, let's say '/opt/oracle/instantclient_12_1':
	mkdir -p /opt/oracle
	cd /opt/oracle
	unzip instantclient-basic-linux.x64-12.1.0.1.0.zip
	unzip instantclient-sdk-linux.x64-12.1.0.1.0.zip
Add the following line to /etc/ld.so.conf and
reload the cached shared libraries:
	echo "/opt/oracle/instantclient_12_1" >> /etc/ld.so.conf
	ldconfig
Call 'make' with:
make WITH_ORACLE=1 ORACLE_DIR=/opt/oracle/instantclient_12_1
For building the Oracle database module you need the two packages 'oracle-instantclient-basic', 'oracle-instantclient-sdk' (both 11.2 and 12.1 are ok, 12.1 needs a higher patchlevel of the SUNW C library though).
Unpack the ZIPs for instance to '/opt/oracle/instantclient_11_2' and build set ORACLE_DIR accordingly (together with WITH_ORACLE=1).
Wolframe can use libxml2 and libxslt (http://xmlsoft.org/) for filtering and the conversion of XML data.
You can build only filtering with libxml2. But if you enable libxslt filtering you also have to enable libxml2 filtering.
You enable the building of a loadable libxml2/libxslt filtering module with:
make WITH_LIBXML2=1 WITH_LIBXSLT=1
The location of those two libraries can be overloaded with:
	make WITH_LIBXML2=1 WITH_LIBXSLT=1 \
		LIBXML2_DIR=/usr/local/libxml2-2.9.1 \
		LIBXSLT_DIR=/usr/local/libxslt-1.1.28
You can also override all compilation and linking flags of libxml2 and libxslt separately:
	make WITH_LIBXML2=1 WITH_LIBXSLT=1 \
		LIBXML2_INCLUDE_DIR=/usr/local/libxml2-2.9.1/include \
		LIBXML2_LIB_DIR=/usr/local/libxml2-2.9.1/lib \
		LIBXML2_LIBS=-lxml2 \
		LIBXSLT_INCLUDE_DIR=/usr/local/libxslt-1.1.28/include \
		LIBXSLT_LIB_DIR=/usr/local/libxslt-1.1.28/lib \
		LIBXSLT_LIBS=-lxslt
The official libxml2 and libxslt package is too old, compile your own versions. Make sure your own libxslt version uses the libxml2 version you compiled and not the system one!
If you don't need working iconv support for non-UTF8 character sets you may also try to use the provided packages 'libxml2-devel' and 'libxslt-devel' but we cannot recommend this.
You need the 'libxml2-devel' and 'libxslt-devel' packages.
You need the 'libxml2-dev' and 'libxslt1-dev ' packages.
You need the 'libxml2-devel' and 'libxslt-devel' packages.
You need the 'libxml2' and the 'libxslt' packages. Both packages are part of the 'l' package series.
Wolframe can use Textwolf (http://textwolf.net) for filtering and the conversion of XML data.
The textwolf library is embedded in the subdirectory
3rdParty/textwolf.
You enable the building of a loadable Textwolf filtering module with:
make WITH_TEXTWOLF=1
Note: If you plan to run tests when building the Wolframe you should enable Textwolf as many tests rely on it's presence.
Wolframe can use cJSON (http://sourceforge.net/projects/cjson/) for filtering and the conversion of JSON data.
The cjson library is embedded in the subdirectory
3rdParty/libcjson.
You enable the building of a loadable cJSON filtering module with:
make WITH_CJSON=1
Wolframe can be scripted with Lua (http://www.lua.org).
The Lua interpreter is embedded in the subdirectory
3rdParty/lua.
You enable the building of a loadable Lua scripting module with:
make WITH_LUA=1
Wolframe can be scripted with Python (https://www.python.org).
The module supports only version 3 of the Python interpreter, version 2 is not supported.
You enable the building of a loadable Python scripting module with:
make WITH_PYTHON=1
The location of the Python library can be overloaded with:
	make WITH_PYTHON=1 \
		PYTHON_DIR=/usr/local/Python-3.3.5
You can also override all compilation and linking flags of the Python library separately:
	make WITH_PYTHON=1 \
		PYTHON_CFLAGS=-I/usr/include/python3.3m -I/usr/include/python3.3m \
		PYTHON_LDFLAGS=-lpthread -Xlink -export-dynamic \
		PYTHON_LIBS=-lpython3.3m
Normally you should not change those flags by hand and rely on the results of the 'python-config' script.
There are no official Python packages for version 3 of Python. Build your own version of Python. Make sure the location of 'python3-config' is in your path.
On Slackware you have to build your own version of Python with:
	./configure --enable-shared
	make
	make install
Alternatively you can of course also build the 'python3' package with the help of SlackBuilds.
We cannot use 'CSWpython31-dev' because it's build with the Forte compiler.
We build our own Python 3 with:
	./configure --prefix=/opt/csw/python-3.3.2/ --enable-shared
	gmake
	gmake install
Wolframe can print with libhpdf (http://libharu.org/, also called libharu).
You enable the building of a loadable libhpdf printing module with:
make WITH_SYSTEM_LIBHPDF=1
You can also link against the embedded version of libhpdf in '3rdParty/libhpdf' instead of the one of the Linux distribution:
make WITH_LOCAL_LIBHPDF=1
The location of the libhpdf library can be overloaded with:
	make WITH_SYSTEM_LIBPHDF=1 \
		LIBHPDF_DIR=/usr/local/libharu-2.2.1
You can also override all compilation and linking flags of the libhpdf library separately:
	make WITH_SYSTEM_LIBPHDF=1 \
		LIBHPDF_INCLUDE_DIR=/usr/local/libharu-2.2.1/include \
		LIBHPDF_LIB_DIR=/usr/local/libharu-2.2.1/lib \
		LIBHPDF_LIBS=-lhpdf
Though most Linux distributions have a 'libhpdf' package we recommend to use the embedded version 2.3.0RC2 as this version contains many patches.
You need the 'zlib-devel' and 'libpng-devel' packages to build libhpdf.
On Fedora you can also try to use the 'libhpdf-devel' package.
You need the 'zlib1g-dev' and 'libpng12-dev' packages to build libhpdf.
You can also try to use the 'libhpdf-dev' package.
You need the 'zlib-devel' and 'libpng12-devel' or 'libpng15-devel' packages to build libhpdf.
You can also try to use the 'libhpdf-devel' package.
You need the 'zlib' and 'libpng' packages to build libhpdf.
You can also try to use the 'libharu' package.
On Slackware you have to build your own version of libhpdf. You need the 'zlib' and 'libpng' packages.
Both packages are part of the 'l' package series.
Build the embedded version of libhpdf with 'WITH_LOCAL_LIBHPDF=1'.
You need the 'png' package for this.
Build the embedded version of libhpdf with 'WITH_LOCAL_LIBHPDF=1'.
You need the 'png' and the 'zlib' packages for this.
Build the embedded version of libhpdf with 'WITH_LOCAL_LIBHPDF=1'.
You need the 'CSWlibz-dev' package for this.
Wolframe can manipulate various image formats with the help of the FreeImage project (http://freeimage.sourceforge.net).
You enable the building of a loadable FreeImage processing module with:
make WITH_SYSTEM_FREEIMAGE=1
You can also link against the embedded version of FreeImage in '3rdParty/freeimage' instead of the one of the Linux distribution:
make WITH_LOCAL_FREEIMAGE=1
The location of the FreeImage package can be overloaded with:
	make WITH_SYSTEM_FREEIMAGE=1 \
		FREEIMAGE_DIR=/usr/local/FreeImage-3.15.4
You can also override all compilation and linking flags of the FreeImage package separately:
	make WITH_SYSTEM_FREEIMAGE=1 \
		FREEIMAGE_INCLUDE_DIR=/usr/local/FreeImage-3.15.4/include \
		FREEIMAGE_LIB_DIR=/usr/local/FreeImage-3.15.4/lib \
		FREEIMAGE_LIBS=-lfreeimage \
		FREEIMAGEPLUS_INCLUDE_DIR=/usr/local/FreeImage-3.15.4/include \
		FREEIMAGEPLUS_LIB_DIR=/usr/local/FreeImage-3.15.4/lib \
		FREEIMAGEPLUS_LIBS=-lfreeimageplus
Though there are FreeImage packages on most Linux distributions you may still want to use the locally embedded version.
There are FreeImage packages, but they are usually quite old. Better build you own version if FreeImage.
You need the 'zlib-devel' and 'libpng-devel' packages to build FreeImage.
You need the 'zlib-devel' and 'libpng-devel' packages to build FreeImage.
You may also try to use 'freeimage-devel' package.
You need the 'zlib1g-dev' and 'libpng12-dev' packages to build FreeImage.
You can also try to use the 'libfreeimage-devel' package.
You need the 'zlib-devel' and 'libpng12-devel' or 'libpng15-devel' packages to build FreeImage.
You can also try to use the 'freeimage-devel' package.
On Slackware you have to build your own version of FreeImage. You need the 'zlib' and 'libpng' packages. Both packages are part of the 'l' package series.
Alternatively you can of course also build the 'FreeImage' package with the help of SlackBuilds.
Build the embedded version of FreeImage with 'WITH_LOCAL_FREEIMAGE=1'.
You need the 'png' package for this.
There is a FreeImage port but it doesn't build the libfreeimageplus library we need.
Note: FreeImage doesn't build on 32-bit currently because gcc doesn't support some 64-bit constants on FreeBSD.
Build the embedded version of FreeImage with 'WITH_LOCAL_FREEIMAGE=1'. You need the 'png' and the 'zlib' packages for this.
Build the embedded version of FreeImage with 'WITH_LOCAL_FREEIMAGE=1'.
You need the 'CSWlibz-dev' package for this.
Libhpdf needs the zlib and libpng libraries.
The location of the zlib and libpng package can be overloaded with:
	make \
		LIBZ_DIR=/usr/local/zlib-1.2.8 \
		LIBPNG_DIR=/usr/local/libpng-1.6.10
You can also override all compilation and linking flags of the zlib and libpng packages separately:
	make \
		LIBZ_INCLUDE_DIR=/usr/local/zlib-1.2.8/include \
		LIBZ_LIB_DIR=/usr/local/zlib-1.2.8/lib \
		LIBZ_LIBS=-lz \
		LIBPNG_INCLUDE_DIR=/usr/local/libpng-1.6.10/include \
		LIBPNG_LIB_DIR=/usr/local/libpng-1.6.10/libs \
		LIBPNG_LIBS=-lpng
Wolframe can use the International Components for Unicode (ICU, http://site.icu-project.org) library for text normalization and conversion.
For this to work you need the ICU library itself (ICU4C, at least version 3.6) and the 'boost-locale' library has to have the ICU backend enabled. This is not the case in all Linux distributions.
Note: The Wolframe server doesn't depend directly on the ICU library, only the ICU normalization module does!
You enable the building of a loadable ICU normalization module with:
make WITH_ICU=1
The location of the ICU library can be overloaded with:
	make WITH_ICU=1 \
		ICU_DIR=/usr/local/icu4c-52_1
You can also override all compilation and linking flags of the ICU library separately:
	make WITH_ICU=1 \
		ICU_INCLUDE_DIR=/usr/local/icu4c-52_1/include \
		ICU_LIB_DIR=/usr/local/icu4c-52_1/lib \
		ICU_LIBS=-licuuc -licudata -licui18n
Boost is too old, build your own Boost locale and ICU support.
You need the 'boost-devel' package. The official Boost packages have support for Boost locale and the ICU backend.
The official Boost packages are not recent enough. Build your own Boost version with ICU support here.
You need the 'boost-devel' package. The official Boost packages have support for Boost locale and the ICU backend.
You need the 'boost-libs' package. The official Boost package have support for Boost locale and the ICU backend.
The official Boost package contains support for boost-locale and the ICU backend. This package is part of the 'l' package series.
The official Boost packages have a boost-locale library which has support for the ICU backend per default.
The official Boost packages don't contain a boost-locale with ICU backend.
Build Boost in this case with the patched from
packaging/patches/FreeBSD
applied.
You also need the 'icu' package in this case.
Note: The Boost locale and ICU support is currently broken, see also https://github.com/Wolframe/Wolframe/issues/59.
You cannot use the 'SUNWicud/SUNWicu' and 'CSWlibicu_dev' packages as they are both linked with the Forte C++ compiler. You have to compile your own version compiled with the gcc compiler from CSW:
gtar zxf icu4c-51_2-src.tgz
apply the solaris XOPEN patch
(packaging/patches/Solaris/icu4c-1.51.2/icu_source_common_uposixdefs_h.patch),
then build ICU with:
	cd icu/source
	./runConfigureICU Solaris/GCC --prefix=/opt/csw/icu4c-51.2
	gmake
	gmake install
Then build Boost as follows:
First apply all patches found in
packaging/patches/Solaris/1.55.0.
Then build boost with:
	./bootstrap.sh --prefix=/opt/csw/boost-1.55.0 \
		--with-icu=/opt/csw/icu4c-51.2 \
		--with-libraries=thread,filesystem,system,program_options,date_time,regex,locale
	./b2 -a -sICU_PATH=/opt/csw/icu4c-51.2 -d2 install
Note: The only tested version for now is version 1.55.0! Other versions of Boost may work or not work..
We don't use the CSW boost packages.
You cannot use the 'SUNWicud/SUNWicu' and 'CSWlibicu_dev' packages as they are both linked with the Forte C++ compiler. You have to compile your own version compiled with the gcc compiler from CSW:
gtar zxf icu4c-49_1_2-src.tgz
apply the solaris icu_source_configure patch
(packaging/patches/Solaris/icu4c-1.49.2/icu_source_configure.patch),
then build ICU with:
	cd icu/source
	./runConfigureICU Solaris/GCC --prefix=/opt/csw/icu4c-49.1.2
	gmake
	gmake install
In Boost patch the correct architecture (V8 is not really supported, but V8
is also very old) and gcc version in tools/build/v2/user-config.jam:
using gcc : 4.8.2 : g++ : <compileflags>-mcpu=v9 ;
Apply all Boost compilation patches from 'packaging/patches/Solaris/boost-1.55.0' now.
Then build boost with:
	./bootstrap.sh --prefix=/opt/csw/boost-1.55.0 \
		--with-libraries=thread,filesystem,system,program_options,date_time,regex,locale \
		--with-icu=/opt/csw/icu4c-49.1.2
	./b2 -a -sICU_PATH=/opt/csw/icu4c-49.1.2 -d2 install
Note: The only tested version for now is version 1.55.0! Other versions of Boost may work or not:
Do not use boost 1.48.0, it breaks in the threading header files with newer gcc versions (4.8.x) and runs only with old gcc versions (4.6.x).
Do not use boost 1.49.0, it has a missing function 'fchmodat' causing building of libboost_filesystem to fail!
Boost 1.50.0 thru 1.54.0 have never been tested with Wolframe, so don't use those!
Wolframe has internationalization support with the help of the gettext mechanism.
You can disable NLS support completly with:
make ENABLE_NLS=0
Per default it is enabled.
'gettext' and 'libintl' are nowadays part of the GNU C library on Linux. No special provisions are necessary.
Wolframe can authenticate users with PAM.
You enable the building of a loadable PAM authentication module with:
make WITH_PAM=1
The location of the PAM library can be overloaded with:
	make WITH_PAM=1 \
		PAM_DIR=/usr/local/pam-1.1.8
You can also override all compilation and linking flags of the PAM library separately:
	make WITH_PAM=1 \
		PAM_INCLUDE_DIR=/usr/local/pam-1.1.8/include \
		PAM_LIB_DIR=/usr/local/pam-1.1.8/lib \
		PAM_LIBS=-lpam
You need the 'pam-devel' package.
Wolframe can authenticate users with the Cyrus SASL library (http://cyrusimap.org/).
Note: GNU SASL is currently not supported.
You enable the building of a loadable SASL authentication module with:
make WITH_SASL=1
The location of the Cyrus SASL library can be overloaded with:
	make WITH_SASL=1 \
		SASL_DIR=/usr/local/cyrus-sasl-2.1.26
You can also override all compilation and linking flags of the Cyrus SASL library separately:
	make WITH_SASL=1 \
		SASL_INCLUDE_DIR=/usr/local/cyrus-sasl-2.1.26/include \
		SASL_LIB_DIR=/usr/local/cyrus-sasl-2.1.26/lib \
		SASL_LIBS=-lsasl2
You need the 'cyrus-sasl-devel' package.
You need the 'libsasl2-dev' package.
For running the SASL tests you also need the 'sasl2-bin' package.
Wolframe has tests written in Google gtest (https://code.google.com/p/googletest/).
Tests are run with:
make test
Some tests run for a long time (regression and stress tests). They are not run per default when calling 'make test', but you have to call:
make longtest
Sometimes you only want to build the test programs but not to run them (for instance when cross-compiling). Then you can set the 'RUN_TESTS' variable as follows:
make test RUN_TESTS=0
Some more complex tests are written with Expect (http://expect.sourceforge.net/).
You enable testing with Expect with:
make WITH_EXPECT=1
The location of the Expect interpreter can be overloaded with:
	make WITH_EXPECT=1 \
		EXPECT=/usr/local/bin/expect
You need the 'expect' and the 'telnet' packages.
You need the 'expect' and 'telnet' packages. Those packages are part of the 'tcl' respectively the 'n' package series.
The documentation including the man pages is written using DocBook (http://www.docbook.org).
Developer documentation is generated with Doxygen (http://www.doxygen.org).
All documentation is built in the 'docs' subdirectory:
	cd docs
	make doc
Note: The various tools are not able to produce the same results on all platforms. Your experience in the quality of the generated artifacts may vary. Generally, the newer the tools, the better.
The validity of the XML of the documenation can be checked with:
	cd docs
	make check
You need the 'libxslt', 'doxygen' and 'docbook-style-xsl' packages (from EPEL).
When generating PDFs you need the 'fop' package.
When rebuilding the SVG images of the documentation you also need 'dia'.
You need the 'libxslt', 'doxygen' and 'docbook-style-xsl' packages.
When generating PDFs you need the 'fop' package.
When rebuilding the SVG images of the documentation you also need 'dia'.
You need the 'xsltproc', 'doxygen' and 'docbook-xsl' packages.
When generating PDFs you need the 'fop' package.
When rebuilding the SVG images of the documentation you also need 'dia'.
For checking the validity of various XML files you need 'libxml2-utils' (for xmllint).
You need the 'libxslt', 'doxygen' and 'docbook-style-xsl' packages.
When generating PDFs you need the 'fop' package.
When rebuilding the SVG images of the documentation you also need 'dia'.
You need the 'libxslt', 'doxygen' and 'docbook-xsl' packages.
When generating PDFs you need the 'fop' package. Newest versions run only with the SVN version of 'java-xmlgraphics-commons'. Install the package 'java-xmlgraphics-commons-svn' from the AUR.
When rebuilding the SVG images of the documentation you also need 'dia'.
You need the 'libxslt' and 'doxygen' packages. Those packages part of the 'l', 'd' package series. DocBook you have to install on your own.
When generating PDFs you have to install 'fop' on your own.
When rebuilding the SVG images of the documentation you also need 'dia' which you will have to build on your own. Alternatively you can of course also build the 'dia' package with the help of SlackBuilds.
The makefiles provide a 'install' and an 'uninstall' target to install and uninstall the software.
The 'DESTDIR' and 'prefix' parameters are useful for packagers to reroute the destination of the installation.
For instance:
	make DESTDIR=/var/tmp prefix=/usr/local/wolframe-0.0.3
 install
installs the software in:
	/var/tmp/usr/local/wolframe-0.0.3
/sbin/wolframed
	/var/tmp/usr/local/wolframe-0.0.3
/etc/wolframe/wolframe.conf
	...
The 'DEFAULT_MODULE_LOAD_DIR' parameter can be used by packagers to set the load directory for loadable modules. For instance a Redhat SPEC file will contain a line like:
make DEFAULT_MODULE_LOAD_DIR=%{_libdir}/wolframe/modules
Usually dependencies are automatically recomputed and stored in files with extension '.d'.
On some platforms and with some older versions of GNU make you can run into problems, especially if you build the software in parallel. For this case you can force the computation of depencies in a special make step as follows:
	make depend
	make -j 4
Additionally the make system understands 'MAKEDEPEND', so you can provide you own dependency generator at need.
Especially useful is
	make MAKEPEDS=/bin/true depend
	make -j 4
to avoid dependency management at all, for instance for one-time builds in continuous integration, where the generation of working dependencies can take a long time and is of no use.
Wolframe supports the standard targets 'dist', 'dist-Z', 'dist-gz' and 'dist-bz2' to create a tarball containg all the necessary sources.
The wolfclient is a Qt-based client for the Wolframe server.
You build it with:
	qmake -config debug -recursive
	make
	make install
respectively for a release version:
	qmake -config release -recursive
	make
	make install
Note: qmake is on some platforms called qmake-qt4 or qmake-qt5 and may be installed in non-standard locations.
Note: Use gmake instead of make on FreeBSD, NetBSD and Solaris.
You can run the unit tests of the client with:
make test
Note:For the tests to run you need an installed X server and have to set the DISPLAY variable correctly.
You can disable the building of SSL-enabled code if you remove the
'WITH_SSL=1' definition in the 'DEFINES' directive in
libqtwolfclient/libqtwolfclient.pro.
You need the Qt libarary of the Unix system you are building on. The following list gives Linux distribution respectively Unix specific instructions and lists the required packages.
You can use the Qt 4 or 5 version to build the client.
The official Qt 4 package is too old, build your own Qt library.
For Qt 5 compile your own version of the library.
For Qt 4 you need the 'qt4-devel' package.
For Qt 5 compile your own version of the library.
For Qt 4 you need the 'qt4-devel' package.
For Qt 5 you need the following packages: 'qt5-qtbase-devel', 'qt5-qttools-devel', 'qt5-qttools-static'.
For Qt 4 you need the 'libqt4-dev' package.
For Qt 5 compile your own version of the library.
For Qt 4 you need the 'libqt4-dev' package.
For Qt 5 compile your own version of the library.
For Qt 4 you need the 'libqt4-dev' package.
For Qt 5 you need the following packages: 'qt5-qmake', 'libqt5designer5', 'qtbase5-dev', 'qttools5-dev', 'qttools5-dev-tools'.
For Qt 4 you need the 'libqt4-devel' package.
For Qt 5 compile your own version of the library.
For Qt 4 you need the 'libqt4-devel' package.
For Qt 5 you need the following packages: 'libqt5-qtbase-devel', 'libqt5-qttools-devel'.
For Qt 4 you need the 'qt4' package.
For Qt 5 you need the 'qt5-base' and the 'qt5-tools' package.
For Qt 4 you need the 'qt' package. This package is part of the 'l' package series.
For Qt 5 compile your own version of the library.
For Qt 4 you need the following packages: 'qt4-gui', 'qt4-moc', 'qt4-network', 'qt4-designer', 'qt4-rcc', 'qt4-uic', 'qt4-qmake', 'qt4-linguist'.
For Qt 5 compile your own version of the library.
For Qt 4 you need the following packages: 'qt4-gui', 'qt4-moc', 'qt4-network', 'qt4-designer', 'qt4-rcc', 'qt4-uic', 'qt4-qmake', 'qt4-linguist'.
For Qt 5 you need the following packages: 'qt5-gui', 'qt5-network', 'qt5-widgets', 'qt5-designer', 'qt5-concurrent', 'qt5-uitools', 'qt5-buildtools', 'qt5-qmake', 'qt5-linguisttools'.
For Qt 4 you need the 'qt4' package.
Make sure /usr/pkg/qt4/bin and
/usr/pkg/bin are part of the path.
Also set 'QTDIR' to /usr/pkg/qt4.
Build the wolfclient with:
qmake -config debug -recursive
respectively
qmake -config release -recursive
Before compiling apply the following patch command to the generated makefiles:
	find . -name Makefile -exec sh -c \
		"sed 's/libtool --silent/libtool --silent --tag=CXX/g' {} > x && mv x {}" \;
Now build normally with:
	gmake
	gmake install
To run the wolfclient you have
currently to set 'LD_LIBRARY_PATH' to /usr/X11R7/lib.
Using Qt 5 for wolfclient is untested.
For Qt 4 you need the 'CSWqt4-dev' package (at least version '4.8.5,REV=2013.11.26').
Using Qt 5 for wolfclient is untested.
For Qt 4 you need the 'CSWqt4-dev' package (at least version '4.8.5,REV=2013.11.26').
Before compiling apply the following patch command to the generated makefiles:
	for i in `find . -name Makefile`; do \
		sed 's|-Wl,-rpath|-Wl,-R|g' $i > /tmp/x; mv -f /tmp/x $i; \
	done
This is because we should use /usr/css/bin/ld as linker and this one unterstands only '-R' and not '-rpath'.
Now build normally with:
	gmake
	gmake install
Using Qt 5 for wolfclient is untested.
This is the Unix-style compilation using the Visual Studio Command Line Window and NMAKE. This is the preferred way currently.
For building Wolframe on Windows you need at least the following software:
Visual Studio C++ 2008 or newer (
cl.exe,rc.exe,link.exeandnmake.exe)Platform SDK 6.0a or newer
mc.exemay be missing in your path (for instance in Visual Studio 2008 it was not bundled), usually it is available as part of the Platform SDK, copy it somewhere into the pathBoost 1.48.0 or newer from http://www.boost.org
Depending on the features you want to use you also may need the following software:
The OpenSSL library 0.9.7 or newer, for encryption and authentication, http://www.openssl.org
The PostgreSQL database client library, version 8.1 or newer, for storing user data and authentication data in a PostgreSQL database, http://postgresql.org
The Oracle OCI client library, version 11.2 or newer, for storing user data and authentication data in an Oracle database, http://www.oracle.com
The win-iconv library, version 0.0.3 or newer, needed by libxml2, http://code.google.com/p/win-iconv/
The libxml2 library, version 2.7.6 or newer, for filtering XML data, http://xmlsoft.org/
The libxslt library, version 1.1.26 or newer, for the transformation of XML data, http://xmlsoft.org/
Python 3, version 3.3.0 or newer, for writting applications in Python, https://www.python.org
The ICU library, version 3.5 or newer, for text normalization and conversion, http://site.icu-project.org
For testing the Wolframe software you need:
Expect 5.40 or newer, for running the Expect tests, http://expect.sourceforge.net/
Expect needs ActiveTcl 8.5 or newer, for running the Expect tests, http://www.activestate.com/activetcl
A working telnet
A PostgreSQL or Oracle database when you want to run the database tests
For building Windows packages you need:
The WIX Toolset, version 3.5 or newer, http://wixtoolset.org/
For building the documentation and manpages you need:
Doxygen for developer documentation, http://www.doxygen.org
Docbook 4.5 or newer and the XSL toolchain, http://www.docbook.org
xsltproc.exe, from libxslt http://xmlsoft.org/The FOP PDF generator for documentation in PDF format, http://xmlgraphics.apache.org/fop/
hhc.exe, help compiler from the 'HTML Help Workshop', http://msdn.microsoft.com/en-us/library/windows/desktop/ms670169%28v=vs.85%29.aspx
For building the wolfclient you need:
Qt 4.6.x or later, or Qt 5, http://qt-project.org/
For secure communication between the wolfclient and the Wolframe server you need the OpenSSL library 0.9.7 or newer, http://www.openssl.org
Wolframe can be build in a Visual Studio command line (or better a Platform SDK command line) using the following command:
nmake /nologo /f Makefile.W32
You can check the compilation mode with:
setenv
The makefiles understand the standard GNU targets like 'clean', 'distclean', 'test', etc. The whole list of options can be seen with:
nmake /nologo /f Makefile.W32 help
Configuration is all done in a file called config.mk.
Examples can be found in the makefiles/nmake directory.
Optional features are enabled by using 'WITH_XXX' variables when calling nmake, e. g. to enable SSL support you call make like this:
nmake /nologo /f Makefile.W32 WITH_SSL=1
On Windows you would rather change the 'OPENSSL_DIR' variable in
the config.mk, for instance:
OPENSSL_DIR = C:\OpenSSL\Win32
A complete build may look like this:
	nmake /nologo /f Makefile.W32 WITH_SSL=1 WITH_EXPECT=1 WITH_LUA=1 ^
		WITH_SQLITE3=1 WITH_PGSQL=1 WITH_ORACLE=1 ^
		WITH_LIBXML2=1 WITH_LIBXSLT=1 ^
		WITH_LIBHPDF=1 WITH_EXAMPLES=1 WITH_ICU=1 WITH_FREEIMAGE=1 ^
		WITH_PYTHON=1 WITH_CJSON=1 WITH_TEXTWOLF=1 ^
		clean all test
We currently have no dependency system for the NMAKE build system, so be careful when to use 'clean' to rebuild parts of the system.
This way of building the system is mainly useful for automatized systems and for packaging.
Ccache (http://ccache.samba.org/) can be used to cache the compilation of Wolframe also on Windows.
You need then ccache.exe binary with MSVC support from
http://cgit.freedesktop.org/libreoffice/contrib/dev-tools/tree/ccache-msvc.
You also need the Cygwin runtime from
http://cygwin.org.
Install the ccache.exe binary into
c:\cygwin\bin.
Set the 'CC' and 'CXX' variables in
makefiles\nmake\config.mk as follows:
	CC=C:\cygwin\bin\ccache.exe cl
	CXX=C:\cygwin\bin\ccache.exe cl
Set the following variable in the shell you use to compile Wolframe:
Set CYGWIN=nodosfilewarning
Boost (http://www.boost.org) is the only library which is absolutely required in order to build Wolframe.
http://boost.teeks99.com provides
pre-compiled packages of Boost. You can install the library into for instance
C:\boost\boost_1_55_0 and set the 'BOOST_XXX' variables in
makefiles\nmake\config.mk as follows:
	BOOST_DIR = C:\Boost\boost_1_55
	BOOST_INCLUDE_DIR = $(BOOST_DIR)
	BOOST_LDFLAGS = /LIBPATH:$(BOOST_DIR)\lib32-msvc-10.0
	BOOST_VC_VER = vc100
	BOOST_MT = -mt
Rename the directory C:\Boost\boost_1_55_0\libs to
C:\Boost\boost_1_55_0\boost.
Note: Those pre-built packages don't have support for the ICU backend in boost-locale. If you need ICU support and enable it with 'WITH_ICU=1' you will have to build your own version of Boost from the sources.
The following Boost libraries are required for building Wolframe:
	bootstrap
	.\b2 --prefix=C:\boost\boost_1_55 ^
		--with-thread --with-filesystem --with-system --with-program_options ^
		--with-date_time ^
		architecture=x86 address-model=64 toolset=msvc ^
		install
Set 'architecture', 'address-mode' and 'toolset' fitting your platform.
If you want to build the ICU normalization module (WITH_ICU=1) you will have to build 'boost-locale' with ICU support and you have to enable the 'regex' and the 'locale' boost libraries too:
	bootstrap
	.\b2 --prefix=C:\boost\boost_1_55 ^
		--with-thread --with-filesystem --with-system --with-program_options ^
		--with-date_time --with-locale --with-regex ^
		-sICU_PATH="C:\icu4c-52_1-win32-debug" ^
		architecture=x86 address-model=64 toolset=msvc ^
		install
Set the "BOOST_XXX" variables in
makefiles\nmake\config.mk as follows:
	BOOST_DIR = C:\Boost\boost_1_55
	BOOST_INCLUDE_DIR = $(BOOST_DIR)
	BOOST_LDFLAGS = /LIBPATH:$(BOOST_DIR)\lib32-msvc-10.0
	BOOST_VC_VER = vc100
	BOOST_MT = -mt
The Wolframe protocol can be secured with SSL. Currently only OpenSSL (http://www.openssl.org) is supported.
Note: No matter whether you use the precompiled version or if you build OpenSSL on your own use the 0.9.8, 1.0.0 or 1.0.1g versions, but not the version 1.0.1 through 1.0.1f (Heartbleed bug)!
You can get a prebuilt version of OpenSSL from http://www.slproweb.com/products/Win32OpenSSL.html. Despite the name you get also 64-bit versions there.
Install the developer version (for instance Win32OpenSSL-1_0_1g.exe)
for instance to C:\OpenSSL-Win32.
Do not copy the OpenSSL binaries to the Windows system directory, copy them to the Bin subdirectory of the OpenSSL installation directory!
Set the "BOOST_XXX" variables in
makefiles\nmake\config.mk as follows:
OPENSSL_DIR = C:\OpenSSL-Win32
You need the community edition of ActivePerl from
http://www.activestate.com/activeperl/.
Install it for instance to C:\Perl.
You will also need NASM to assemble certain
parts of OpenSSL. You can get a Windows NASM from
http://www.nasm.us/.
Install it for instance to C:\nasm.
Make sure the Perl interpreter and the NASM assembler are part of the path in the shell you want to build OpenSSL:
Set PATH=%PATH%;C:\Perl\bin;C:\nasm
Get the source package openssl-1.0.1g.tar.gz of OpenSSL from
http://www.openssl.org.
Configure the package with:
	perl Configure debug-VC-WIN32 \
		--prefix="C:\openssl-1.0.1g-win32-debug"
for a debug version, respectively with:
	perl Configure VC-WIN32 \
		--prefix="C:\openssl-1.0.1g-win32-release"
for a release version.
Note: Make sure there prefix you choose has no spaces in it!
Prepare OpenSSL for NASM support with:
ms\do_nasm.bat
Build and install OpenSSL now with:
	nmake /f ms\ntdll.mak
	nmake /f ms\ntdll.mak install
More build information is available
in INSTALL.W32 and
INSTALL.W64 of the
OpenSSL package itself.
Wolframe can use an Sqlite3 database (http://sqlite.org) as backend for data storage and for authentication and autorization.
The Sqlite3 library is embedded in the subdirectory
3rdParty/sqlite3.
You enable the building of a loadable Sqlite3 database module with:
nmake /nologo /f Makefile.W32 WITH_SQLITE3=1
Wolframe can use a PostgreSQL database (http://postgresql.org) as backend for data storage and for authentication and autorization.
Download the Windows installer from EnterpriseDB (you reach the download link via http://postgresql.org).
You will have to set some variables in
makefiles\nmake\config.mk as follows:
	PGSQL_DIR = C:\Program Files\PostgreSQL\9.3
	PGDLL_WITH_I18N = 1
You enable the building of a loadable PostgreSQL database module with:
nmake /nologo /f Makefile.W32 WITH_PGSQL=1
You need the community edition of ActivePerl from
http://www.activestate.com/activeperl/.
Install it for instance to C:\Perl.
Make sure the Perl interpreter is part of the path in the shell you want to build PostgreSQL:
Set PATH=%PATH%;C:\Perl\bin
Get the source package postgresql-9.3.4.tar.gz of PostgreSQL from
http://www.opstgresql.org.
Configure the package in the config.pl
file which you create as follows:
	cd src\tools\msvc
	copy config_default.pl config.pl
Adapt config.pl to your needs. We actually don't
want to build the full server just the client PostgreSQL library, so
specifying the location of OpenSSL is enough:
openssl=>"C:\\openssl-1.0.1g-win32-debug"
Note: Those must be two backslashes!
If you built your own version of OpenSSL before you will be missing some linking libraries in the right places. So copy them with:
	mkdir C:\openssl-1.0.1g-win32-debug\lib\VC
	copy C:\openssl-1.0.1g-win32-debug\lib\libeay32.lib ^
		C:\openssl-1.0.1g-win32-debug\lib\VC\libeay32MDd.lib
	copy C:\openssl-1.0.1g-win32-debug\lib\ssleay32.lib ^
		C:\openssl-1.0.1g-win32-debug\lib\VC\ssleay32MDd.lib
respectively if you built the release version:
	mkdir C:\openssl-1.0.1g-win32-release\lib\VC
	copy C:\openssl-1.0.1g-win32-release\lib\libeay32.lib ^
		C:\openssl-1.0.1g-win32-release\lib\VC\libeay32MD.lib
	copy C:\openssl-1.0.1g-win32-release\lib\ssleay32.lib ^
		C:\openssl-1.0.1g-win32-release\lib\VC\ssleay32MD.lib
Build the libpq library now with:
build DEBUG libpq
respectively if you prefer a release version:
build RELEASE libpq
Note:
You may have to touch preproc.c and
preproc.h if 'build' wants
to start 'bison' and you don't have 'bison' installed.
Install the PostgreSQL client library for instance
to C:\PostgreSQL-9.3.4-win32-debug with:
install C:\PostgreSQL-9.3.4-win32-debug
Note: Unless you
were able to build the whole PostgreSQL the 'install'
script will fail. In this case copy the essential files
to for instance C:\PostgreSQL-9.3.4-win32-debug with:
	mkdir C:\PostgreSQL-9.3.4\include
	mkdir C:\PostgreSQL-9.3.4\lib
	copy Debug\libpq\libpq.dll C:\PostgreSQL-9.3.4\lib
	copy Debug\libpq\libpq.lib C:\PostgreSQL-9.3.4\lib
	copy src\interfaces\libpq\libpq-fe.h C:\PostgreSQL-9.3.4\include
	copy src\include\postgres_ext.h C:\PostgreSQL-9.3.4\include
	copy src\include\pg_config_ext.h C:\PostgreSQL-9.3.4\include
Note:
If you disable OpenSSL (for instance for debugging), you have
to touch sslinfo.sql in contrib/sslinfo.
The same applies for
uuid-ossp.sql and pgxml.sql.in.
Note: If you want to build PostgrSQL with gettext/libint or zlib support you have to build those libraries first, or get them from http://gnuwin32.sourceforge.net/packages.html.
Wolframe can use a Oracle database (http://www.oracle.com) as backend for data storage and for authentication and autorization.
Import note: Make sure you have all the licenses to develop with Oracle and to install an Oracle database! The Wolframe team doesn't take any responsability if licenses are violated!
You have to download the two packages
instantclient-basic-nt-12.1.0.1.0.zip and
instantclient-sdk-nt-12.1.0.1.0.zip and
install them to for instance
C:\Oracle\instantclient_12_1.
You will have to set the 'ORACLE_DIR' variable in
makefiles\nmake\config.mk as follows:
ORACLE_DIR = C:\Oracle\instantclient_12_1
You enable the building of a loadable Oracle database module with:
nmake /nologo /f Makefile.W32 WITH_ORACLE=1
Wolframe can use libxml2 and libxslt (http://xmlsoft.org/) for filtering and the conversion of XML data.
You can build only filtering with libxml2. But if you enable libxslt filtering you also have to enable libxml2 filtering.
Download the Windows ZIP files libxml2-2.7.8.win32.zip,
iconv-1.9.2.win32.zip and
libxslt-1.1.26.win32.zip
from
http://ftp.zlatkovic.com/libxml/).
Unpack them for instance to:
C:\libxml2-2.7.8.win32,
C:\iconv-1.9.2.win32 and
C:\libxslt-1.1.26.win32.
You will have to set the following variables in
makefiles\nmake\config.mk:
	ZLIB_DIR = C:\zlib-1.2.5.win32
	ICONV_DIR = C:\iconv-1.9.2.win32
	LIBXML2_DIR = C:\libxml2-2.7.8.win32
	LIBXSLT_DIR = C:\libxslt-1.1.26.win32
You enable the building of a loadable libxml2/libxslt filtering module with:
nmake /nologo /f Makefile.W32 WITH_LIBXML2=1 WITH_LIBXSLT=1
For libxml2 to support character sets you need a working
iconv library. We currently use
win-iconv-0.0.6.zip from
http://code.google.com/p/win-iconv/.
Build iconv.dll with
the supplied makefile from
packaging\patches\Windows\win-iconv\Makefile.msvc
and install the results to for instance
C:\win-iconv-0.0.6-win32-debug with:
	nmake /nologo /f Makefile.msvc DEBUG=1
	mkdir C:\win-iconv-0.0.6-win32-debug
	mkdir C:\win-iconv-0.0.6-win32-debug\include
	mkdir C:\win-iconv-0.0.6-win32-debug\lib
	mkdir C:\win-iconv-0.0.6-win32-debug\bin
	copy iconv.h C:\win-iconv-0.0.6-win32-release\include
	copy iconv.lib C:\win-iconv-0.0.6-win32-debug\lib
	copy iconv.dll C:\win-iconv-0.0.6-win32-debug\bin
respectively if you want to build a release version:
	nmake /nologo /f Makefile.msvc
	mkdir C:\win-iconv-0.0.6-win32-release
	mkdir C:\win-iconv-0.0.6-win32-release\include
	mkdir C:\win-iconv-0.0.6-win32-release\lib
	mkdir C:\win-iconv-0.0.6-win32-release\bin
	copy iconv.h C:\win-iconv-0.0.6-win32-release\include
	copy iconv.lib C:\win-iconv-0.0.6-win32-release\lib
	copy iconv.dll C:\win-iconv-0.0.6-win32-release\bin
Adapt the 'ICONV_DIR' variable in
makefiles\nmake\config.mk as follows:
ICONV_DIR = C:\win-iconv-0.0.6-win32-debug
Get the source package libxml2-2.9.1.tar.gz from
ftp://xmlsoft.org/libxml2/.
Configure libxml2, make it use the 'win-iconv' library:
	cd win32
	cscript configure.js compiler=msvc
		prefix="C:\libxml2-2.9.1-win32-release"
		lib="C:\win-iconv-0.0.6-win32-release\lib"
		include="C:\win-iconv-0.0.6-win32-release\include"
		zlib=no iconv=yes vcmanifest=yes
For a debug version you have to change 'debug' to 'release' in the paths and to add 'debug=yes' and 'cruntime=/MDd':
	cd win32
	cscript configure.js compiler=msvc
		prefix="C:\libxml2-2.9.1-win32-debug"
		lib="C:\win-iconv-0.0.6-win32-debug\lib"
		include="C:\win-iconv-0.0.6-win32-debug\include"
		zlib=no iconv=yes vcmanifest=yes
		debug=yes cruntime=/MDd
Note: Try to avoid spaces
in the installation prefix, if you really need some spaces then you will
have to fix them after running the configure.js
script by hand in the config.msvc file:
PREFIX="C:\libxml2-2.9.1 win32 debug"
Finally build and install libxml2 with:
	nmake /nologo /f Makefile.msvc all
	nmake /nologo /f Makefile.msvc install
Adapt the 'LIBXML2_DIR' variable in
makefiles\nmake\config.mk as follows:
LIBXML2_DIR = C:\libxml2-2.9.1-win32-debug
Get the source package libxslt-1.1.28.tar.gz from
ftp://xmlsoft.org/libxslt/.
Configure libxslt, make it use the 'win-iconv' and the 'libxml2' library compiled above:
	cd win32
	cscript configure.js compiler=msvc
		prefix="C:\libxslt-1.1.28-win32-release"
		lib="C:\libxml2-2.9.1-win32-release\lib;C:\win-iconv-0.0.6-win32-release\lib"
		include="C:\libxml2-2.9.1-win32-release\include\libxml2;C:\win-iconv-0.0.6-win32-release\include"
		zlib=no iconv=yes vcmanifest=yes
For a debug version you have to change 'debug' to 'release' in the paths and to add 'debug=yes' and 'cruntime=/MDd':
	cd win32
	cscript configure.js compiler=msvc
		prefix="C:\libxslt-1.1.28-win32-debug"
		lib="C:\libxml2-2.9.1-win32-debug\lib;C:\win-iconv-0.0.6-win32-debug\lib"
		include="C:\libxml2-2.9.1-win32-debug\include;C:\win-iconv-0.0.6-win32-debug\include"
		zlib=no iconv=yes vcmanifest=yes
		debug=yes cruntime=/MDd
Note: Try to avoid spaces
in the installation prefix, if you really need some spaces then you will
have to fix them after running the configure.js
script by hand in the config.msvc file:
PREFIX="C:\libxslt-1.1.28 win32 debug"
Finally build and install libxslt with:
	nmake /nologo /f Makefile.msvc all
	nmake /nologo /f Makefile.msvc install
Adapt the 'LIBXSLT_DIR' variable in
makefiles\nmake\config.mk as follows:
LIBXSLT_DIR = C:\libxslt-1.1.28-win32-debug
The DLLs end up in the wrong directory, move them from 'lib' to 'bin':
	cd C:\libxslt-1.1.28-win32-debug
	move lib\*.dll bin\.
Wolframe can use Textwolf (http://textwolf.net) for filtering and the conversion of XML data.
The textwolf library is embedded in the subdirectory
3rdParty/textwolf.
You enable the building of a loadable Textwolf filtering module with:
nmake /nologo /f Makefile.W32 WITH_TEXTWOLF=1
Note: If you plan to run tests when building the Wolframe you should enable Textwolf as many tests rely on it's presence.
Wolframe can use cJSON (http://sourceforge.net/projects/cjson/) for filtering and the conversion of JSON data.
The cjson library is embedded in the subdirectory
3rdParty/libcjson.
You enable the building of a loadable cJSON filtering module with:
nmake /nologo /f Makefile.W32 WITH_CJSON=1
Wolframe can be scripted with Lua (http://www.lua.org).
The Lua interpreter is embedded in the subdirectory
3rdParty/lua.
You enable the building of a loadable Lua scripting module with:
nmake /nologo /f Makefile.W32 WITH_LUA=1
Wolframe can be scripted with Python (https://www.python.org).
The module supports only version 3 of the Python interpreter, version 2 is not supported.
Download the official Python 3 Installer for Windows from http://python.org).
You will have to set the 'PYTHON_XXX' variables in
makefiles\nmake\config.mk as follows:
	PYTHON_DIR = C:\Python34
	PYTHON_VERSION = 34
	PYTHON_MAJOR_VERSION = 3
	PYTHON_LIB_DIR = $(PYTHON_DIR)\libs
	PYTHON_DLL_DIR = $(PYTHON_DIR)\DLLs
You enable the building of a loadable Python scripting module with:
nmake /nologo /f Makefile.W32 WITH_PYTHON=1
Note: The binary installation packages from http://python.org) do not contain debug versions of the library. If you want to build a debugging version of Wolframe you have to build your own version of Python.
You have to get the sources of Python3 called
Python-3.4.0.tar from
http://python.org.
Unpack it for instance to C:\Python-3.4.0.
Open the solution file PCBuild\pcbuild.sln.
Build the desired version. Read also PCBuild\readme.txt.
Copy the resulting python34_d.lib on top of the downloaded
binary vesion in for instance C:\Python34\libs and
python34_d.dll to C:\Python34\DLLs.
You will have to set the 'PYTHON_XXX' variables in
makefiles\nmake\config.mk as follows:
	PYTHON_DIR = C:\Python34
	PYTHON_VERSION = 34
	PYTHON_MAJOR_VERSION = 3
	PYTHON_LIB_DIR = $(PYTHON_DIR)\libs
	PYTHON_DLL_DIR = $(PYTHON_DIR)\DLLs
Wolframe can print with libhpdf (http://libharu.org/, also called libharu).
The libhpdf library is embedded in the subdirectory
3rdParty/libhpdf.
You enable the building of a loadable libhpdf printing module with:
nmake /nologo /f Makefile.W32 WITH_LIBHPDF=1
Wolframe can manipulate various image formats with the help of the FreeImage project (http://freeimage.sourceforge.net).
The FreeImage package is embedded in the subdirectory
3rdParty/freeimage.
You enable the building of a loadable FreeImage processing module with:
nmake /nologo /f Makefile.W32 WITH_SYSTEM_FREEIMAGE=1
Libhpdf needs the zlib and libpng libraries.
The libpng and zlib libraries are embedded in the subdirectory
3rdParty/zlib and 3rdParty/libpng.
Wolframe can use the International Components for Unicode (ICU, http://site.icu-project.org) library for text normalization and conversion.
You can take the pre-build ZIP-files from
http://site.icu-project.org,
called somthing like icu4c-52_1-Win32-msvc10.zip and
unpack them in for instance C:\icu4c-52_1_1-Win32-msvc10.
You will have to set the 'ICU_XXX' variables in
makefiles\nmake\config.mk as follows:
	ICU_LIB_VERSION = 52
	ICU_DIR = C:\icu4c-52_1-Win32-msvc10\icu
You also have to build your own version of Boost, meaning the 'boost-locale' library has to be built with ICU support enabled and you have to enable the 'regex' and the 'locale' boost libraries too:
	bootstrap
	.\b2 --prefix=C:\boost\boost_1_55 ^
		--with-thread --with-filesystem --with-system --with-program_options ^
		--with-date_time --with-locale --with-regex ^
		-sICU_PATH="C:\icu4c-52_1-win32-debug" ^
		architecture=x86 address-model=64 toolset=msvc ^
		install
Note: The binary installation packages from http://site.icu-project.org) do not contain debug versions of the library. If you want to build a debugging version of Wolframe you have to build your own version of ICU.
You have to get the ZIP file with the Windows sources called
icu4c-51_1-src.zip from
http://site.icu-project.org.
Unpack it for instance to C:\icu4c-52_1-src.
Open the solution file icu\source\allinone\allinone.sln.
Build the desired version (Release or Debug, 32-bit or 64-bit).
Best is to copy the resulting artifacts into a directory
like C:\icu4c-52_1-win32-debug. Copy in
there the include, bin
and lib directories.
Adapt the 'ICU_XXX' variables in
makefiles\nmake\config.mk as follows:
	ICU_LIB_VERSION = 52
	ICU_DIR = C:\icu4c-52_1-win32-debug
You build boost with boost-locale and ICU backend exactly the same way as with the pre-compiled version of ICU:
bootstrap .\b2 --prefix=C:\boost\boost_1_55 ^ --with-thread --with-filesystem --with-system --with-program_options ^ --with-date_time --with-locale --with-regex ^ -sICU_PATH="C:\icu4c-52_1-win32-debug" ^ architecture=x86 address-model=64 toolset=msvc ^ install
Wolframe has tests written in Google gtest (https://code.google.com/p/googletest/).
Tests are run with:
nmake /nologo /f Makefile.W32 test
Some tests run for a long time (regression and stress tests). They are not run per default when calling 'make test', but you have to call:
nmake /nologo /f Makefile.W32 longtest
Some more complex tests are written with Expect (http://expect.sourceforge.net/).
You enable testing with Expect with:
nmake /nologo /f Makefile.W32 WITH_EXPECT=1
You can get a Windows version of TCL from http://www.activestate.com/activetcl/. Take the 32-bit community version, the the 64-bit version had no Expect available (at least at the time of writting).
Install ActiveTcl 8.6.1 to for instance
C:\Tcl86.
Install Expect with:
cd C:\Tcl86 teacup install Expect
Adapt the following variable in
makefiles\nmake\config.mk:
TCL_DIR = C:\Tcl86
Some tests also need 'telnet'. If telnet is not enabled as Windows feature, enable it in "Control Panel", "Windows Features" under "Telnet Client".
The documentation including the man pages is written using DocBook (http://www.docbook.org).
You need the Docbook XSLT files from
http://sourceforge.net/projects/docbook/files/docbook-xsl-ns/.
Install them and set the 'XSLT_HTMLHELP_STYLESHEET' variable
in makefiles\nmake\config.mk:
XSLT_HTMLHELP_STYLESHEET = C:\docbook-xsl-1.76.1\htmlhelp\htmlhelp.xsl
You will also need a working xsltproc.exe.
For generating CHM help files you have to install
the "HTML Help Workshop and Documentation" from Microsoft.
Install it and set the 'HHC_LOCATION' variable
in makefiles\nmake\config.mk:
HHC_LOCATION = C:\Program Files\HTML Help Workshop\hhc.exe
Developer documentation is generated with Doxygen (http://www.doxygen.org).
Get Doxygen from http://www.stack.nl/~dimitri/doxygen/,
install it to for instance C:\Doxygen and
set the 'DOXYGEN' variable in
makefiles\nmake\config.mk:
DOXYGEN = C:\Doxygen\bin\doxygen.exe
The wolfclient is a Qt-based client for the Wolframe server.
You build it for Qt 4 with:
C:\Qt\4.8.1\bin\qmake.exe -config debug -recursive nmake
respectively for a release version:
C:\Qt\4.8.1\bin\qmake.exe -config release -recursive nmake
You build it for Qt 5 with:
C:\Qt\Qt5.2.1\5.2.1\msvc2010\bin\qmake.exe -config debug -recursive nmake
respectively for a release version:
C:\Qt\Qt5.2.1\5.2.1\msvc2010\bin\qmake.exe -config release -recursive nmake
If you want SSL support you have to download or build OpenSSL and rebuild Qt 4 or Qt 5 with SSL support:
The Wolframe protocol can be secured with SSL. Currently only OpenSSL (http://www.openssl.org) is supported.
Note: No matter whether you use the precompiled version or if you build OpenSSL on your own use the 0.9.8, 1.0.0 or 1.0.1g versions, but not the version 1.0.1 through 1.0.1f (Heartbleed bug)!
You can get a prebuilt version of OpenSSL from http://www.slproweb.com/products/Win32OpenSSL.html. Despite the name you get also 64-bit versions there.
Install the developer version (for instance Win32OpenSSL-1_0_1g.exe)
for instance to C:\OpenSSL-Win32.
Do not copy the OpenSSL binaries to the Windows system directory, copy them to the Bin subdirectory of the OpenSSL installation directory!
Set the "BOOST_XXX" variables in
makefiles\nmake\config.mk as follows:
OPENSSL_DIR = C:\OpenSSL-Win32
You need the community edition of ActivePerl from
http://www.activestate.com/activeperl/.
Install it for instance to C:\Perl.
You will also need NASM to assemble certain
parts of OpenSSL. You can get a Windows NASM from
http://www.nasm.us/.
Install it for instance to C:\nasm.
Make sure the Perl interpreter and the NASM assembler are part of the path in the shell you want to build OpenSSL:
Set PATH=%PATH%;C:\Perl\bin;C:\nasm
Get the source package openssl-1.0.1g.tar.gz of OpenSSL from
http://www.openssl.org.
Configure the package with:
perl Configure debug-VC-WIN32 \ --prefix="C:\openssl-1.0.1g-win32-debug"
for a debug version, respectively with:
perl Configure VC-WIN32 \ --prefix="C:\openssl-1.0.1g-win32-release"
for a release version.
Note: Make sure there prefix you choose has no spaces in it!
Prepare OpenSSL for NASM support with:
ms\do_nasm.bat
Build and install OpenSSL now with:
nmake /f ms\ntdll.mak nmake /f ms\ntdll.mak install
More build information is available
in INSTALL.W32 and
INSTALL.W64 of the
OpenSSL package itself.
Make sure you download the correct Qt package fitting your architecture and Microsoft Visual Studio version.
If you take the prebuild Qt libraries you have to disable the
building of SSL-enabled code by removing the
'WITH_SSL=1' definition in the 'DEFINES' directive in
libqtwolfclient/libqtwolfclient.pro.
Set the following environment variables in order for Qt to find the OpenSSL header files and libraries:\
set OPENSSL_DIR=C:\openssl-1.0.1g-win32-debug set INCLUDE=%INCLUDE%;%OPENSSL_DIR%\include set LIB=%LIB%;%OPENSSL_DIR%\lib
or for the release version:
set OPENSSL_DIR=C:\openssl-1.0.1g-win32-release set INCLUDE=%INCLUDE%;%OPENSSL_DIR%\include set LIB=%LIB%;%OPENSSL_DIR%\lib
Compile Qt with OpenSSL enabled:
configure -platform win32-msvc2010 -debug -openssl nmake
For a release version use:
configure -platform win32-msvc2010 -release -openssl nmake
Write your own modules in C++
Copyright © 2010 - 2014 Project Wolframe
Commercial Usage. Licensees holding valid Project Wolframe Commercial licenses may use this file in accordance with the Project Wolframe Commercial License Agreement provided with the Software or, alternatively, in accordance with the terms contained in a written agreement between the licensee and Project Wolframe.
GNU General Public License Usage. Alternatively, you can redistribute this file and/or modify it under the terms of the GNU General Public License as published by the Free Software Foundation, either version 3 of the License, or (at your option) any later version.
Wolframe is distributed in the hope that it will be useful, but WITHOUT ANY WARRANTY; without even the implied warranty of MERCHANTABILITY or FITNESS FOR A PARTICULAR PURPOSE. See the GNU General Public License for more details.
You should have received a copy of the GNU General Public License along with Wolframe. If not, see http://www.gnu.org/licenses/
If you have questions regarding the use of this file, please contact Project Wolframe.
Aug 29, 2014 version 0.0.3
Table of Contents
List of Tables
This manual introduces the extension modules of Wolframe and explains how to build them. After reading this you should be able to write Wolframe extension modules on your own.
First we introduce the basic C++ data structures you have to understand in order to develop your own Wolframe modules. Later we will introduce the different module types and the building blocks used to build them.
Table of Contents
In this chapter we give a survey of the basic data types used in the Wolframe module interfaces.
The variant data type describes an atomic value of any scalar or string type.
It is the basic type for interfaces to all language bindings for writing Wolframe
applications. The type Variant is defined in types/variant.hpp and
has the following interface:
namespace _Wolframe {
namespace types {
class Variant
{
public:
//Different value types a variant can have:
enum Type
{
Custom, //< data type defined by a custom data type module
Timestamp, //< date and time value with a precision down to microseconds
BigNumber, //< big BCD fixed point number in the range of 1E-32767 to 1E+32768
Double, //< IEEE 754 double precision floating point number
Int, //< 64 bit signed integer value
UInt, //< 64 bit unsigned integer value
Bool, //< boolean value
String //< 0-terminated UTF-8 string
};
//Current type enum or type name of this:
Type type() const;
const char* typeName() const;
//Null constructor:
Variant();
//Copy constructors:
Variant( bool o);
Variant( double o);
Variant( float o);
Variant( int o);
Variant( unsigned int o);
Variant( Data::Int o);
Variant( Data::UInt o);
Variant( const char* o);
Variant( const char* o, std::size_t n);
Variant( const std::string& o);
Variant( const Variant& o);
Variant( const types::CustomDataType* typ,
const types::CustomDataInitializer* dsc=0);
Variant( const types::CustomDataValue& o);
Variant( const types::DateTime& o);
Variant( const types::BigNumber& o);
//Assignment operators:
Variant& operator=( const Variant& o);
Variant& operator=( bool o);
Variant& operator=( double o);
Variant& operator=( float o);
Variant& operator=( int o);
Variant& operator=( unsigned int o);
Variant& operator=( Data::Int o);
Variant& operator=( Data::UInt o);
Variant& operator=( const char* o);
Variant& operator=( const std::string& o);
Variant& operator=( const types::CustomDataValue& o);
Variant& operator=( const char* o);
Variant& operator=( const types::DateTime& o);
Variant& operator=( const types::BigNumber& o);
//Initializer as constant (borrowed value reference):
void initConstant( const char* o, std::size_t l);
void initConstant( const std::string& o);
void initConstant( const char* o);
//Comparison operators:
bool operator==( const Variant& o) const;
bool operator!=( const Variant& o) const;
bool operator>( const Variant& o) const;
bool operator>=( const Variant& o) const;
bool operator<=( const Variant& o) const;
bool operator<( const Variant& o) const;
//Getter functions with value conversion if needed:
std::string tostring() const;
std::wstring towstring() const;
double todouble() const;
bool tobool() const;
Data::Int toint() const;
Data::UInt touint() const;
Data::Timestamp totimestamp() const;
//Base pointer in case of a string (throws if not string):
char* charptr() const;
//Size in case of a string (throws if not string):
std::size_t charsize() const;
///\brief Get the pointer to the custom data object (throws for non custom data type)
const CustomDataValue* customref() const;
///\brief Get the pointer to the custom data object (throws for non custom data type)
CustomDataValue* customref();
///\brief Get the pointer to the big number object (throws for non big number data type)
const types::BigNumber* bignumref() const;
///\brief Get the pointer to the big number object (throws for non big number data type)
types::BigNumber* bignumref();
///\brief Getter with value conversion
Data::Timestamp totimestamp() const;
///\brief Test if this value is atomic (not a structure or an indirection)
bool atomic() const;
//Evaluate if defined (not Null):
bool defined() const;
//Reset to Null:
void clear();
//Convert type:
void convert( Type type_);
//Move assignment from value o (o gets Null):
void move( Variant& o);
///\brief Assigning o to this including a conversion to a defined type
void assign( Type type_, const Variant& o);
};
}} //namespace
Certain interfaces like filters use the type VariantConst that is the same as a
variant but does not hold ownership on the value it references. VariantConst is defined
to avoid unnecessary string copies mainly in filters. It inherits the properties of the type Variant
and adds or overwrites some methods.
VariantConst has to be used carefully because we have to ensure on our own that the
referenced value exists as long as the VariantConst variable
exists. The mechanisms of C++ do not support you here. You have to know what you do.
The type VariantConst is also defined in types/variant.hpp and
has the following interface:
namespace _Wolframe {
namespace types {
struct VariantConst :public Variant
{
//Null constructor:
VariantConst();
//Copy constructors:
VariantConst( const Variant& o);
VariantConst( const VariantConst& o);
VariantConst( bool o);
VariantConst( double o);
VariantConst( float o);
VariantConst( int o);
VariantConst( unsigned int o);
VariantConst( Data::Int o);
VariantConst( Data::UInt o);
VariantConst( const char* o);
VariantConst( const char* o, std::size_t n);
VariantConst( const std::string& o);
VariantConst( const types::CustomDataValue& o);
VariantConst( const types::BigNumber& o);
VariantConst( const types::DateTime& o);
//Assignment operators:
VariantConst& operator=( const Variant& o);
VariantConst& operator=( const VariantConst& o);
VariantConst& operator=( bool o);
VariantConst& operator=( double o);
VariantConst& operator=( float o);
VariantConst& operator=( int o);
VariantConst& operator=( unsigned int o);
VariantConst& operator=( Data::Int o);
VariantConst& operator=( Data::UInt o);
VariantConst& operator=( const char* o);
VariantConst& operator=( const std::string& o);
VariantConst& operator=( const types::CustomDataValue& o);
VariantConst& operator=( const types::BigNumber& o);
VariantConst& operator=( const types::DateTime& o);
VariantConst& operator=( const char* o);
VariantConst& operator=( const std::string& o);
};
}} //namespace
Table of Contents
In this chapter we introduce how modules are declared for extending a Wolframe application with our own functions and objects.
A module has to include "appdevel/moduleFrameMacros.hpp" or simply "appDevel.hpp" and declare
a module header and a module trailer with the macros WF_MODULE_BEGIN and
WF_MODULE_END. A single module source file built as Wolframe
application extension module must contain only one
WF_MODULE_BEGIN .... WF_MODULE_END declaration. But a module declaration
can contain an arbitrary number of objects that not conflicting in anything they define (names, etc.)
The following example shows an empty module without any exported objects, thus the simplest module
we can declare.
#include "appDevel.hpp"
WF_MODULE_BEGIN( "empty", "an example module not exporting anything")
WF_MODULE_END
The macro WF_MODULE_BEGIN has two parameters
Table 3.1. Parameters of WF_MODULE_BEGIN
| NAME | DESCRIPTION |
|---|---|
| Identifier of the module (*) | Description sentence of the module for user info when inspecting a module. |
(*) Currently not used but will be when a namespace concept will be implemented.
The end declaration WF_MODULE_END closes the module object and defines the module entry point structure.
For building a module you need to reference the Wolframe core library (-lwolframe) and eventually some of the extension libraries (-lwolframe_serialize, -lwolframe_langbind, -lwolframe_database) that's all. You will find example makefiles in the examples of the project. But you are free to use your own build mechanism.
In this section we explain how modules are filled with functionality. We can define an arbitrary number of objects in a module as long as they do not conflict (e.g. have name clashes etc.)
In this chapter we introduce how to declare a normalizer function in a module for defining your own DLL form data types. First we introduce the data structures you have to know to implement normalizer functions and then we will show the module building blocks to declare a normalizer function in a module.
A normalize function is defined as interface in order to be able to define it as object with data. This is because normalizer functions can be parametrized. For example to express the normalize function domain. The following listing shows the interface definition:
namespace _Wolframe {
namespace types {
struct NormalizeFunction
{
virtual ~NormalizeFunction(){}
virtual const char* name() const=0;
virtual Variant execute( const Variant& i) const=0;
};
}}
The object is created by a function type (here with the example function name CreateNormalizeFunction) with the following interface
_Wolframe::types::NormalizeFunction* CreateNormalizeFunction(
_Wolframe::types::NormalizeResourceHandle* reshnd,
const std::vector<types::Variant>& arg);
The resource handle parameter (reshnd) is the module singleton object instance that is
declared as class in the module building blocks (see following section). The argument (arg)
is a list of variant type arguments that parametrize the function. What the function
gets as arguments are the comma separated list of parameters in '(' brackets ')' when the function
is referenced in a .wnmp file (type normalization declaration file, see section
"Data Types in DDLs" in the chapter "Forms" of the "Application Development Manual")
or constructed with the provider.type method in a script.
When you include "appdevel/normalizeModuleMacros.hpp" or simply "appDevel.hpp" you get the building blocks declared to build a normalizer function in a module. These building blocks will be exmplained in this section.
Some normalizer functions share resource object declared only once as a singleton in this module.
Such a resource class is defined as a class derived from types::NormalizeResourceHandle
with an empty constructor. When we have declared this resource signleton class we can include
it in the module before any normalizer referencing it as
WF_NORMALIZER_RESOURCE( ResourceClass )
with ResourceClass identifying the module singleton resource class and object.
The following declaration shows a declaration of a simple normalizer function.
WF_NORMALIZER_FUNCTION(name,constructor)
where name is the identifier string of the function in the system and constructor a
function with the signature of the CreateNormalizeFunction shown in the
section 'Normalize Interface' above.
The following declaration shows a declaration of a normalizer function using a resource
module singleton object defined as class 'ResourceClass' and declared with the
WF_NORMALIZER_RESOURCE macro (section 'Declaring a resource singleton object').
WF_NORMALIZER_WITH_RESOURCE(name,constructor,ResourceClass)
The parameter name and constructor are defined as in the
WF_NORMALIZER_FUNCTION macro.
As first example we show a module that implements 2 normalization functions Int
and Float without a global resource class. Int converts a value to an
64 bit integer or throws an exception, if this is not possible. Float converts a value
to a double presicion floating point number or throws an exception, if this is not possible.
#include "appDevel.hpp"
using namespace _Wolframe;
class NormalizeInt
:public types::NormalizeFunction
{
public:
NormalizeInt( const std::vector<types::Variant>&){}
virtual ~NormalizeInt(){}
virtual const char* name() const
{return "int";}
virtual types::Variant execute( const types::Variant& i) const
{return types::Variant( i.toint());}
virtual types::NormalizeFunction* copy() const
{return new NormalizeInt(*this);}
};
class NormalizeFloat
:public types::NormalizeFunction
{
public:
NormalizeFloat( const std::vector<types::Variant>&){}
virtual ~NormalizeFloat(){}
virtual const char* name() const
{return "float";}
virtual types::Variant execute( const types::Variant& i) const
{return types::Variant( i.todouble());}
virtual types::NormalizeFunction* copy() const
{return new NormalizeFloat(*this);}
};
WF_MODULE_BEGIN(
"example1",
"normalizer module without resources")
WF_NORMALIZER( "int", NormalizeInt)
WF_NORMALIZER( "float", NormalizeFloat)
WF_MODULE_END
The second example show one of the functions in the example above (Int) but
declares to use resources. The resource object is not really used, but you see in the example
how it gets bound to the function that uses it.
#include "appDevel.hpp"
using namespace _Wolframe;
class ConversionResources
:public types::NormalizeResourceHandle
{
public:
ConversionResources()
{}
virtual ~ConversionResources()
{}
};
class NormalizeInt
:public types::NormalizeFunction
{
public:
explicit NormalizeInt( const types::NormalizeResourceHandle* res_,
const std::vector<types::Variant>&)
:res(dynamic_cast<const ConversionResources*>(res_)){}
virtual ~NormalizeInt()
{}
virtual const char* name() const
{return "int";}
virtual types::Variant execute( const types::Variant& i) const
{return types::Variant( i.toint());}
virtual types::NormalizeFunction* copy() const
{return new NormalizeInt(*this);}
private:
const ConversionResources* res;
};
WF_MODULE_BEGIN(
"example2",
"normalizer module with resources")
WF_NORMALIZER_RESOURCE( ConversionResources)
WF_NORMALIZER_WITH_RESOURCE(
"Int", NormalizeInt, ConversionResources)
WF_MODULE_END
In this chapter we introduce how to declare a custom data type in a module.
Custom data types can be used in scripting language bindings and as normalizers
referenced in a .wnmp file (type normalization declaration file, see section
"Data Types in DDLs" in the chapter "Forms" of the "Application Development Manual")
First we introduce the data structures you
have to know to implement a custom data type and then we will show the module building
block to declare a custom data type in a module.
A custom data type definition involves 3 classes: CustomDataType,CustomDataValue and CustomDataInitializer. The CustomDataInitializer class is optional and only needed when value construction has to be parametrized. If an initializer is involved then it is created and passed as argument to the method constructing the custom data type value (class CustomDataValue). The class CustomDataType defines the custom data type and all its methods defined. The class CustomDataValue defines a value instance of this type. The class CustomDataInitializer, if specified, defines an object describing the parametrization of the value construction. An example of an initializer could be the format of a date or the precision in a fixed point number. The following listings show these interfaces:
The class to build the custom data type definition structure composed of methods added
with CustomDataType::define( .. ). From this class we do not derive. We incrementally
add method by method by calling CustomDataType::define( .. ) in the type constructor
function.
namespace _Wolframe {
namespace types {
// Custom Data Type Definition
class CustomDataType
{
public:
typedef unsigned int ID;
enum UnaryOperatorType {Increment,Decrement,Negation};
enum BinaryOperatorType {Add,Subtract,Multiply,Divide,Power,Concat};
enum ConversionOperatorType {ToString,ToInt,ToUInt,ToDouble,ToTimestamp};
enum DimensionOperatorType {Length};
typedef types::Variant (*ConversionOperator)(
const CustomDataValue& operand);
typedef types::Variant (*UnaryOperator)(
const CustomDataValue& operand);
typedef types::Variant (*BinaryOperator)(
const CustomDataValue& operand, const Variant& arg);
typedef std::size_t (*DimensionOperator)(
const CustomDataValue& arg);
typedef types::Variant (*CustomDataValueMethod)(
const CustomDataValue& val,
const std::vector<types::Variant>& arg);
typedef CustomDataValue* (*CustomDataValueConstructor)(
const CustomDataInitializer* initializer);
typedef CustomDataInitializer* (*CreateCustomDataInitializer)(
const std::vector<types::Variant>& arg);
public:
CustomDataType()
:m_id(0)
{
std::memset( &m_vmt, 0, sizeof( m_vmt));
}
CustomDataType( const std::string& name_,
CustomDataValueConstructor constructor_,
CreateCustomDataInitializer initializerconstructor_=0);
void define( UnaryOperatorType type, UnaryOperator op);
void define( BinaryOperatorType type, BinaryOperator op);
void define( ConversionOperatorType type, ConversionOperator op);
void define( DimensionOperatorType type, DimensionOperator op);
void define( const char* methodname, CustomDataValueMethod method);
};
typedef CustomDataType* (*CreateCustomDataType)( const std::string& name);
}}//namespace
The custom data inizializer definition. From this class we have to derive our own initializer definions.
namespace _Wolframe {
namespace types {
// Initializer for a custom data value
class CustomDataInitializer
{
public:
CustomDataInitializer();
virtual ~CustomDataInitializer();
};
}}//namespace
The custom data type value instance definition. From this class we have to derive our own custom value definions.
namespace _Wolframe {
namespace types {
// Custom data value interface
class CustomDataValue
{
public:
CustomDataValue();
CustomDataValue( const CustomDataValue& o);
virtual ~CustomDataValue();
const CustomDataType* type() const;
const CustomDataInitializer* initializer() const;
virtual int compare( const CustomDataValue& o) const=0;
virtual std::string tostring() const=0;
virtual void assign( const Variant& o)=0;
virtual CustomDataValue* copy() const=0;
// try to convert the value to one of the basic
// variant types and return true on success:
virtual bool getBaseTypeValue( Variant&) const;
};
}}//namespace
When you include "appdevel/customDatatypeModuleMacros.hpp" or simply "appDevel.hpp" you get the building block declared to build a custom data type in a module.
The following declaration shows a declaration of a simple custom data type.
WF_CUSTOM_DATATYPE(name,constructor)
where name is the identifier string of the function in the system and constructor a function with the following signature:
typedef CustomDataType* (*CreateCustomDataType)( const std::string& name);
In this chapter we introduce how to declare a filter type in a module. Filters are used to deserialize input and to serialize output.
Filters provide a uniform interface to content as sequence of elements. The elements have one of the following types.
Table 3.2. Filter element types
| Identifier | Description |
|---|---|
| OpenTag | Open a substructure (element value is the name of the structure) as the current scope. |
| CloseTag | Close the current substructure scope or marks the end of the document if there is no substructure scope open left (top level close). |
| Attribute | Declare an attribute (element value is the name of the attribute) |
| Value | Declare a value. If the previous element was an attribute then the value specifies the content value of the attribute. Otherwise the value specifies the content value (only one allowed) of the current substructure scope. |
Filter values are chunks of the input and are interpreted depending on the filter element type.
A filter definition is a structure with 2 substructure references: An input filter (InputFilter) and an output filter (OutputFilter). You have to include "filter/filter.hpp" to declare a filter.
From this interface you have to derive to get an input filter class.
namespace _Wolframe {
namespace langbind {
// Input filter interface
class InputFilter
{
public:
// State of the input filter
enum State
{
Open, // normal input processing
EndOfMessage, // end of message reached (yield)
Error // an error occurred
};
// Default constructor
explicit InputFilter( const char* name_);
// Copy constructor
///\param[in] o input filter to copy
InputFilter( const InputFilter& o);
// Destructor
virtual ~InputFilter();
// Get a self copy
virtual InputFilter* copy() const=0;
// Declare the next input chunk to the filter
virtual void putInput(
const void* ptr,
std::size_t size, bool end)=0;
// Get the rest of the input chunk left
// unparsed yet (defaults to nothing left)
virtual void getRest(
const void*& ptr,
std::size_t& size, bool& end);
// Get a named member value of the filter
virtual bool getValue(
const char* id, std::string& val) const;
// Get next element
virtual bool getNext(
ElementType& type,
const void*& element, std::size_t& elementsize)=0;
// Get the document meta data
virtual const types::DocMetaData* getMetaData();
// Get the current state
State state() const;
// Set input filter state with error message
void setState( State s, const char* msg=0);
};
// Shared input filter reference
typedef boost::shared_ptr<InputFilter> InputFilterR;
}}//namespace
#endif
From this interface you have to derive to get an output filter class.
namespace _Wolframe {
namespace langbind {
// Output filter
class OutputFilter
:public FilterBase
{
public:
// State of the input filter
enum State
{
Open, //< normal input processing
EndOfBuffer, //< end of buffer reached
Error //< have to stop with an error
};
// Default constructor
OutputFilter(
const char* name_,
const ContentFilterAttributes* attr_=0);
// Copy constructor
OutputFilter( const OutputFilter& o);
// Destructor
virtual ~OutputFilter(){}
// Get a self copy
virtual OutputFilter* copy() const=0;
// Print the follow element to the buffer
virtual bool print(
ElementType type,
const void* element,
std::size_t elementsize)=0;
// Set the document meta data.
void setMetaData( const types::DocMetaData& md);
// Get a reference to the document meta data.
const types::DocMetaData* getMetaData() const;
// Get the current state
State state() const;
// Set output filter state with error message
void setState( State s, const char* msg=0);
protected:
std::size_t write( const void* dt, std::size_t dtsize);
};
///\typedef OutputFilterR
// Shared output filter reference
typedef types::SharedReference<OutputFilter> OutputFilterR;
}}//namespace
#endif
The structure 'filter' you have to create and instantiate with an input filter and an output filter reference. There is a filter type defined with a virtual constructor to instantiate the filter. From this class you have to derive.
namespace _Wolframe {
namespace langbind {
typedef std::pair<std::string,std::string> FilterArgument;
class FilterType
{
public:
virtual ~FilterType(){}
virtual Filter* create( const std::vector<FilterArgument>& arg) const=0;
};
}}//namespace
When you include "appdevel/filterModuleMacros.hpp" or simply "appDevel.hpp" you get the building block declared to build a filter in a module.
This is the glossary for the Wolframe Extensions Development Manual.
Wolframe glossary
- Normalization Function
A Normalization Function is a function taking an atomic value as input and returning an atomic value as output. It validates the input and throws an exception if the validation failes. It transforms the value into a normalized form.
- Variant Type
A variant type represents an atomic value with its type. The value can appear as an integral or floating or fixed point number or as a boolean or as a string. The variant types helps to interface with interpreted non strongly typed or value typed languages. The name "variant" for this type has been chosen because it is used in many other systems (Microsoft COM/.NET, Qt, boost) as name for this kind of a union type.