Build your first Wolframe application
Copyright © 2010 - 2014 Project Wolframe
Commercial Usage. Licensees holding valid Project Wolframe Commercial licenses may use this file in accordance with the Project Wolframe Commercial License Agreement provided with the Software or, alternatively, in accordance with the terms contained in a written agreement between the licensee and Project Wolframe.
GNU General Public License Usage. Alternatively, you can redistribute this file and/or modify it under the terms of the GNU General Public License as published by the Free Software Foundation, either version 3 of the License, or (at your option) any later version.
Wolframe is distributed in the hope that it will be useful, but WITHOUT ANY WARRANTY; without even the implied warranty of MERCHANTABILITY or FITNESS FOR A PARTICULAR PURPOSE. See the GNU General Public License for more details.
You should have received a copy of the GNU General Public License along with Wolframe. If not, see http://www.gnu.org/licenses/
If you have questions regarding the use of this file, please contact Project Wolframe.
Aug 29, 2014 version 0.0.2
Table of Contents
- Foreword
- 1. Introduction
- 2. Steps
- 2.1. Step 1 - Basic connectivity
- 2.2. Step 2 - Basic Authorization
- 2.3. Step 3 - Get the whole chain working
- 2.4. Step 4 - Implement server side customer list
- 2.5. Step 5 - Implement client side customer list
- 2.6. Step 6 - Show customer
- 2.7. Step 7 - Editing customer
- 2.8. Step 8 - Add a new customer
- 2.9. Step 9 - Delete a customer
This is the Wolframe Tutorial.
It describes step by step how to use Wolframe to build a small demo application.
Table of Contents
You need the following packages (We assume you are on an Ubuntu Linux, for other platforms there are similar packages available. Some platforms may have only two monolithic packages to download, a 'wolframe' and a 'wolfclient' package):
wolframe_0.0.3 -1_amd64.deb: the Wolframe core server
wolframe-sqlite3_0.0.3 -1_amd64.deb: the Sqlite3 database driver module
wolframe-libxml2_0.0.3 -1_amd64.deb: the XML filter based on libxml2
wolfclient_0.0.4 -1_amd64.deb: the Wolframe graphical user interface client
We want to manage a list of customers with name and address and provide the usual operations:
list all customers
create new customers
edit existing customers
view customer entries
delete customers
Table of Contents
- 2.1. Step 1 - Basic connectivity
- 2.2. Step 2 - Basic Authorization
- 2.3. Step 3 - Get the whole chain working
- 2.4. Step 4 - Implement server side customer list
- 2.5. Step 5 - Implement client side customer list
- 2.6. Step 6 - Show customer
- 2.7. Step 7 - Editing customer
- 2.8. Step 8 - Add a new customer
- 2.9. Step 9 - Delete a customer
We have to set up the wolframed daemon with a running configuration file:
cd ~/tutorial/server
We create the central configuration file of the server tutorial.conf:
; we have to load the wolframe protocol to be able to talk to the server
LoadModules {
    Module mod_protocol_wolframe
}

; we install a verbose default logger to the shell
Logging {
    Stderr {
        Level DEBUG
    }
}

; one connection, one thread is enough
Server {
    MaxConnections 1
    Threads 1
    Listen {
        Address *
        Port 7661
        MaxConnections 1
    }
}
We can start the server now in the shell foreground with:
/usr/sbin/wolframed -f -c tutorial.conf
We see the following output of the server in the shell:
NOTICE: Starting server
INFO: Undefined ServerTokens, using ProductOnly
INFO: Empty random generator device. Using default device.
DEBUG: Random generator initialized. Using device '/dev/urandom'
DEBUG: Loading programs
INFO: Accepting connections on 0.0.0.0:7661
DEBUG: 1 network acceptor(s) created.
DEBUG: 0 network SSL acceptor(s) created.
The server is up and listening to port 7661. The server can be stopped anytime by pressing Ctrl+C.
If we use a telnet to connect to the server with:
telnet localhost 7661
we get:
Connected to localhost.
Escape character is '^]'.
BYE Access denied.
Connection closed by foreign host.
The server tells us:
DEBUG: Connection from 127.0.0.1:39110 to 0.0.0.0:7661 not authorized
DEBUG: Connection to 127.0.0.1:39110 closed
So we have to configure some basic authorization first.
For the time being we add a dummy authorization to the server configuration which accepts all connections (not very secure, but for now good enough):
; dummy authorization
AAAA {
    Authorization {
        Default allow
    }
}
If we start the server now, the telnet shows us:
Connected to localhost.
Escape character is '^]'.
Wolframe
OK
Type quit, then Enter
now and get back to the shell:
BYE
Connection closed by foreign host.
The server in the shell shows the following output indicating that authorization was successful:
DEBUG: Connection from 127.0.0.1:47064 to 0.0.0.0:7661 authorized
DEBUG: Connection to 127.0.0.1:47064 closed
Now that we have ensured that basic connectivity to the Wolframe server is available, we can configure the basics for the Qt client, called wolfclient.
We start wolfclient with:
cd ~/tutorial/client
wolfclient tutorial.conf
First define your connection by selecting "Manage servers" in the "File" menu. Define a new connection called "tutorial" which connects to server "localhost" on port 7661. Leave the SSL connection unchecked.
You can test the connection now by pressing the "Test Connection" button.
You should get a message like
Connection successful
in a dialog box.
Safe the connection parameters by pressing the "Ok" button. You see a list of all your configured servers, the only one we defined is "tutorial". Press "Ok" again.
Now you can try to login to your server by selecting "Login" in the "File" menu. Leave the "Username" and the "Password" fields empty as we did not configure any authentification method. Just pick the server called "tutorial" in the "Server" field.
Because we didn't write any user interfaces yet, we get an error message:
Unable to load form or plugin 'init', does the it exist?
To get rid of that error message we will have to create our start form in the Qt designer first. For now we just click away the error message.
We start now the Qt designer and create an empty form of type QWidget named
~/tutorial/client/init.ui and save it.
If we restart the client and login in we see the same empty window again, but this time it's the dynamically loaded initial form (which is again empty). The previous error message disappeared.
We want to store the customer data in a database. As language to describe this transaction we use TDL (Transaction Definition Language) and as database we use Sqlite. So we have to tell the server to load the TDL module and the database module for Sqlite:
LoadModules {
    Module mod_protocol_wolframe
    Module mod_command_tdl
    Module mod_db_sqlite3
}
Now we also have to create a database and populate it with the following schema:
CREATE TABLE Customer (
    id              INTEGER PRIMARY KEY AUTOINCREMENT,
    name            TEXT    NOT NULL,
    address         TEXT
);
Store this into schema.sql. Then execute:
sqlite3 tutorial.db < schema.sql
Now we have to tell server to use this sqlite database file:
Database {
    SQLite {
        Identifier db
        File tutorial.db
        ForeignKeys yes
    }
}
When we restart the server we see:
DEBUG: SQLite database unit 'db' created with 4 connections to file 'tutorial.db'
Now we want to use some XML filters to send/receive XML over the protocol,
so we have to add the following modules to tutorial.conf:
LoadModules {
    Module mod_protocol_wolframe
    Module mod_command_tdl
    Module mod_db_sqlite3
    Module mod_doctype_xml
    Module mod_filter_libxml2
}
The module mod_doctype_xml is there to detect documents of type XML. The module mod_filter_libxml2 is there to process XML documents. In order to see which modules are currently loaded in the wolframed we can use:
/usr/sbin/wolframed -p -c tutorial.conf
We see:
..
Module files to load:
   /usr/lib/wolframe/modules/mod_protocol_wolframe.so
   /usr/lib/wolframe/modules/mod_command_tdl.so
   /usr/lib/wolframe/modules/mod_db_sqlite3.so
   /usr/lib/wolframe/modules/mod_doctype_xml.so
   /usr/lib/wolframe/modules/mod_filter_libxml2.so
..
which looks ok.
For mapping the requests to programs in the business layer
we need the directmap module. First add to
tutorial.conf:
LoadModules {
    Module mod_protocol_wolframe
    Module mod_command_tdl
    Module mod_db_sqlite3
    Module mod_doctype_xml
    Module mod_filter_libxml2
    Module mod_command_directmap
}
and a new section 'Processor' on the same level as 'LoadModules'
Processor {
    Database db
    CmdHandler {
        Directmap {
            Program tutorial.dmap
            Filter XML=libxml2
	}
    }
}
The "filter" directive denotes that the command handler should use the "libxml2" module for parsing XML requests.
Now we have to create a file tutorial.dmap.
This file maps the requests to the corresponding transaction definitions:
COMMAND CustomerListRequest
    CALL SelectCustomerList
    RETURN SKIP {standalone="yes", root="list"};
We map the 'CustomerListRequest' request to a function 'SelectCustomerList' that is executed to perform the request. It will return the document without validation (SKIP). The attributes in curly brackets after the RETURN SKIP define the meta data of the document. Depending of the output filters used we have to define a set of document meta data. Because we do not declare the meta data as part of the document type description as we will do later, we have to declare them here in the command. The meta data attribute standalone='yes' tells the XML filter not to include any document type declaration. The declaration root='list' declares the root element for the XML output. In our example we need to define the root element because we use XML for output and XML needs a root element to be defined. The returned content will be a list of customers. The function will be implemented in a TDL program in the server. We first add the TDL program declaration to the 'Processor' configuration section:
Processor {
    Database db
    CmdHandler {
        Directmap {
            Program tutorial.dmap
            Filter XML=libxml2
	}
    }
    Program Customer.tdl
}
The Customer.tdl file contains the database transaction 'SelectCustomerList'
we want to execute.
We only have to specify the enclosing tag 'customer' for each customer record
we are going to retrieve with 'INTO customer'.
TRANSACTION SelectCustomerList
BEGIN
    INTO customer DO SELECT * from Customer;
END
We also need a validator for the input when the client sends a 'CustomerListRequest'.
We load the simple form DDL compiler in the 'LoadModules' section of the tutorial.conf and
register the simpleform program Customer.sfrm to the list of programs in the same file:
LoadModules {
    Module mod_protocol_wolframe
    Module mod_command_tdl
    Module mod_db_sqlite3
    Module mod_doctype_xml
    Module mod_filter_libxml2
    Module mod_command_directmap
    Module mod_ddlcompiler_simpleform
}

Processor {
    Database db
    CmdHandler {
        Directmap {
            Program tutorial.dmap
            Filter XML=libxml2
	}
    }
    Program Customer.tdl
    Program Customer.sfrm
}
and we add a simple form file Customer.sfrm.
We add a form called 'CustomerListRequest' which is empty for now
but for the root element 'customer':
FORM CustomerListRequest
    -root customer
{
}
We have to restart the Wolframe daemon now and restart it with:
pkill wolframed
/usr/sbin/wolframed -f -c tutorial.conf
This we have to do every time we
change the configuration file tutorial.conf
or one of the files referenced there as tutorial.dmap,
Customer.tdl or Customer.sfrm.
The server shows now a message about the transaction function it loaded:
DEBUG: Loaded transaction function 'SelectCustomerList'
Now we create a telnet request which contains pseudo authentication credentials
and a request for the list of customers, called
~/tutorial/client/CustomerListRequest.netcat:
AUTH
MECH NONE
REQUEST
<?xml version="1.0" encoding="UTF-8"?>
<!DOCTYPE customer SYSTEM 'CustomerListRequest'>
<customer/>
.
QUIT
This we can execute with:
netcat -v localhost 7661 < CustomerListRequest.netcat
and we get:
Wolframe
OK
MECHS NONE
OK authorization
ANSWER
<?xml version="1.0" encoding="UTF-8" standalone="yes"?>
<list/>

.
OK REQUEST CustomerListRequest
BYE
We got an empty list of customers. So we have successfully configured the server for our first command.
Let's add some customer data now:
cat > data.sql
INSERT INTO Customer(name,address) values('Dr Who','Blue Police Box');
INSERT INTO Customer(name,address) values('John Smith','The Wheel in Space');
Ctrl-D

sqlite3 tutorial.db < data.sql
When we reexecute the netcat command we see that the answer contains now the list of customers:
<?xml version="1.0" encoding="UTF-8" standalone="yes"?>
<list>
    <customer>
        <id>1</id>
        <name>Dr Who</name>
        <address>Blue Police Box</address>
    </customer>
    <customer>
        <id>2</id>
        <name>John Smith</name>
        <address>The Wheel in Space</address>
    </customer>
</list>
So, the data is now correctly retrieved from the database.
Instead of using netcat you can also use the wolframec for testing the requests.
First create an XML file containing just the request and name
it CustomerListRequest.xml:
<?xml version="1.0" encoding="UTF-8"?>
<!DOCTYPE customer SYSTEM 'CustomerListRequest'>
<customer/>
The request can be executed by calling:
wolframec -d CustomerListRequest.xml
We can also test the command without even starting the wolframed daemon process. We use the wolfilter program for that in the following way:
cat ~/tutorial/client/CustomerListRequest.xml | \
    wolfilter -c ~/tutorial/server/tutorial.conf CustomerListRequest
We can move now to the wolfclient to make our first request visible.
It's time now to get something working visually, so we start to add a first simple interface to our wolfclient.
For this we need the 'Qt designer'. We open the file
~/tutorial/client/init.ui again
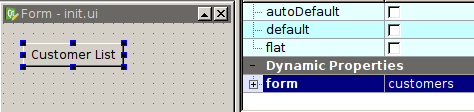
draw a single button with the text "Customer List":

We add a dynamic property 'form' of type String to this button, which has the value 'customers':
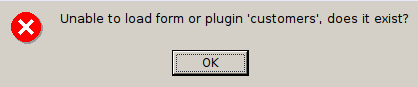
When we save the form and start the wolfclient, we get (after logging in) the first page with the "Customer List" button. Pressing it gives the error message:
This means we have to define a new form
~/tutorial/client/customers.ui, which will
show the list of customers, for now we leave it empty. When we start the
wolfclient and press the "Customer List" button again, we see that
the form gets changed to the "customer" form (empty).
We add now a QTreeWidget item to the
customer.ui form and choose a grid layout
for the whole form. We change the name of the widget to 'customer':
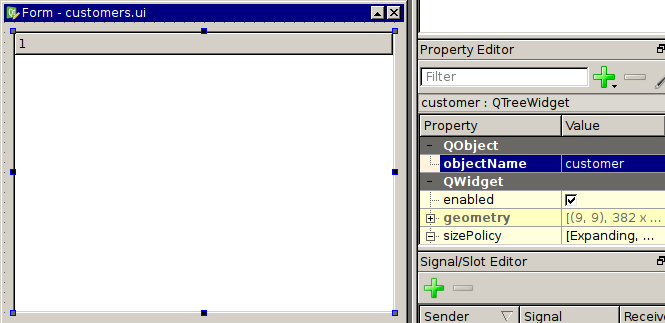
We also disable the 'rootIsDecorated' tick (we have a list, not a tree of customers). We also set 'selectionMode' to 'SingleSelection' and 'selectionBehaviour' to 'selectRows' to get the default expected behaviour of a list.
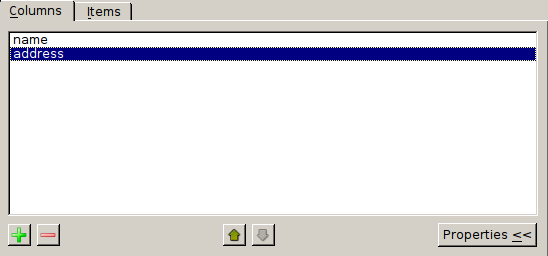
Now we change the columns of the list (context menu "Edit items" in the widget data area):
We can now open the wolfclient and press the button and the customer list is loaded. But it's empty, we have first to fill it with data of our customers.
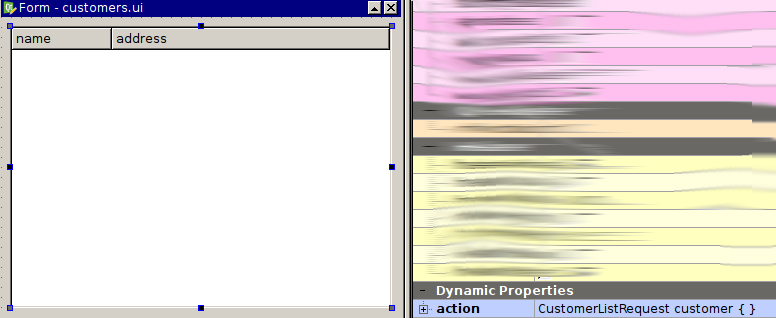
So we add a string property 'action' to the widget 'customer' containing the following value:
CustomerListRequest customer { }
We define the 'action' to be executed, when the form is loaded. In our case we want to execute a 'CustomerListRequest'. The root element of the request should be 'customer'. We currently don't want to pass any additional elements, so we specify '{ }' for the empty content:
When we reexecute the wolfclient still nothing happens. So we enable the 'Developer Mode' in the settings in the tab 'Developer'. Then we see that the XML request has been constructed:
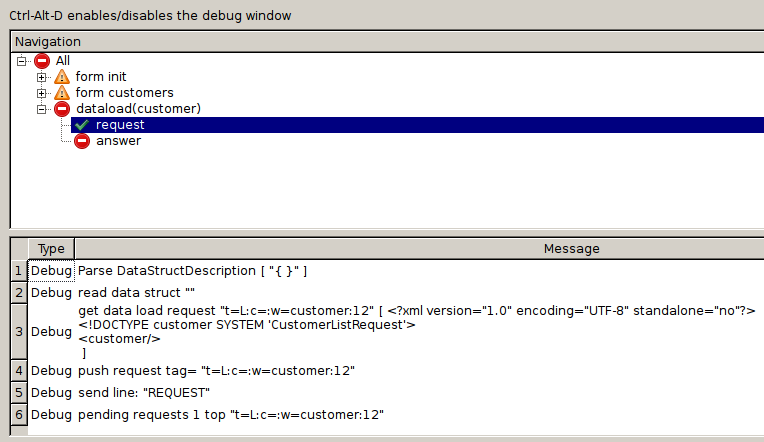
We see that the request was ok but that the answer has errors:
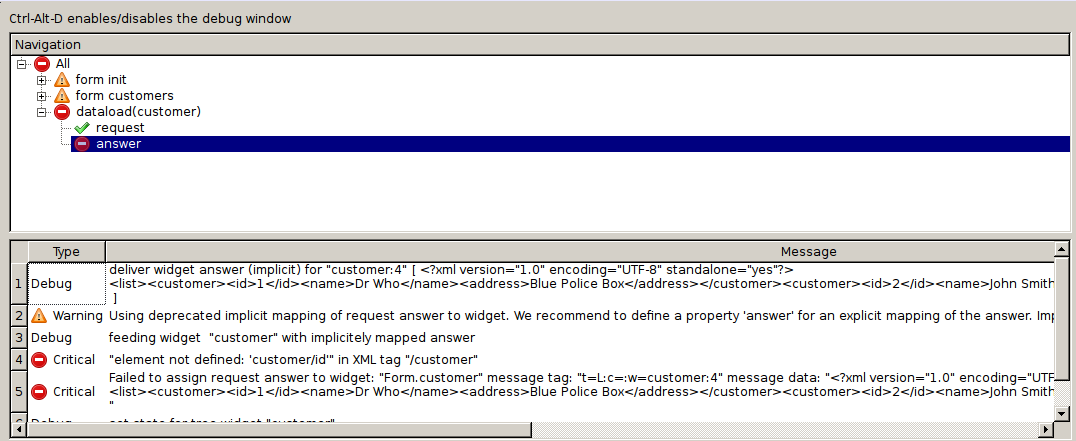
The reason for this is, we have to tell the client how to map the elements of the result structure in the XML back to widgets and properties of the widgets.
We want to map the following XML:
<?xml version="1.0" encoding="UTF-8" standalone="yes"?>
<list>
    <customer>
        <id>1</id>
        <name>Dr Who</name>
        <address>Blue Police Box</address>
    </customer>
    <customer>
        <id>2</id>
        <name>John Smith</name>
        <address>The Wheel in Space</address>
    </customer>
</list>
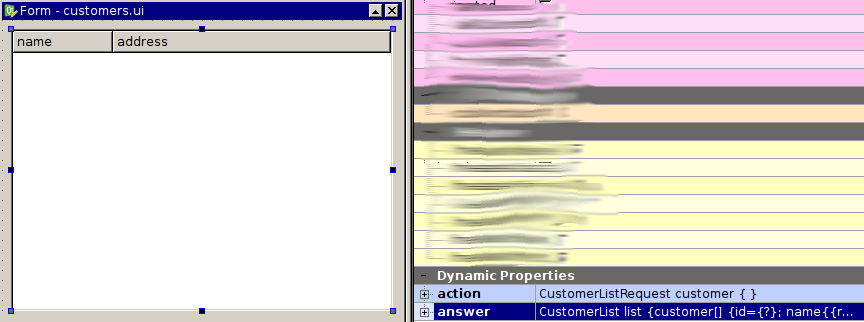
We reference the root element and the tag and attribute values into the properties of the list widget 'customer' (in our case the rows called 'name' and 'address'). This addressing schema belongs into the dynamic property 'answer' similar to the 'action' property:
CustomerList list {
    customer[] {
        id={?};
        name{{row.name}};
        address{{row.address}}
    }
}
The line breaks and indentation are optional and you can write the mapping
in a single line.
The '?' is used for elements in the XML we don't need at the moment.
'row' is a property of the QTreeWidget widget
named 'customer' and iterates through all rows in the list. Each row
has sub-properties 'name' and 'address' which represent
the corresponding column:
When we reexecute the wolfclient and click on the customer list we see that the customer list is shown as expected:
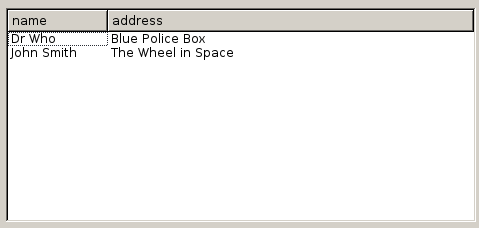
But when we look at the contents of the debug window we still see an error reported:

For simplicity we defined the output with the document meta data attribute
'{ standalone = "yes" }' that the returned document should not be built
with an explicit document type definition.
But the client expects a document type declaration. For this we
change the definition in the file tutorial.dmap we
created in step 4 in the following way:
COMMAND CustomerListRequest
    CALL SelectCustomerList
    RETURN SKIP CustomerList {root="list"};
The directive 'RETURN SKIP CustomerList {root="list"}' states that a document of type 'CustomerList' with the root element 'list' is returned without validation of the output. We omit a validation on purpose for now to get to the next step.
In the next step we want to show how data is communicated between the forms by implementing a simple "show me customer data" use case.
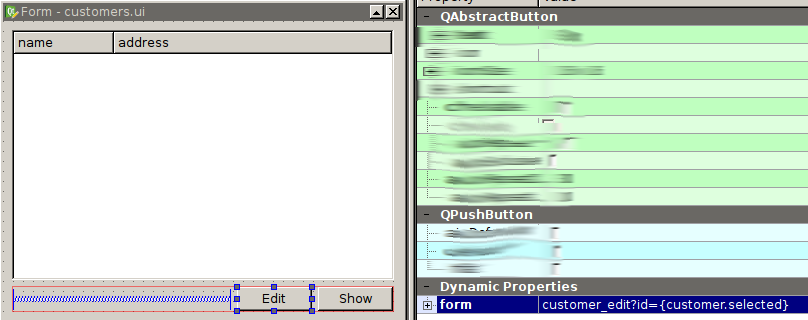
Let's start by adding a button in customers.ui called 'Show':
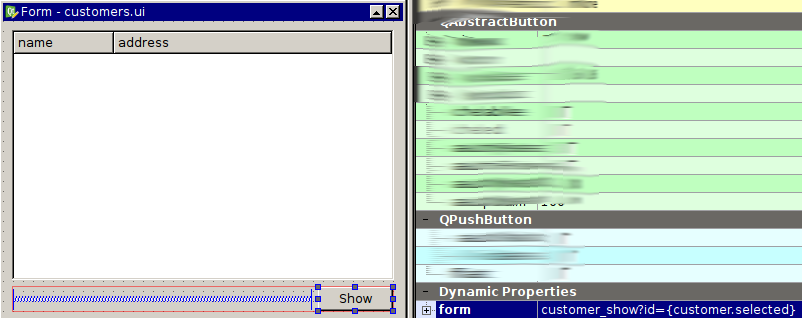
We add a dynamic property 'form' to the button which we set to:
customer_show?id={customer.selected}
As before 'customer_show' is the name of the form to be loaded when we press the button.
We want the currently selected customer to be accessible in the
customer_show.ui form, so we have to pass
the parameter 'id' as the value of the currenctly selected row
in the 'customer' list widget. This is denoted by
'{customer.selected}'.
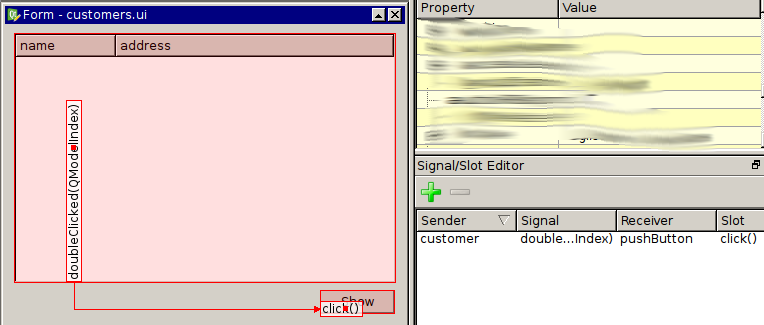
We also add some signals for the double click on the customer list to click the "Show" button:
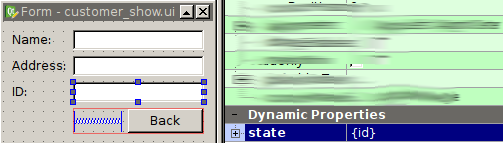
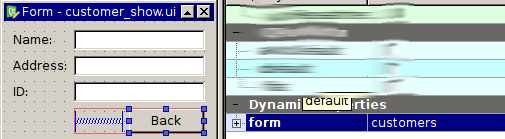
Now of course we have to create a new form called customer_show.ui. We
choose a form layout and add two fields with labels 'Name:' and 'Address:'
and each of them having a QLineEdit widget. The names of the widgets
should be 'name' and 'address' in order to match the future read request
from the server. Temporarily we also add an 'id' field which shows us
the current value of the form parameter 'id' passed by the 'customers':
Finally we also need a button which brings us back to the customer list by simply adding a 'form' action with the value 'customers':
If we start the wolfclient and select a customer and try to press 'Show' we will notice that the button is disabled. This is because the form parameter 'id' cannot be set to the id of the currently selected customer. Widgets in wolfclient have the default behaviour of using the 'id' attribute as an identifier for the whole row. In the previous step we didn't map the 'id' from the XML to the 'id' property of the row. So we change the 'answer' property of the 'customer' widget in the 'customers.ui' form:
CustomerList list {
    customer[] {
        id={row.id};
        name{{row.name}};
        address{{row.address}}
    }}
'id={row.id}' maps the 'id' attribute to the 'id' property of each row.
The 'id' is now an XML attribute and not an element anymore. We also would like to do some validation on the output, so we can rely on each customers to actually have an 'id' attribute.
This is the moment we go back to the server and start with output form validation.
We add a form called 'CustomerList' to the file Customer.sfrm
form which describes the result of the 'CustomerListRequest' more precisely and especially
declares the 'id' as mandatory attribute of the customer. The form 'CustomerList'
contains now the meta data element definition for 'root' ("-root list").
We will not have to define it anymore in any directmap RESULT directive for
'CustomerList':
FORM CustomerList
    -root list
{
    customer []
    {
        id !@string
        name string
        address string
    }
}
We change now the command in tutorial.dmap
again to switch on validation. The SKIP attribute is removed and
the root element does not have to be specified because it is defined now
in the form declaration:
COMMAND CustomerListRequest CALL SelectCustomerList RETURN CustomerList;
Checking with:
netcat -v localhost 7661 < CustomerListRequest.netcat
or:
wolframec -d CustomerListRequest.xml
we get now:
<?xml version="1.0" encoding="UTF-8" standalone="no"?>
<!DOCTYPE list SYSTEM "CustomerList">
<list>
    <customer id="1">
        <name>Dr Who</name>
        <address>Blue Police Box</address>
    </customer>
    <customer id="2">
        <name>John Smith</name>
        <address>The Wheel in Space</address>
    </customer>
</list>
Now the 'Show' button is no longer disabled and when double-clicking an entry in the list of customers the wolfclient shows the id of the customer.
The 'name' and the 'address' fields are still empty though. We could of course use two form parameters 'name' and 'address' to propagate the values between the two forms, but if the form gets more complex, this is not a good idea. It's better to load the data for one customer, selecting the data by the current 'id'.
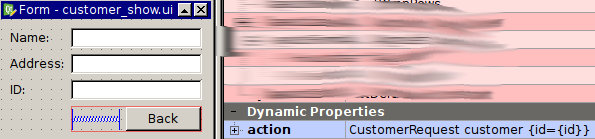
We start by setting the 'action' property on the customer_show.ui form
as follows: we want it to execute a request with document type 'CustomerRequest'
which searches for a single customer by customer id:
The XML sent to the server will look as follows:
<?xml version="1.0" encoding="UTF-8"?>
<!DOCTYPE customer SYSTEM 'CustomerRequest'>
<customer id="2"/>
We also get in the client:
no command handler for 'CustomerRequest'
and in the server:
ERROR: Error calling procedure: no command handler for 'CustomerRequest'
We see, that the request is sent to the server, but we didn't define the necessary things in the server yet. So we add another simple mapping:
COMMAND CustomerRequest CALL SelectCustomer RETURN Customer;
to tutorial.dmap.
We define a new form 'CustomerRequest' in Customer.sfrm which contains the
validation of the customer request. The customer request should have except the root element
'customer' and a mandatory attribute 'id' to search for:
FORM CustomerRequest
    -root customer
{
    id !@string
}
Of course we have to define a transaction function 'SelectCustomer'
in Customer.tdl:
TRANSACTION SelectCustomer
BEGIN
    INTO . DO SELECT * from Customer WHERE id=$(id);
END
The '$(id)' refers to the 'id' we pass down for the customer record to retrieve. We don't have to specify '$(customer/id)' here as the root element is always removed before.
We also have to define how the result should be mapped, so
we add a 'Customer' form to Customer.sfrm:
FORM Customer
    -root customer
{
    id !@string
    name string
    address string
}
We can see in the shell if this new request is working. We define
create a file called CustomerRequest.xml with the
following content:
<?xml version="1.0" encoding="UTF-8"?>
<!DOCTYPE customer SYSTEM 'CustomerRequest'>
<customer id="2"/>
We can then see that our request is working by executing:
wolframec -d CustomerRequest.xml
which returns us:
<?xml version="1.0" encoding="UTF-8" standalone="no"?>
<!DOCTYPE customer SYSTEM "Customer">
<customer id="2">
    <name>John Smith</name>
    <address>The Wheel in Space</address>
</customer>
Now if we restart client and server and we click on the second customer in the list we get:

So we successfully read the data of a customer into a form.
This time we didn't specify an 'answer' attribute in the 'customer_show.ui' form. So how could the data be mapped back into the widget? There is an implicit mapping of elements by name, so the contents of the 'name' XML element are mapped into the widget with name 'name'. This should only be used if the forms are simple, it's better to specify an explicit answer as follows:
Customer customer { id={?}; name{{name}}; address{{address}} }
We change the show customer use case slightly, so that we can also
edit the customer in the customer_show.ui form.
Let's first make a copy of customer_show.ui
and name it customer_edit.ui.
As before we add first a "Edit" button to the
customers.ui with 'forms'
set to:
customer_edit?id={customer.selected}
We change the form customer_edit.ui
and remove the line with 'ID' as we don't need it anymore
and because nobody should be able to edit the id of
a customer and change it! We also add another button and label
it 'Save', for this button we set 'action' to generate a
'CustomerUpdate' request:
CustomerUpdate customer {
    id={main.id};
    name {{main.name}};
    address {{main.address}}
}
We also set 'form' to 'customers', so the user gets taken back to the changed list of customers when saving the current record:

The resulting 'CustomerUpdate' XML request looks as follows:
<?xml version="1.0" encoding="UTF-8"?>
<!DOCTYPE customer SYSTEM 'CustomerUpdate'>
<customer id="2">
    <name>John Smith</name>
    <address>The Wheel in Space</address>
</customer>
Similar to to the "show customer" case we add now a new command mapping
in tutorial.dmap:
COMMAND CustomerUpdate CALL UpdateCustomer;
We also add a simple form 'CustomerUpdate' to Customer.sfrm
which looks very similar to the 'Customer' form:
FORM CustomerUpdate
    -root customer
{
    id !@string
    name string
    address string
}
Finally we write the transaction function 'CustomerUpdate' in
Customer.tdl:
TRANSACTION UpdateCustomer
BEGIN
    DO UPDATE Customer SET name=$(name), address=$(address)
        WHERE id=$(id);
END
Note, that this time the database transaction doesn't return a result.
Restart server and client and start to edit the customers.
In debug mode in wolfclient we can right-click on the "Save" button and we pick the menu item "Debug: Inspect commands". Then we get a dialog box which shows us the status of the widget elements and how the XML request looks like which would be sent down to the server:

We also want to add new customers to the list. The "add customer" case is very similar to the "edit customer" case.
Let's copy the customer_edit.ui to
customer_add.ui. We remove the
'action' and 'answer' on from the form itself as
we don't want to read anything when we create a new customer.
But of course we could execute here a "Get new customer initial data"
request which initializes certain values in the form.
We change the "Save" button and rename it to "Add". We also change 'CustomerUpdate' to 'CustomerCreate' in the 'action' attribute and we remove the id property as this one is automatically choosen by the sequence in the database:
CustomerCreate customer {
    name {{main.name}};
    address {{main.address}}
}

We also introduce a new element here, the 'initalFocus' property. We
set it on the 'name' QLineWidget, so that it
gets the initial keyboard focus when the form is loaded:

In the customers.ui form we have to add a 'Add' button which has one
property 'form' with value 'customer_add':

Now for the server side. We add a new mapping for customer creation
in tutorial.dmap:
COMMAND CustomerCreate CALL CreateCustomer;
We also have to add the form 'CustomerCreate' to Customer.sfrm:
FORM CustomerCreate
    -root customer
{
    name string
    address string
}
This is the same as the 'CustomerUpdate' form with the exception that we don't accept an 'id' attribute to be passed to the server.
Last we add a 'CreateCustomer' transaction function:
TRANSACTION CreateCustomer
BEGIN
    DO INSERT INTO Customer( name, address )
        VALUES( $(name), $(address) );
END
When we restart the server and client we see the following request being passed to the wolframe server:
<?xml version="1.0" encoding="UTF-8"?>
<!DOCTYPE customer SYSTEM 'CustomerCreate'>
<customer>
    <name>New Customer</name>
    <address>New Location</address>
</customer>
We want to get rid of customers. For this we have to change little
in the custorms.ui form: a button "Delete" with
the following 'action' property:
CustomerDelete customer {id={customer.selected}}
We also want to reload the customer list after deletion. For now we just set add a 'form' property with the value of 'customer', this is the simplest way to reload the list of customers after the deletion:

We add another map for the 'CustomerDelete' request in tutorial.dmap:
COMMAND CustomerDelete CALL DeleteCustomer;
We also add a new form 'CustomerDelete' to the simpleform file Customer.sfrm
which allows us only the specify an 'id' attribute of the customer to delete:
FORM CustomerDelete
    -root customer
{
    id !@string
}
Finally we add the implementation of the delete transaction
in Customer.tdl:
TRANSACTION DeleteCustomer
BEGIN
    DO DELETE FROM Customer WHERE id=$(id);
END
Executing the request we see in the wolfclient debug output:
<?xml version="1.0" encoding="UTF-8"?>
<!DOCTYPE customer SYSTEM 'CustomerDelete'>
<customer id="3"/>
Seems ok, customer gone. :-)